More than nine years ago, I created a remote garage door opener that connected to my HomeKit setup. This has proven to be a budget-friendly and super handy device, as I am able to control my garage door from anywhere in the world. I came up with this solution before WiFi-based remote garage door openers were commercialized.
However, recently the Raspberry Pi Zero W started to randomly lose WiFi network connection, and I have to reboot it all the time. Of course, this is very frustrating. Since the device is plugged into a ceiling plug, the same socket that is used for the actual garage door opener, it is quite inconvenient to cycle the device. I typically had to restart the whole garage by resetting the breaker on the main electrical panel.
I have some extra ESP32-S3 SuperMini boards on the side that I was going to replace the PiZero W with. I bought these from Pinduoduo (拼多多) when I was in China last year. Due to my laziness, I did not get around to it. Something else happened that allowed me to find another workaround.
About three and a half years ago, I purchased the VOCOlinc HomeKit Smart Plugs from Amazon. I used these to remotely control some fans in the house. One of these was recently freed up. I can then plug the adapter used to power the Pi Zero into the Smart Plug. Now I have a remote way to remotely power cycle the Pi Zero. A remote device to control the power of another remote device! Not only can I cycle the Pi Zero remotely, I can also programmatically determine when to cycle the device.
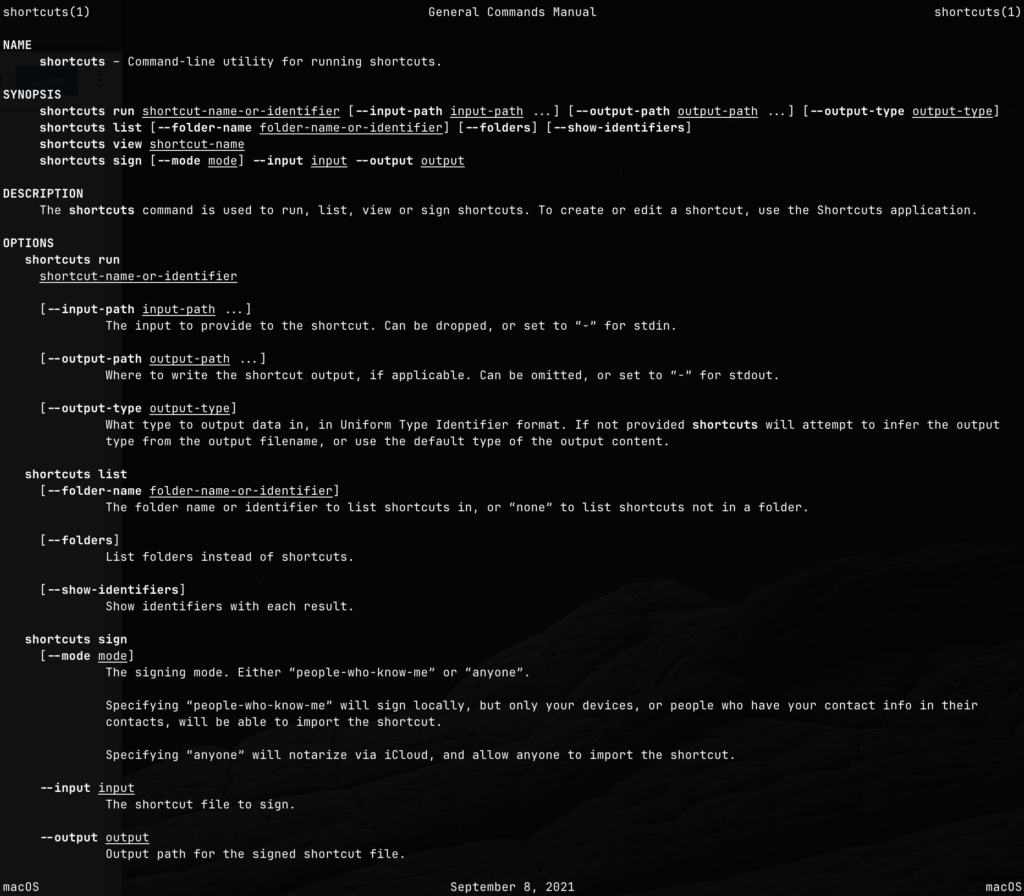
The Smart Plug is setup with my HomeKit environment and I recently learned that on a Mac, you can use the Shortcut App to toggle an accessory or scene with HomeKit.
I also found out that once I have a Shortcut, I can invoke it using the shortcuts command line command.
Using this shortcut concept, I can create a periodic cron job that effectively check the connectivity of the Pi Zero every 15 minutes. If I am unable to connect, I can effectively remote restart the Pi Zero. The script is listed below:
#!/usr/bin/env zsh
#
# This script is meant to be run as root

logger "cyclePizero.sh: INFO test connectivity to pizero.localdomain"
if ! ping -q -c 1 pizero.localdomain >/dev/null; then
        logger "cyclePizero.sh: ERROR unable to ping pizero.localdomain"
        logger "cyclePizero.sh: INFO restarting the resolved daemon"
        systemctl restart systemd-resolved.service
        logger "cyclePizero.sh: INFO cycling pizero.localdomain"
        ssh bigbird -n 'shortcuts run "Toggle Garage Opener"'
        sleep 3
        ssh bigbird -n 'shortcuts run "Toggle Garage Opener"'
        logger "cyclePizero.sh: INFO cycling completed"
else
        logger "cyclePizero.sh: INFO pizero.localdomain ping successfully"
fi
Note that I also sometimes have to restart the name resolution service, system-resolved. This is another reason sometimes HomeKit fails to communicate with the Pi Zero.
Hopefully this patch will work until I finally have time to replace it with the ESP32.
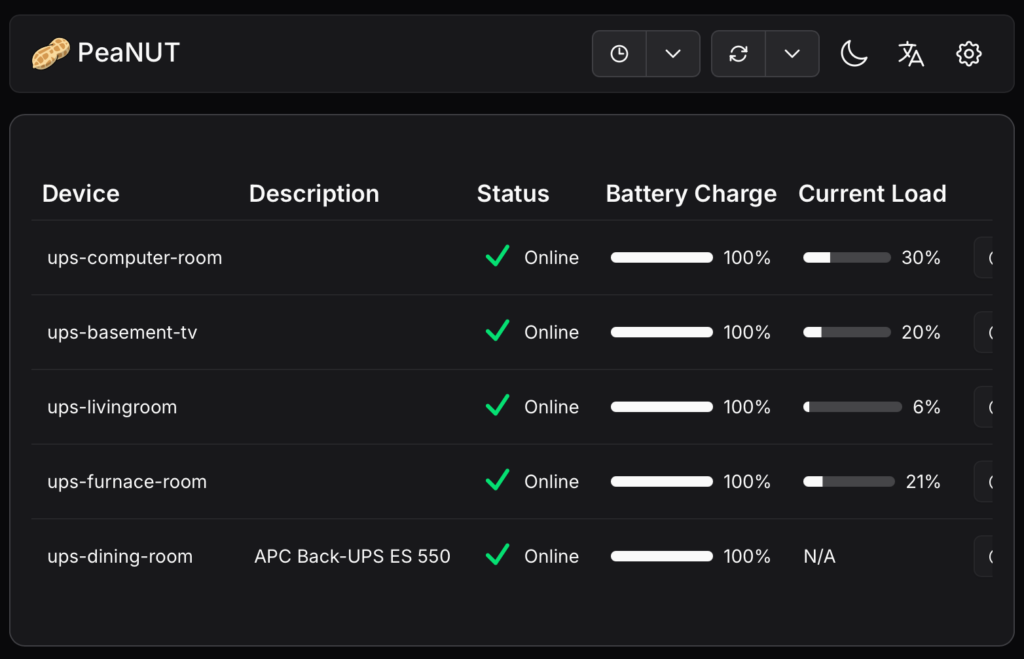
We have several UPS (Uninterruptible Power Supply) units around the house. They are there to prevent power interruptions to networking equipment and computer servers. When you are into home automation, keeping these services up and running is almost essential.
Previously this year, I noticed one of the UPS unit keeps on chirping and the body of the UPS unit was warm to the touch. I noticed on the LED display, that its battery is due to be replaced. This was not an issue. However I treated this as a cautionary tale because some of my UPS units were situated within the house that I rarely visit, so I may not hear the beeping alerts and may end up being a potential fire hazard should the battery misbehave. I decided that I needed to monitor my UPS units more frequently.
I started to learn about NUT (Network UPS Tools), and went on a mission to deploy this solution so that I can centrally monitored all of my UPS on a single web site. The first step is to ensure that all of my UPS can physically communicate its status to a computer host. This means they all have to be connected with a USB port.
Once communication is established, I then had to install NUT software on each of the computer hosts. My UPS units were installed on different hosts consisting of Raspberry PI, Ubuntu Linux, and Mac, so I had to configure each properly. Below is a summary of the configuration steps.
# lsusb
Bus 001 Device 001: ID 1d6b:0002 Linux Foundation 2.0 root hub
Bus 001 Device 002: ID 0764:0601 Cyber Power System, Inc. PR1500LCDRT2U UPS
Bus 002 Device 001: ID 1d6b:0003 Linux Foundation 3.0 root hub
Inside ups.conf: Copy the above output from nut-scanner into end of the file and be sure to change the ups-nameinto something that is unique.
Inside upsmon.conf: Remember to replace ups-name.
MONITOR ups-name 1 upsmon secret primary
Inside upsd.conf:
LISTEN 0.0.0.0 3493
LISTEN ::1 3493
Inside upsd.users:
[upsmon]
        password = secret
        actions = SET
        instcmds = ALL
        upsmon primary
Finally we need add a file in /etc/udev/rules.d which governs whether we can send commands to the UPS. We need to create a file called 99-nut-ups.rules and that file should contain the following content:
You can also perform actions on the UPS unit. First we can query a list of commands that we can execute on the UPS. Note that with this example the UPS is being queried by a remote host hence the usage of avs.localdomain instead of localhost.
# upscmd -l ups-computer-room@avs.localdomain
Instant commands supported on UPS [ups-computer-room]:

beeper.disable - Disable the UPS beeper
beeper.enable - Enable the UPS beeper
beeper.mute - Temporarily mute the UPS beeper
beeper.off - Obsolete (use beeper.disable or beeper.mute)
beeper.on - Obsolete (use beeper.enable)
load.off - Turn off the load immediately
load.off.delay - Turn off the load with a delay (seconds)
shutdown.reboot - Shut down the load briefly while rebooting the UPS
shutdown.stop - Stop a shutdown in progress
test.battery.start.deep - Start a deep battery test
test.battery.start.quick - Start a quick battery test
test.battery.stop - Stop the battery test
test.panel.start - Start testing the UPS panel
test.panel.stop - Stop a UPS panel test
Reading the above, we see that we can perform a quick battery test by sending the command test.battery.start.quick. We do this with:
The configuration files are stored in /usr/local/etc/nut.
Since there is no lsusb or nut-scanner on the Mac, you can use the following command to see if the UPS is connected with USB or not.
system_profiler SPUSBHostDataType
You can also use:
pmset -g ps
The ups.conf file is more simple, because you don’t need the other details:
[ups-dining-room]
  driver = macosx-ups
  port = auto
  desc = "APC Back-UPS ES 550"
All other configuration files is the same and there is no need to create the /etc/udev/rules.d file.
I need to start nut when the Mac reboots, so I need to configure launchd for this. First I created two scripts, start.sh and stop.sh in the ~/Applications/nut. Below are their respective contents:
sudo launchctl bootstrap system /Library/LaunchDaemons/home.nut.custom.plist
Now the NUT daemon will be running when we reboot the Mac.
PEANUT Installation
Once this is all done, I am then able to retrieve all of my UPS units’ status from anywhere on my network as long as I have the nut-client package installed and have access to the upsc command. We are now ready to install the PEANUT web interface using podman.
On a computer host that is running other centralized services within my house, We performed the following steps.
We created the following systemd unit file called: /etc/systemd/system/peanut.service, which contains the following:
The above file was generated with the podman utility itself using:
podman generate systemd --new --files peanut
For the above to work, there must be a container peanut running first, which we did with the following command just to temporary create the file. This also assumes a local config directory is created for the volume mapping.
I have an old Raspberry Pi running Volumio to stream my music library to my living room home theatre. This morning, I needed to perform an update from Volumio 3 to Volumio 4. After I did the upgrade, the Raspberry Pi acquired a new IP address, which I need to discover through my Unifi Dream Machine Pro (UDMPro) Max web based user interface. It is then that I noticed that all the virtual machines hosted using Proxmox running on our AI Server have dropped off from my network. This is the AI Server that I built back in August of 2023, and discussed in this post.
I thought all I needed to do was a reboot, still no network connection. The networking interface seems to be off. I plug in a keyboard into the server, and added a monitor. No video signal, and the keyboard did not respond, not even the NUMLOCK LED worked. This is not good. All signs point to a hardware failure.
I pulled out PCIe cards one by one and try to resuscitate the server. No good. With a bare-bones motherboard, memory, and CPU, it still did not respond. I couldn’t even get into the BIOS. The fans were spinning, and the motherboard diagnostic LED’s point to some error when it is trying to initiate video / VGA.
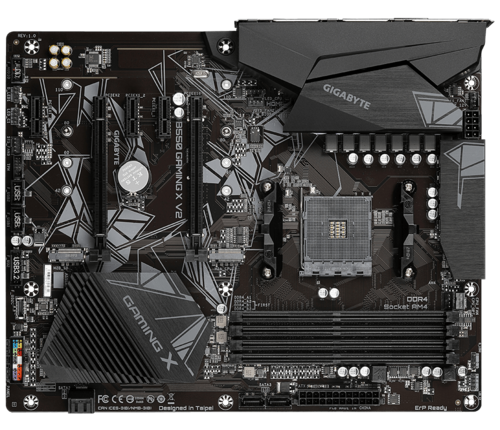
I ended up finding a possible replacement motherboard, Gigabyte B550 Gaming X V2, at a local Canada Computers for $129 (before tax), and some thermal paste for $9.99 (before tax) to reseat the CPU and the cooler.
Replacement Board
The good news is that after replacing the motherboard, I was able to get into the BIOS. However when I try to boot the machine with the used Nvidia P40 card, it failed to boot again. I had to forego this card. The GPU could have been damaged by the old mainboard, or the GPU could have been damaged first and caused the mainboard to fail. At this point I am too tired to play the chicken or the egg game. I simply left the card out, and restore Proxmox on the server. It will no longer be an AI server, but at least the virtual machines on the server can be recovered.
Proxmox boots but will not shutdown. I had to undo the PCIe passthrough configurations that I did when I build the AI Server. This involved editing the GRUB configuration so that all the special options are removed in /etc/default/grub:
GRUB_CMDLINE_LINUX_DEFAULT=""
Before it had configurations containing options to make use of IOMMU and the vfio modules. After this update, I had to perform the following commands:
update-grub
update-initramfs -u -k all
I then proceed to reboot the system, and the system behaved normally. During this process I also found out that Proxmox will not start normally if any of the mounts configured in /etc/fstab are not available. This threw me for a loop because the regular USB backup drive was disconnected when I was trying to resolve this issue.
Since the PCIe bus has different peripherals, I knew from my past experience which I detailed here, I have to edit the /etc/network/interfaces file with the new interface name. The following command really helped me identify the new name and which NIC I should pick, because there were multiple interfaces, and I wanted to pick the 2.Gbps one.
lshw -class network
In the end, all of the virtual hosts are now up and running. I hope this new motherboard proves to be more stable without the used P40 GPU. Fingers crossed!
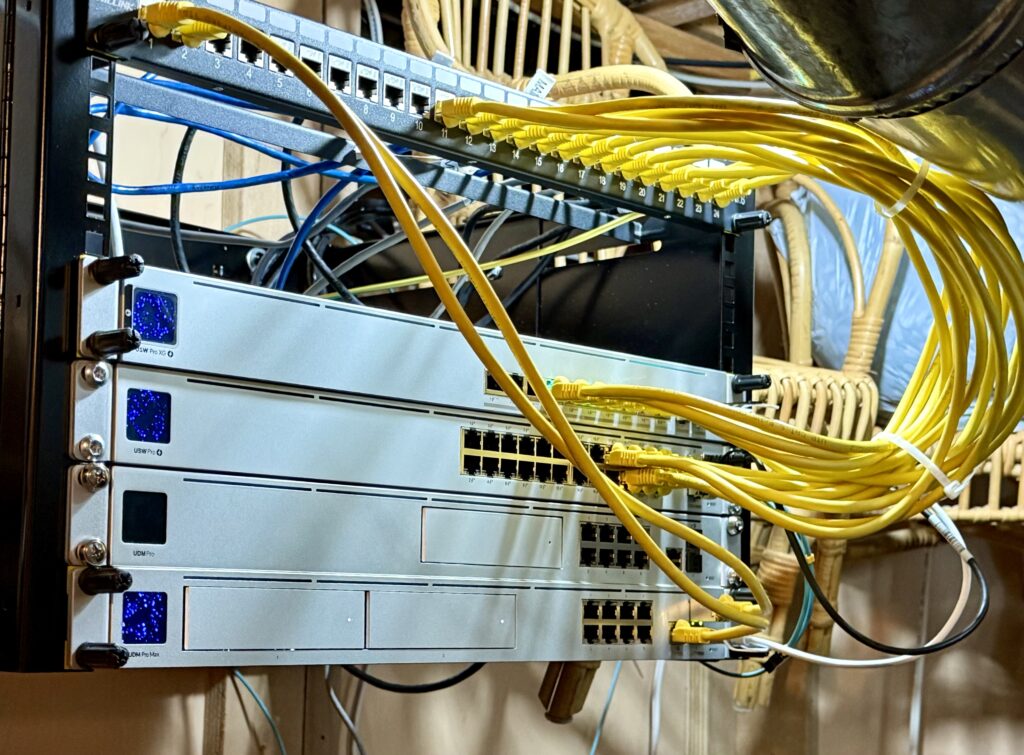
I purchased the patch panel from Amazon back in June of this year. Today I finally got around to installing it. One of the main reasons for the delay was that I had to properly ground the patch panel to an electrical outlet. I did this with an old PC power cable and solder the ground wire only to the metal frame of the patch panel.
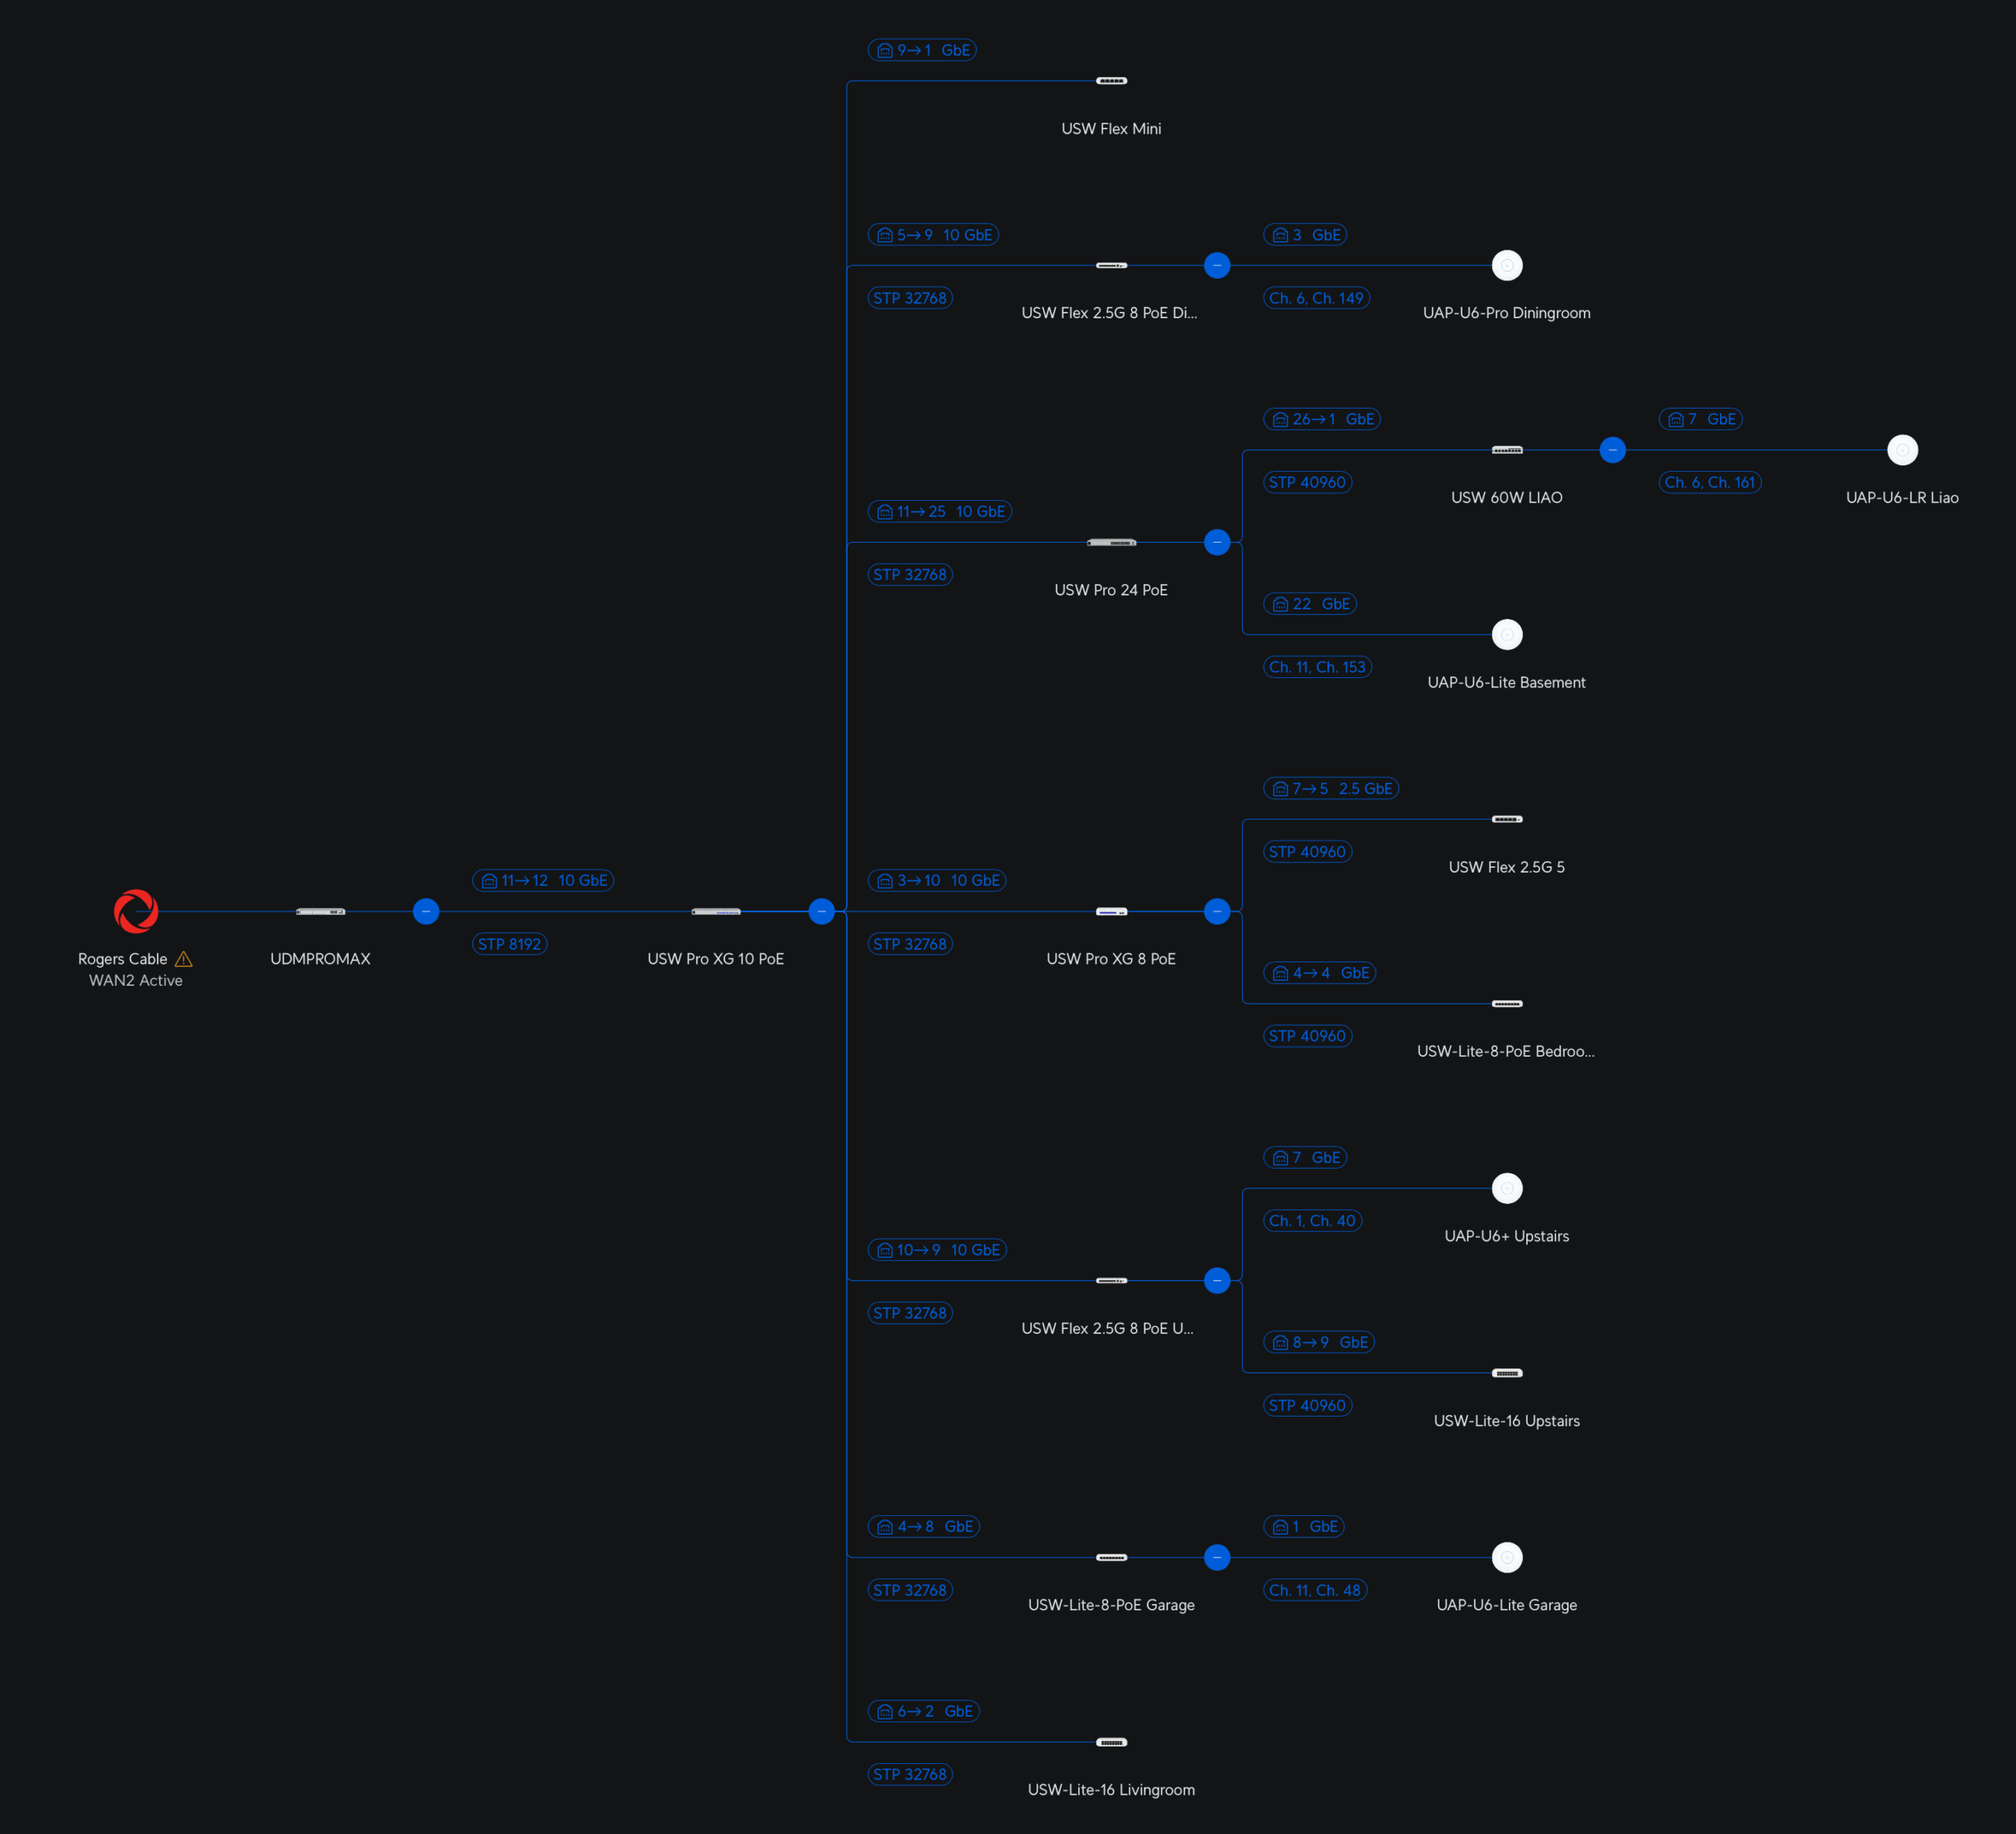
In addition to the patch panel, I also purchased this wall mountable network rack. This 7U rack has enough room for our new 10Gbps networking equipment that I talked about in this post. These included the UDM Pro Max router / firewall, and our 10Gbps networking upgrade with our new USW Pro XG 10 PoE switch.
We also upgrade some of the satellite switches in the house with:
Using the UDM Pro Max, we can have dual Internet Service Providers (ISP). We are currently using TelMax and Rogers with a 75% and 25% traffic split, respectively. If one goes down, the other automatically pickup all the traffic, so we have Internet redundancy.
The UDM Pro Max allows us to have our old UDM Pro to be a cold stand-by in case the unit fails.
I think we can all agree that the latter 10Gbps system is much neater. I’m quite happy with the reorganization and the upgrade.
After all of this, we now have the most current speed tests:
The above shows the TelMax speed test.The above shows the Rogers speed test.
Today is the first time that I register advertised speed with my TelMax subscription.
Now our household wired networking infrastructure is ready for WiFi 7 upgrade. That is a project for next year.
Recently, I added TelMax as our Internet Service Provider. One of the requirements for their service is an externally accessible IP address. When the service was provisioned this past September, this requirement was satisfied. However, in the middle of this month (November), the service was switched to CGNAT. You can click on the link to learn more about CGNAT, but effectively, after their CGNAT rollout, I no longer have an externally accessible IP. This was frustrating, especially when I was in China working remotely and depended on this external IP. I understand that TelMax wants to tier their services so that a dedicated IP address is in a higher tier service. However, to make this change unannounced and unscheduled is really not professional. Their sales staff at the time also promised that an external IP will be available as part of the residential offering; clearly, it was not, so buyers beware.
Long story short, this past Friday, I called into their customer service and had my service upgraded to a business service where a dedicated IP is part of the offering. Kudos to the customer service rep who handled the migration and provisioning. This new service also gave me 4Gbps symmetrical throughput, so that is a nice to have.
Unfortunately, the service did not last, and in about four hours, the service went down. Since this happened off business hours, I called back on Saturday morning. TelMax first line support during non-business hours is effectively useless. The result of the Saturday call was, “Thank you for the information; sorry about your situation; and someone will get back to you.” Very open-ended without a commitment for a time range of resolution. You are effectively left hanging. Apparently, today I learned that it can be up to 72 hours for someone to get back to you. This is clearly not acceptable for a business account, in my opinion.
On Sunday, feeling frustrated and unloved by TelMax, I went to their online portal and wrote a lengthy support email describing my situation. Crickets, not even an auto reply email. I called them on Monday and got hold of their tier 2 support and tried to get the service back up and running. Full disclosure here. At this point, we all thought the issue was at TelMax and not with me. My firewall was working fine because the rest of my network is humming along. We even switched out the cable thinking the cable may be defective. I asked whether there is any way to verify that ethernet port labeled 10GE on the fibre modem is working or not. He told me it is working. I found it strange why there is no physical link indicator then? He decided to escalate the issue, and the call ended.
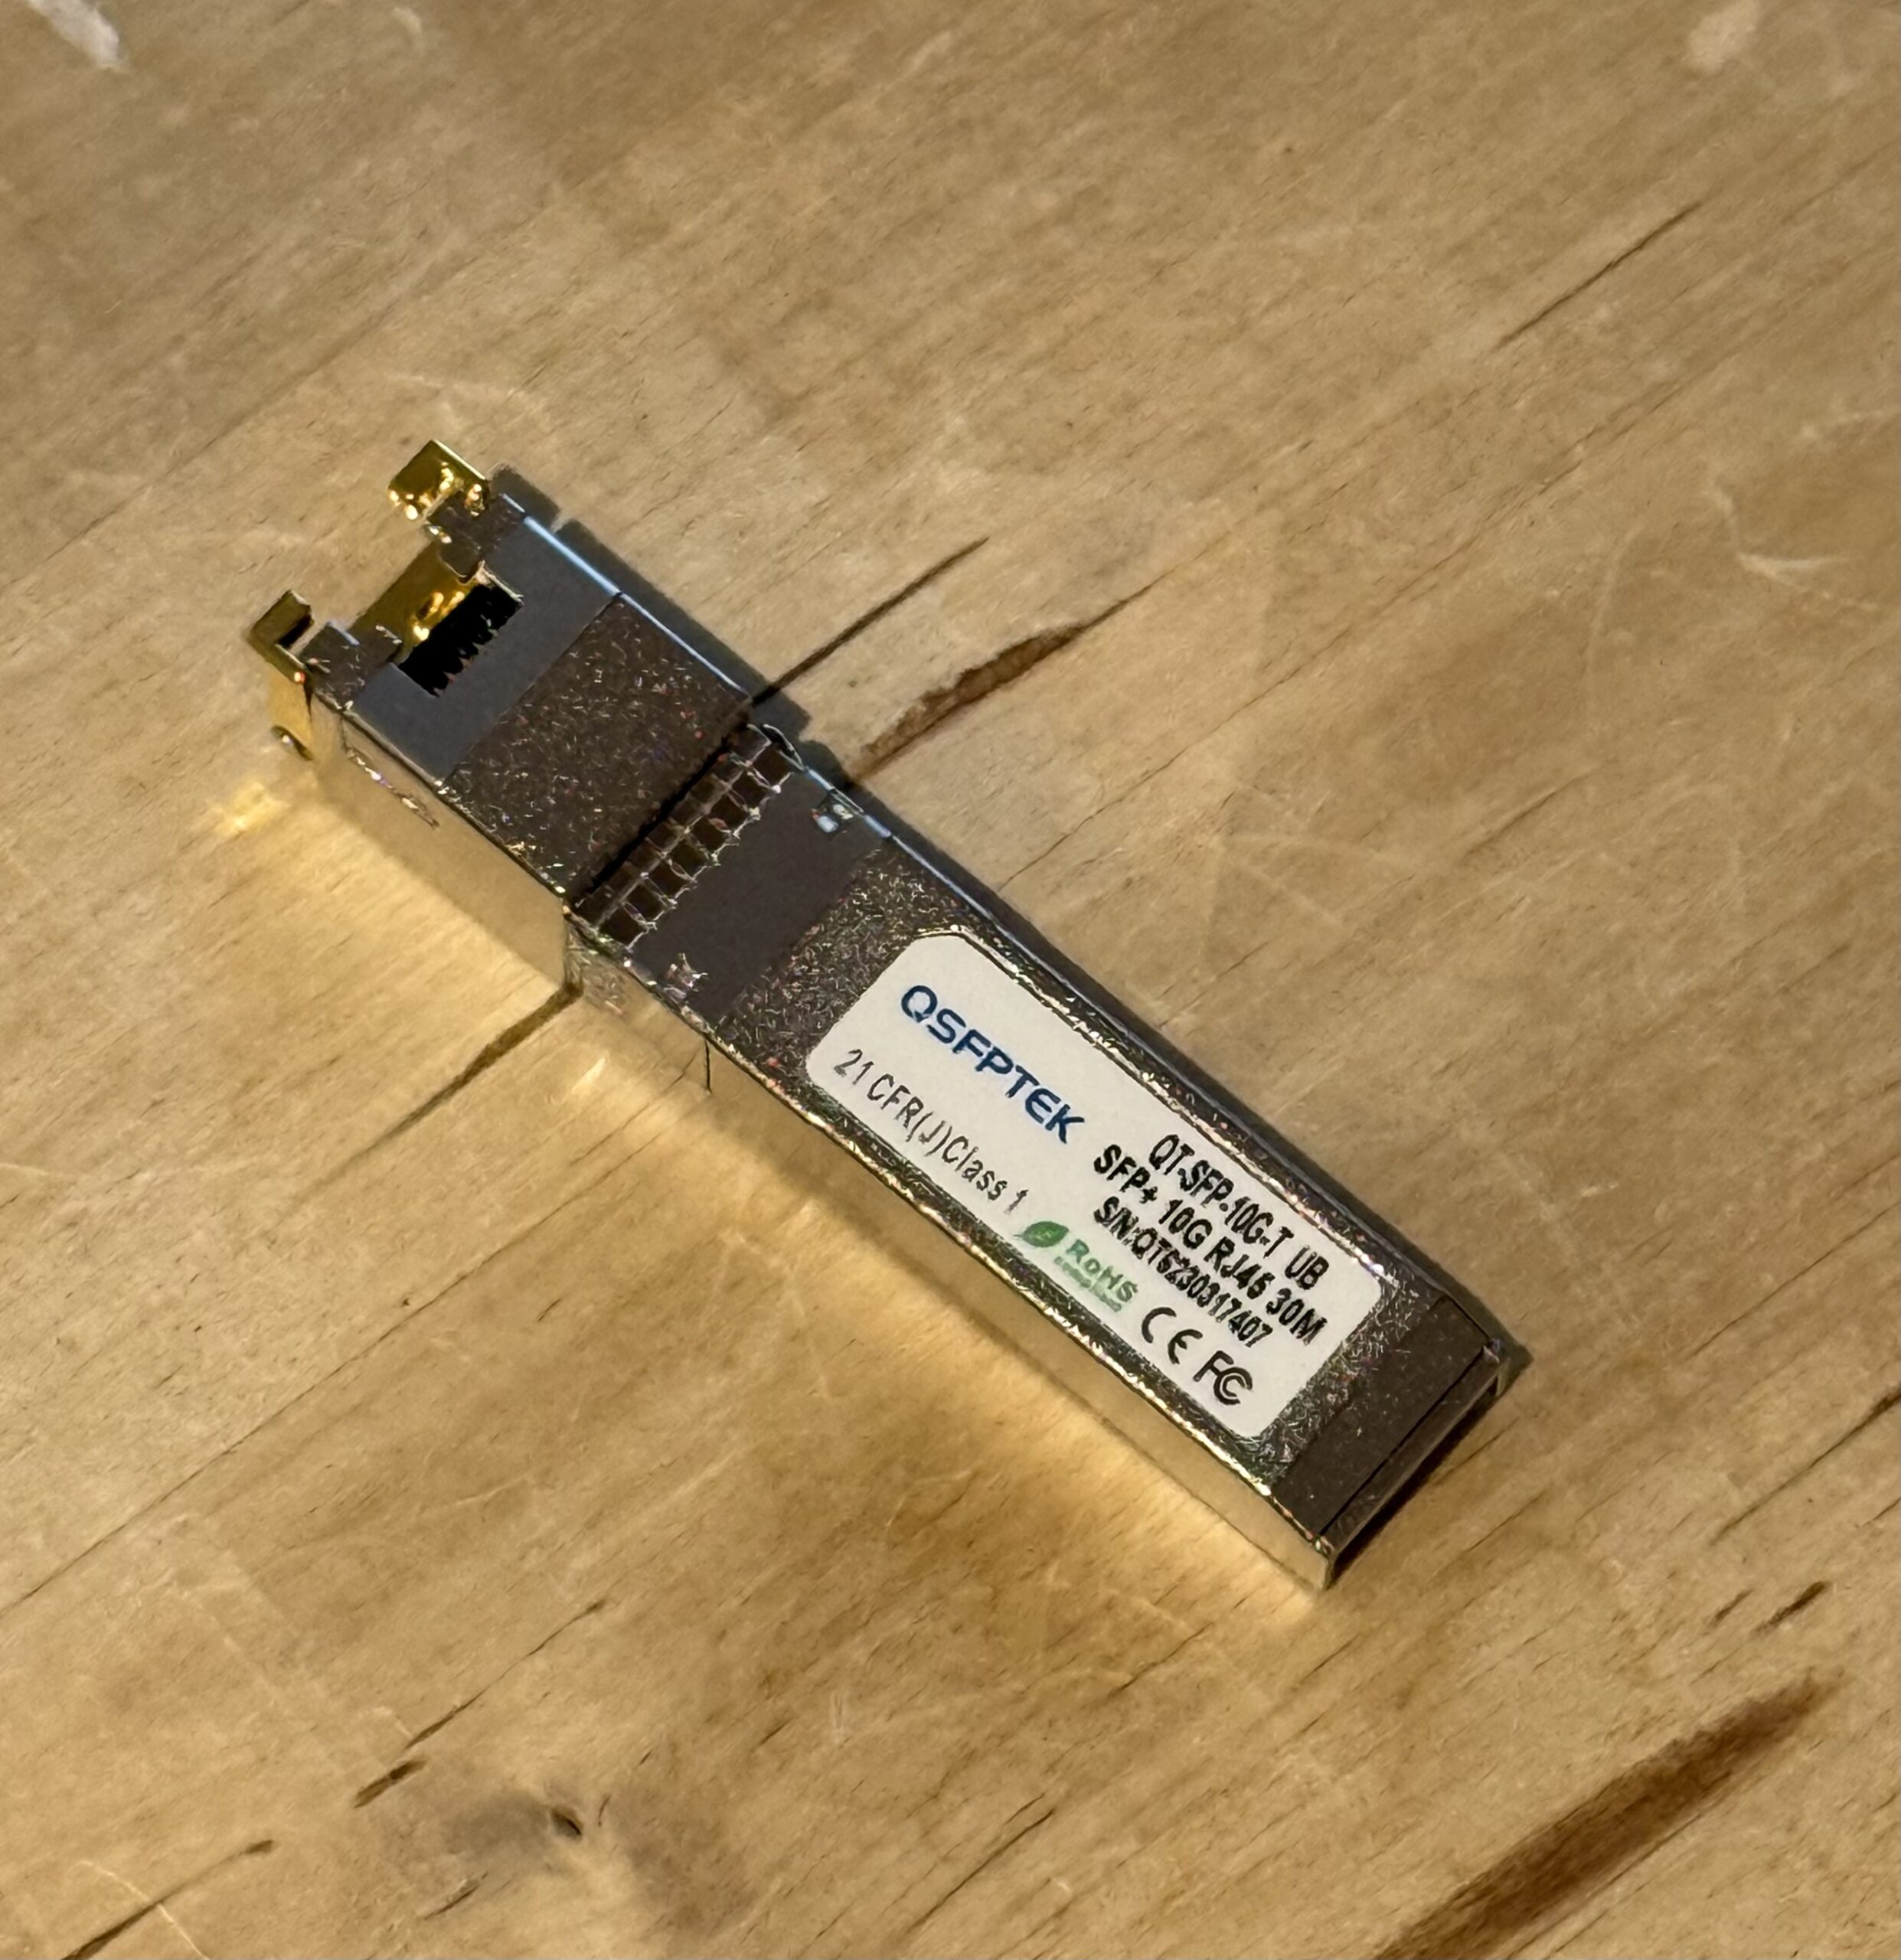
2+ years old SFP+ module failed
No one got back to me for the entire Monday. Today I woke up and decided to use my spare laptop to directly test the 10GE port on the fibre modem, and behold there was activity! This confirmed that TelMax equipment was fine at least electrically. The problem must reside with my equipment. I swapped out the SFP+ module with a new one and the physical connection was resolved. Whew!
Since TelMax connections are bound to the physical network interface ID (MAC address), I still had to call into customer support this morning and talked to another tier 2 support rep named Sue. She was wonderful and much more knowledgeable. A few minutes later she had it resolved by rebinding the service to the new SFP+ module’s MAC.
Take aways from these collective events:
TelMax should not switch their networking architecture unannounced and unscheduled when it impacts existing customer experiences. I spent literally hours in China trying to resurrect services with CGNAT. Ultimately, I had to switch back to a backup Rogers connection.
When your ISP is down, don’t assume it is just their fault even though 99% it is. 😁
TelMax support staff’s technical knowledge can range from nothing to super helpful. On the Monday call, the staff should have advised me to use a spare laptop so that we can eliminate my networking equipment as the issue. In fairness, I should have caught this as well, but I’m a bit rusty and I am the stupid customer here.
The TelMax support experience is too open-ended. There is no ticket, no status check, nothing.
In the end, I was in the driving seat to resolve this issue, and it was not TelMax. This is not a good customer experience. I wish TelMax would improve their support capabilities and perceptions as fast as possible. I wish them luck.
I recently was in a situation where I am remote and all of my standard VPN clients stopped working. All I had was a private opened ssh port to my remote server. Luckily I had the foresight to setup this private port before I left home!
I was able to get certain SOCKS to work using the ssh -D option, like:
With this I was able to browse the basics after making the required SOCKS configuration with my WiFi network settings. However, accessing hosts on my private network is still an issue. I can also get macOS Screen Sharing to a specific remote host (e.g. HOST2) to work by establishing a port tunnel using:
I then proceeded to create a Screen Sharing session using port 5901 instead of the default 5900 on my localhost.
With the help of chat.deepseek.com, I was able to discover a nice tool called sshuttle. This seems like the perfect solution for me. Unfortunately I was not able to install sshuttle because GitHub was blocked where I am. I had to install the utility manually. First, I had to configure my local git environment to use the SOCKS server that I created earlier.
Now that everything is working. I then install sshuttle properly with brew.
HOMEBREW_NO_AUTO_UPDATE=1 brew install sshuttle
Once this is done, I removed the temporary install at ~/Applications/sshuttle and rerun the sshuttle using the brew version.
Everything is now working the way that I want. Effectively, it is as good as a VPN with all traffic being routed through my private ssh connection. Thanks to modern AI tools like DeepSeek I was able to figure this out.
In a previous post, I talked about upgrading to the UDMPro Max. This was in preparation for upgrading a series of new switches in the house. Effectively bringing our networking speed from 1Gbps to 10Gbps or 2.5Gbps for most of the house devices. Some home automation devices, TV’s, and other media devices will remain at 1Gbps, since this is plenty for what they need.
Another major reason for upgrading the switching speeds is to prepare for WiFi 7 upgrade. Most of the access points supporting WiFi 7 now require at least a 2.5Gbps wired connection in order to take advantage of the full WiFi speed improvements.
Below is my updated networking landscape for now.
Current networking landscape after several switch upgrades.
New hardware:
1 x UDMPro Max
1 x USW Pro XG 10 PoE
1 x USW Pro XG 8 PoE
2 x USW Flex 2.5G 8 PoE
Old hardware (kept as cold standby):
1 x UDMPro
1 x US 24 250W
1 x USW 60W
The last major upgrade was performed about 4 years ago, as outlined by this post. We also installed fibre about 5 years ago and we talked about it on this post, when we added the USW Pro 24 PoE switch with SFP slots.
I won’t get into the specifications, other than to say the Max offers more speeds and feeds.
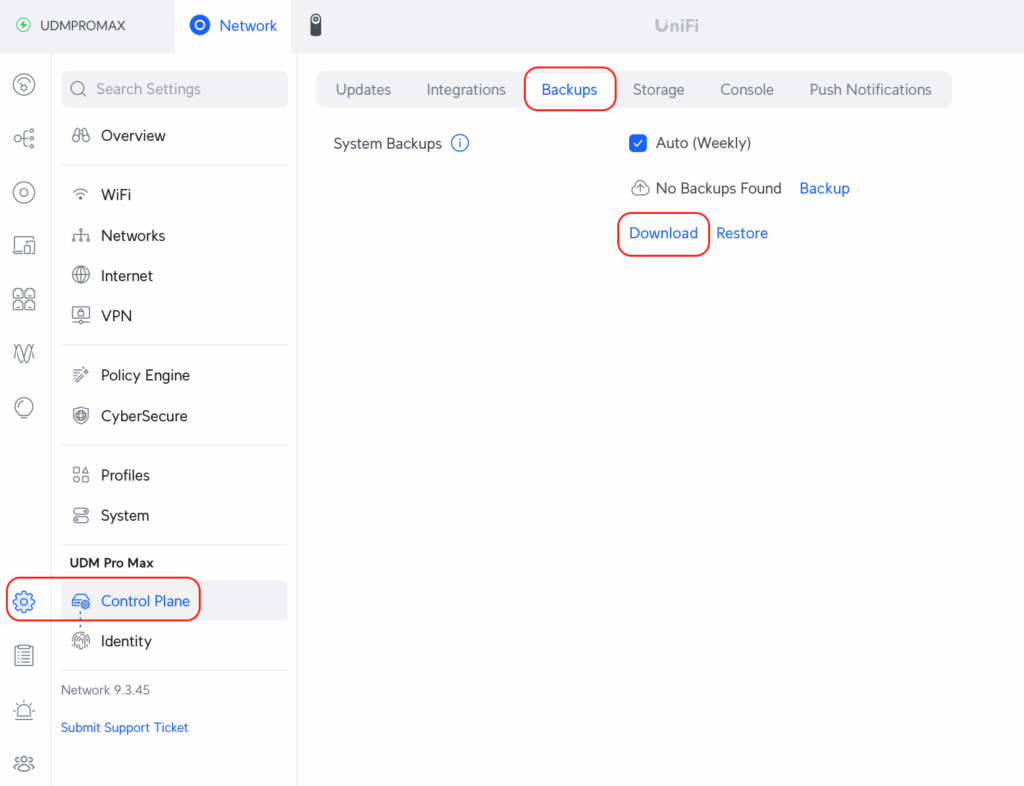
I wanted to document the migration process, because for me it was not trivial. The Max came with outdated firmware. The backup and restore options were not visible with a user that had “Super Admin” role. They are only available with the “Owner” role. This took me sometime to figure out.
Step 1: Login into the old UDM Pro with the Unifi owner account. This is usually the account that contains the Two Factor Authentication;
Step 2: Perform a download of all the applications and their respective settings. This should result in unified_os_backup_*.unifi file;
Perform a backup on the old UDM PRO
Step 3: If you are using Protect (Unifi Security Application), and want to reuse the old hard drive, the migration process will not migrate the videos, so be prepare to backup the contents on a separate machine and reformat the hard drive, or just buy new hard drives;
Step 4: I powered down the old UDM Pro, because I need the WAN connection to be connected to the new UDM Pro Max. At this point, you will lose Internet connectivity for most of your household devices;
Step 5: I physically installed the UDM Pro Max, and connected the WAN, and connected my laptop with the unifi backup file that we got in Step 2. Note that I did not connect the rest of my network at this point. Also the entire restoration process requires Internet connectivity so don’t try to restore it without Internet. I learned this the hard way, resulting in several resets;
Step 6: I had to upgrade the UDM Pro Max because it came with old firmware and it will not restore with the old firmware. This was super frustrating because it elongated the down time for your household;
Step 7: Before I perform the restore, I powered down the Max and installed my old hard drive from the old Pro. After restarting the Max, I then reformat the hard drive with the Protect App;
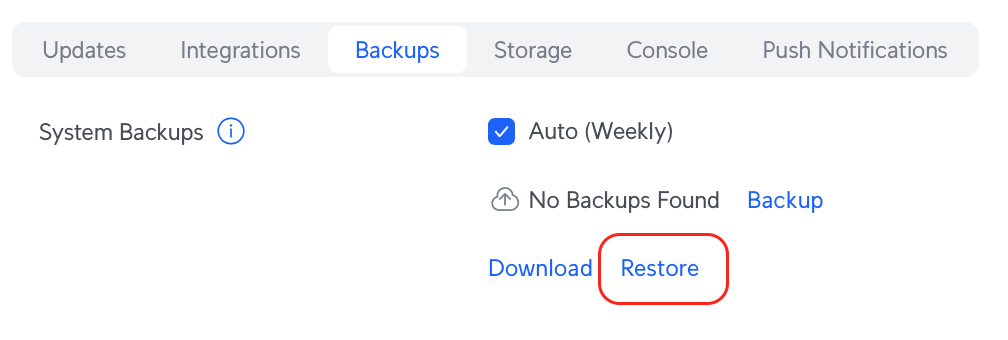
Upload the previously downloaded backup file and do a restore
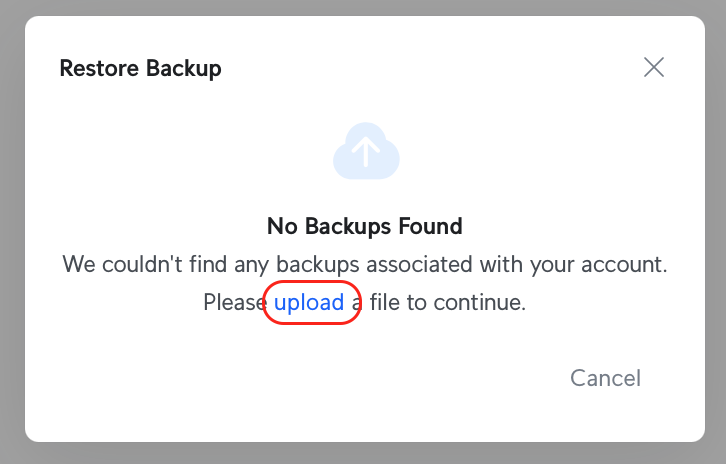
Step 8: I then proceed to restore from the backup file that I previously copied on to my laptop. This took about 10 to 15 minutes;
The dialog is pretty cryptic, so be sure to click on the upload link and ignore the No Backups Found message.
Step 9: Once the system is up, I attached all the networking devices to the new Max and waited to ensure that all the Unifi devices are recognized by the new Max;
Step 10: I did one final reboot just to be sure that everything is okay;
So far so good. We did find a couple of issues. Rogers, my ISP provisioned a new WAN IP so I had to update my DNS entries. The VPN server configurations had to be updated with the new WAN IP.
I am going to let the Max run for a few days, and then perform a factory reset with the old Pro. We will then use the Pro as a Shadow (Hot Standby) Gateway for potential fail-over.
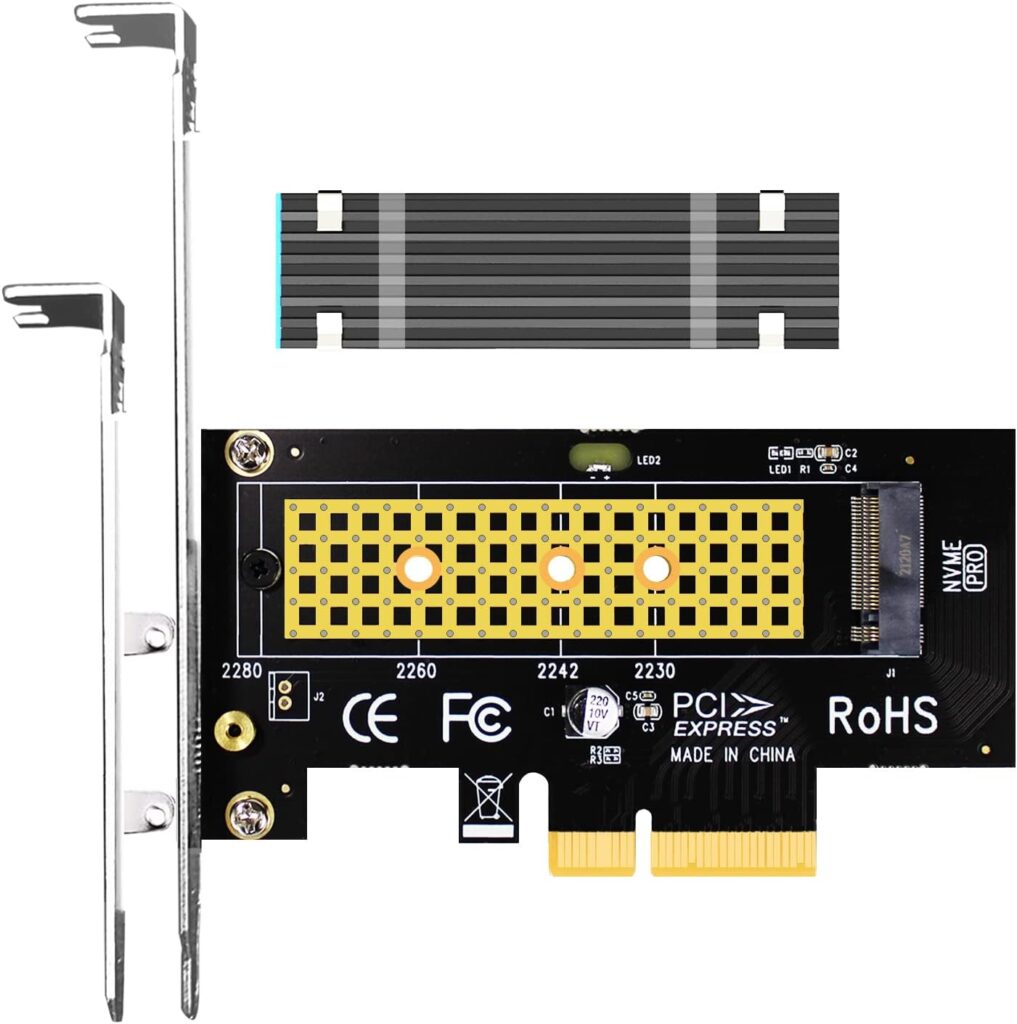
I recently wanted to install an M.2 NVMe to PCIe 4.0 X4 Adapter on an existing server. The idea was to install a new NVMe SSD drive, and the motherboard had no more M.2 sockets available.
The server is running Proxmox with Linux Kernel 6.8.12. I thought this should be a 15-minute exercise. How wrong I was. After installing all the hardware, the system booted up but there was no networking access. This was especially painful because I could no longer remote into the server. I had to go pull out an old monitor and keyboard and perform diagnostics.
I used the journalctl command to diagnose the issue, and found the following entry:
Feb 01 13:36:21 pvproxmox networking[1338]: error: vmbr0: bridge port enp6s0 does not exist
Feb 01 13:36:21 pvproxmox networking[1338]: warning: vmbr0: apply bridge ports settings: bridge configuration failed (missing ports)
Feb 01 13:36:21 pvproxmox /usr/sbin/ifup[1338]: error: vmbr0: bridge port enp6s0 does not exist
Feb 01 13:36:21 pvproxmox /usr/sbin/ifup[1338]: warning: vmbr0: apply bridge ports settings: bridge configuration failed (missing ports)
The above error message indicates that enp6s0 no longer exists. When I looked at earlier messages, I noticed this one:
Feb 01 13:36:15 pvproxmox kernel: r8169 0000:07:00.0 enp7s0: renamed from eth0
It looks like the interface name has been changed from enp6s0 to enp7s0. Therefore the correct remedy is to edit the /etc/network/interfaces to reflect the name change. Below is the new content of the file.
# cat /etc/network/interfaces
auto lo
iface lo inet loopback

iface enp7s0 inet manual

auto vmbr0
iface vmbr0 inet static
        address 192.168.188.2/24
        gateway 192.168.188.1
        bridge-ports enp7s0
        bridge-stp off
        bridge-fd 0

iface wlp5s0 inet manual
This would be very annoying if the old interface name was used in many other configuration files. There is one other reference that I found on the Internet (https://www.baeldung.com/linux/rename-network-interface) detailing a way to change the network interface name using the udev rules. I did not try this, but something to keep in mind in the future.
In a previous post and on another home server, I did fix the name using netplan, but Proxmox is not using it.
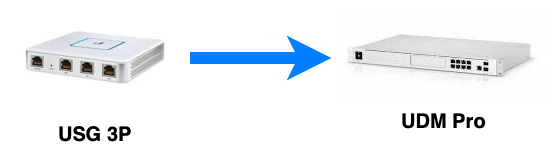
As I indicated in a previous post, I wanted to upgrade my old USG firewall to the new UDM Pro. In that post, I have outlined my reasons, so I will not repeat them here.
I wanted to perform the upgrade with a minimum amount of downtime. With several household members who are online constantly for both school work as well as for entertainment, any perceived downtime will result in a typical earful, which I would rather avoid.
In preparation for the upgrade, I performed the required backups for both the Unifi Video and the Unifi Network Controller applications that are both previously running on my NAS server. I copy the backups to an old MacBook Air that I will use as my console to setup the UDM Pro. I wanted to make sure that I stop both the unifi and unifi-video services on my Ubuntu NAS. We do not want to risk some sort of conflicts when we plug in the UDM Pro.
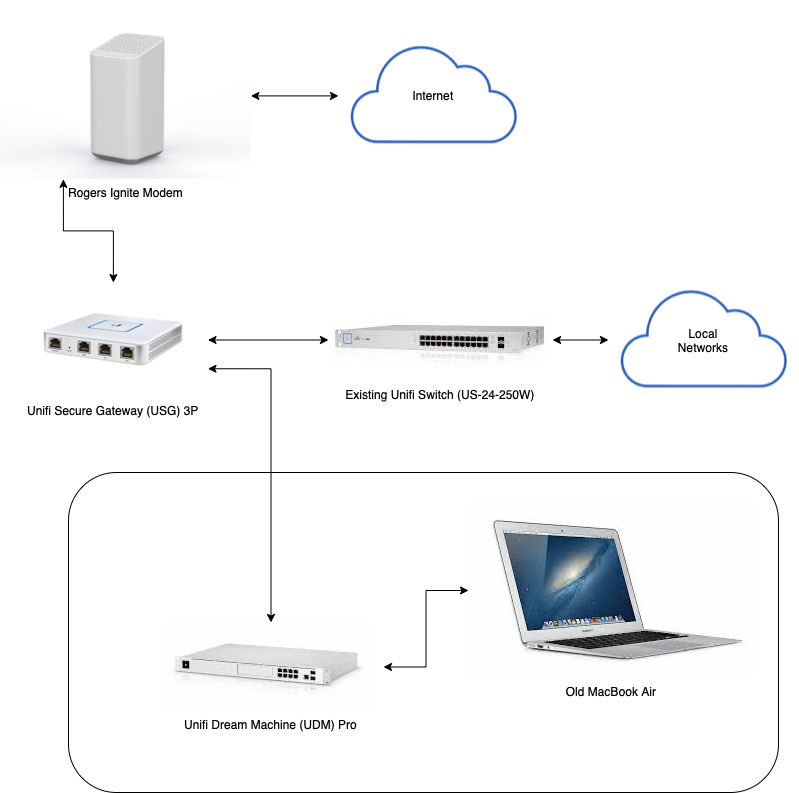
I also configured the old USG LAN2 port so that it will provision a network that has a separate IP subnet different from all of my existing networks. In my case, it was 10.10.11.1. I did this so that I can connect the UDM Pro into the LAN2 port of the old USG, which mimics my Internet Service Provider (ISP). This way, while I configure and setup the UDM Pro, my existing home network can continue to function and provide the require services to my household.
Connections used for UDM Pro setup
The setup connection layout looks like the above diagram. After the UDM Pro booted up, I used Safari to point to 192.168.1.1, which hosted the UDM Pro’s web administration interface. Since I already had a Unifi account, I used that to login initially. Once logged in, I proceeded to upgrade both the Network and Protect applications on the device. The Network application was upgraded to 6.5.53, and the Protect application was upgraded to 1.20.0. I am not planning to use the Access and Talk applications, but upgraded those any ways in case of any outstanding security holes.
I then open the Network application and performed a restore from the backup that I previously copied on to the MacBook Air. This restore worked without a hitch. All of my configurations and network and WiFi settings were ported over. The UDM Pro also automatically created another user from my old restore, which I promptly switched over, and disabled the external access to the UDM Pro, call me paranoid. I did a restart of the device to make sure that it boots back up smoothly. Once I have confirmed that everything is still okay, then I proceeded to shutdown the UDM Pro.
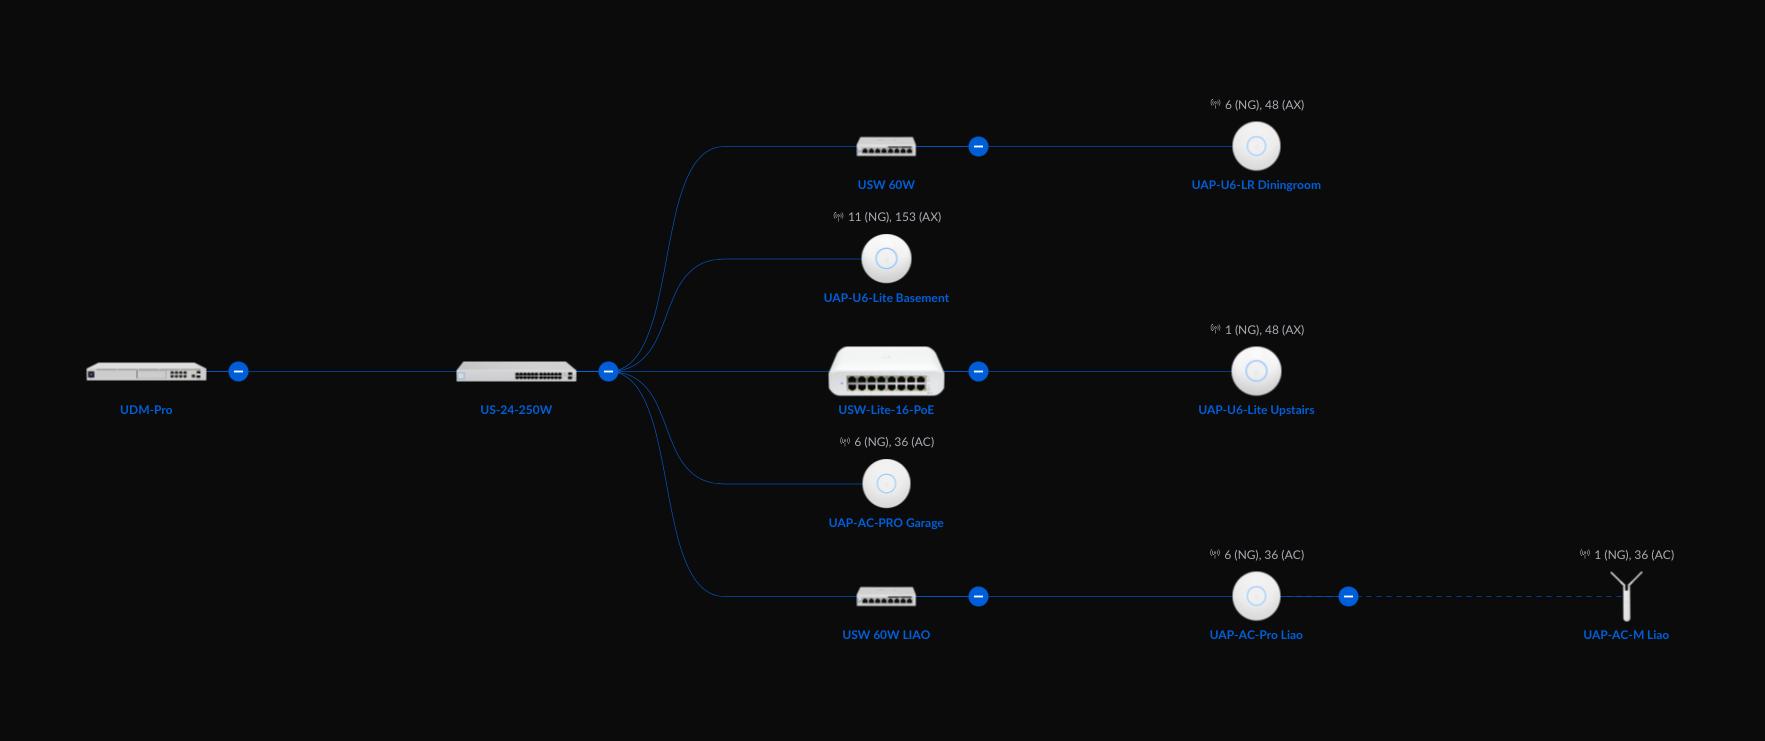
Before I make the physical swap, replacing the USG with the UDM Pro, I ssh into each Unifi managed device, switches and access points to ensure that the inform URL is reachable. Once I was satisfied of this, I then proceeded with the swap. Now my network looks like this:
Post upgrade layout (click to enlarge)
My expectation was that once the UDM Pro boots up and the Network application comes online, all the Unifi networking devices will automatically be managed by the UDM Pro. The reality however was slightly different. On the plus side, the network is fully functional and the only down time was the time it took to perform the swap and the boot up process of the UDM Pro, no more than 5 minutes. However on the down side, when I inspected all the devices (not clients) within the Network application, only one of all the devices successfully registered with the new Network application. I was a bit puzzled and miffed.
After about an hour’s investigation, apparently some devices did not like the inform URL to be http://unifi:8080/inform. I specifically picked the hostname instead of the IP address because it was changing from my NAS server to the UDM Pro. Unfortunately for some unknown reason, only a single Unifi access point UAP-AC-Pro made the jump and was successfully adopted by the UDM Pro. All the other devices went into a state of a repeated adoption loop. Even rebooting the devices did not help.
To remedy the situation, I had to ssh into each of the remaining devices and manually performed the following command (twice):
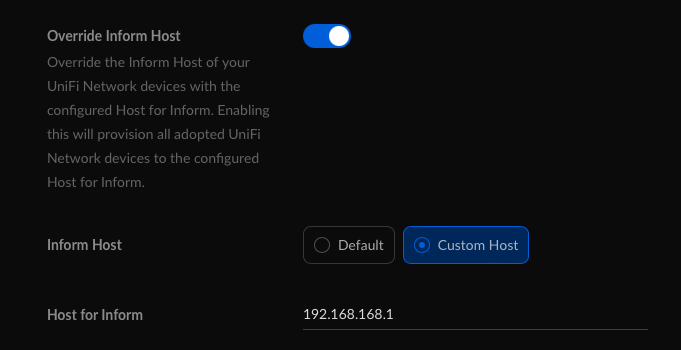
set-inform http://192.168.168.1:8080/inform
I am uncertain why I had to do it twice, but the first time did not work with the Network application. Once all the devices were adopted, I then proceed to configure the Override Inform Host settings on the UDM Pro. See below:
Note that the above settings were only in the New UI and missing form the Class UI
I had to set the above and not the default, because the will ubnt did not work, perhaps this had something to do with my Pi-hole configuration. Also, although by this point all the devices were connected, there were two remaining access points complaining about a STUN issue. When I check their respective logs, the STUN URL was incorrect because it retained the old unifi hostname. It was at this point, I decided to let the Network controller to push out an IP address based inform URL for all the devices.
I perform another reboot of the UDM Pro just to make sure we have transition stability over a power outage, and everything seems to be running smoothly now.
The restore of my Unifi Video configuration with the new Unifi Protect application on the UDM Pro was way more smoother. I dear say flawless. However, there was a minor hiccup. I run Homebridge at home to connect my Unifi Protect G3 Flex cameras to my HomeKit environment. This relied on an RSTP stream that was previously supported by Unifi Video. However the new Protect application used RSTPS, which is an encrypted version of the stream. Long story short, I had to switch from the Camera FFmpeg to the Unifi Protect plugin. Not a big deal, but I was super glad that the Unifi Protect plugin existed for Homebridge.
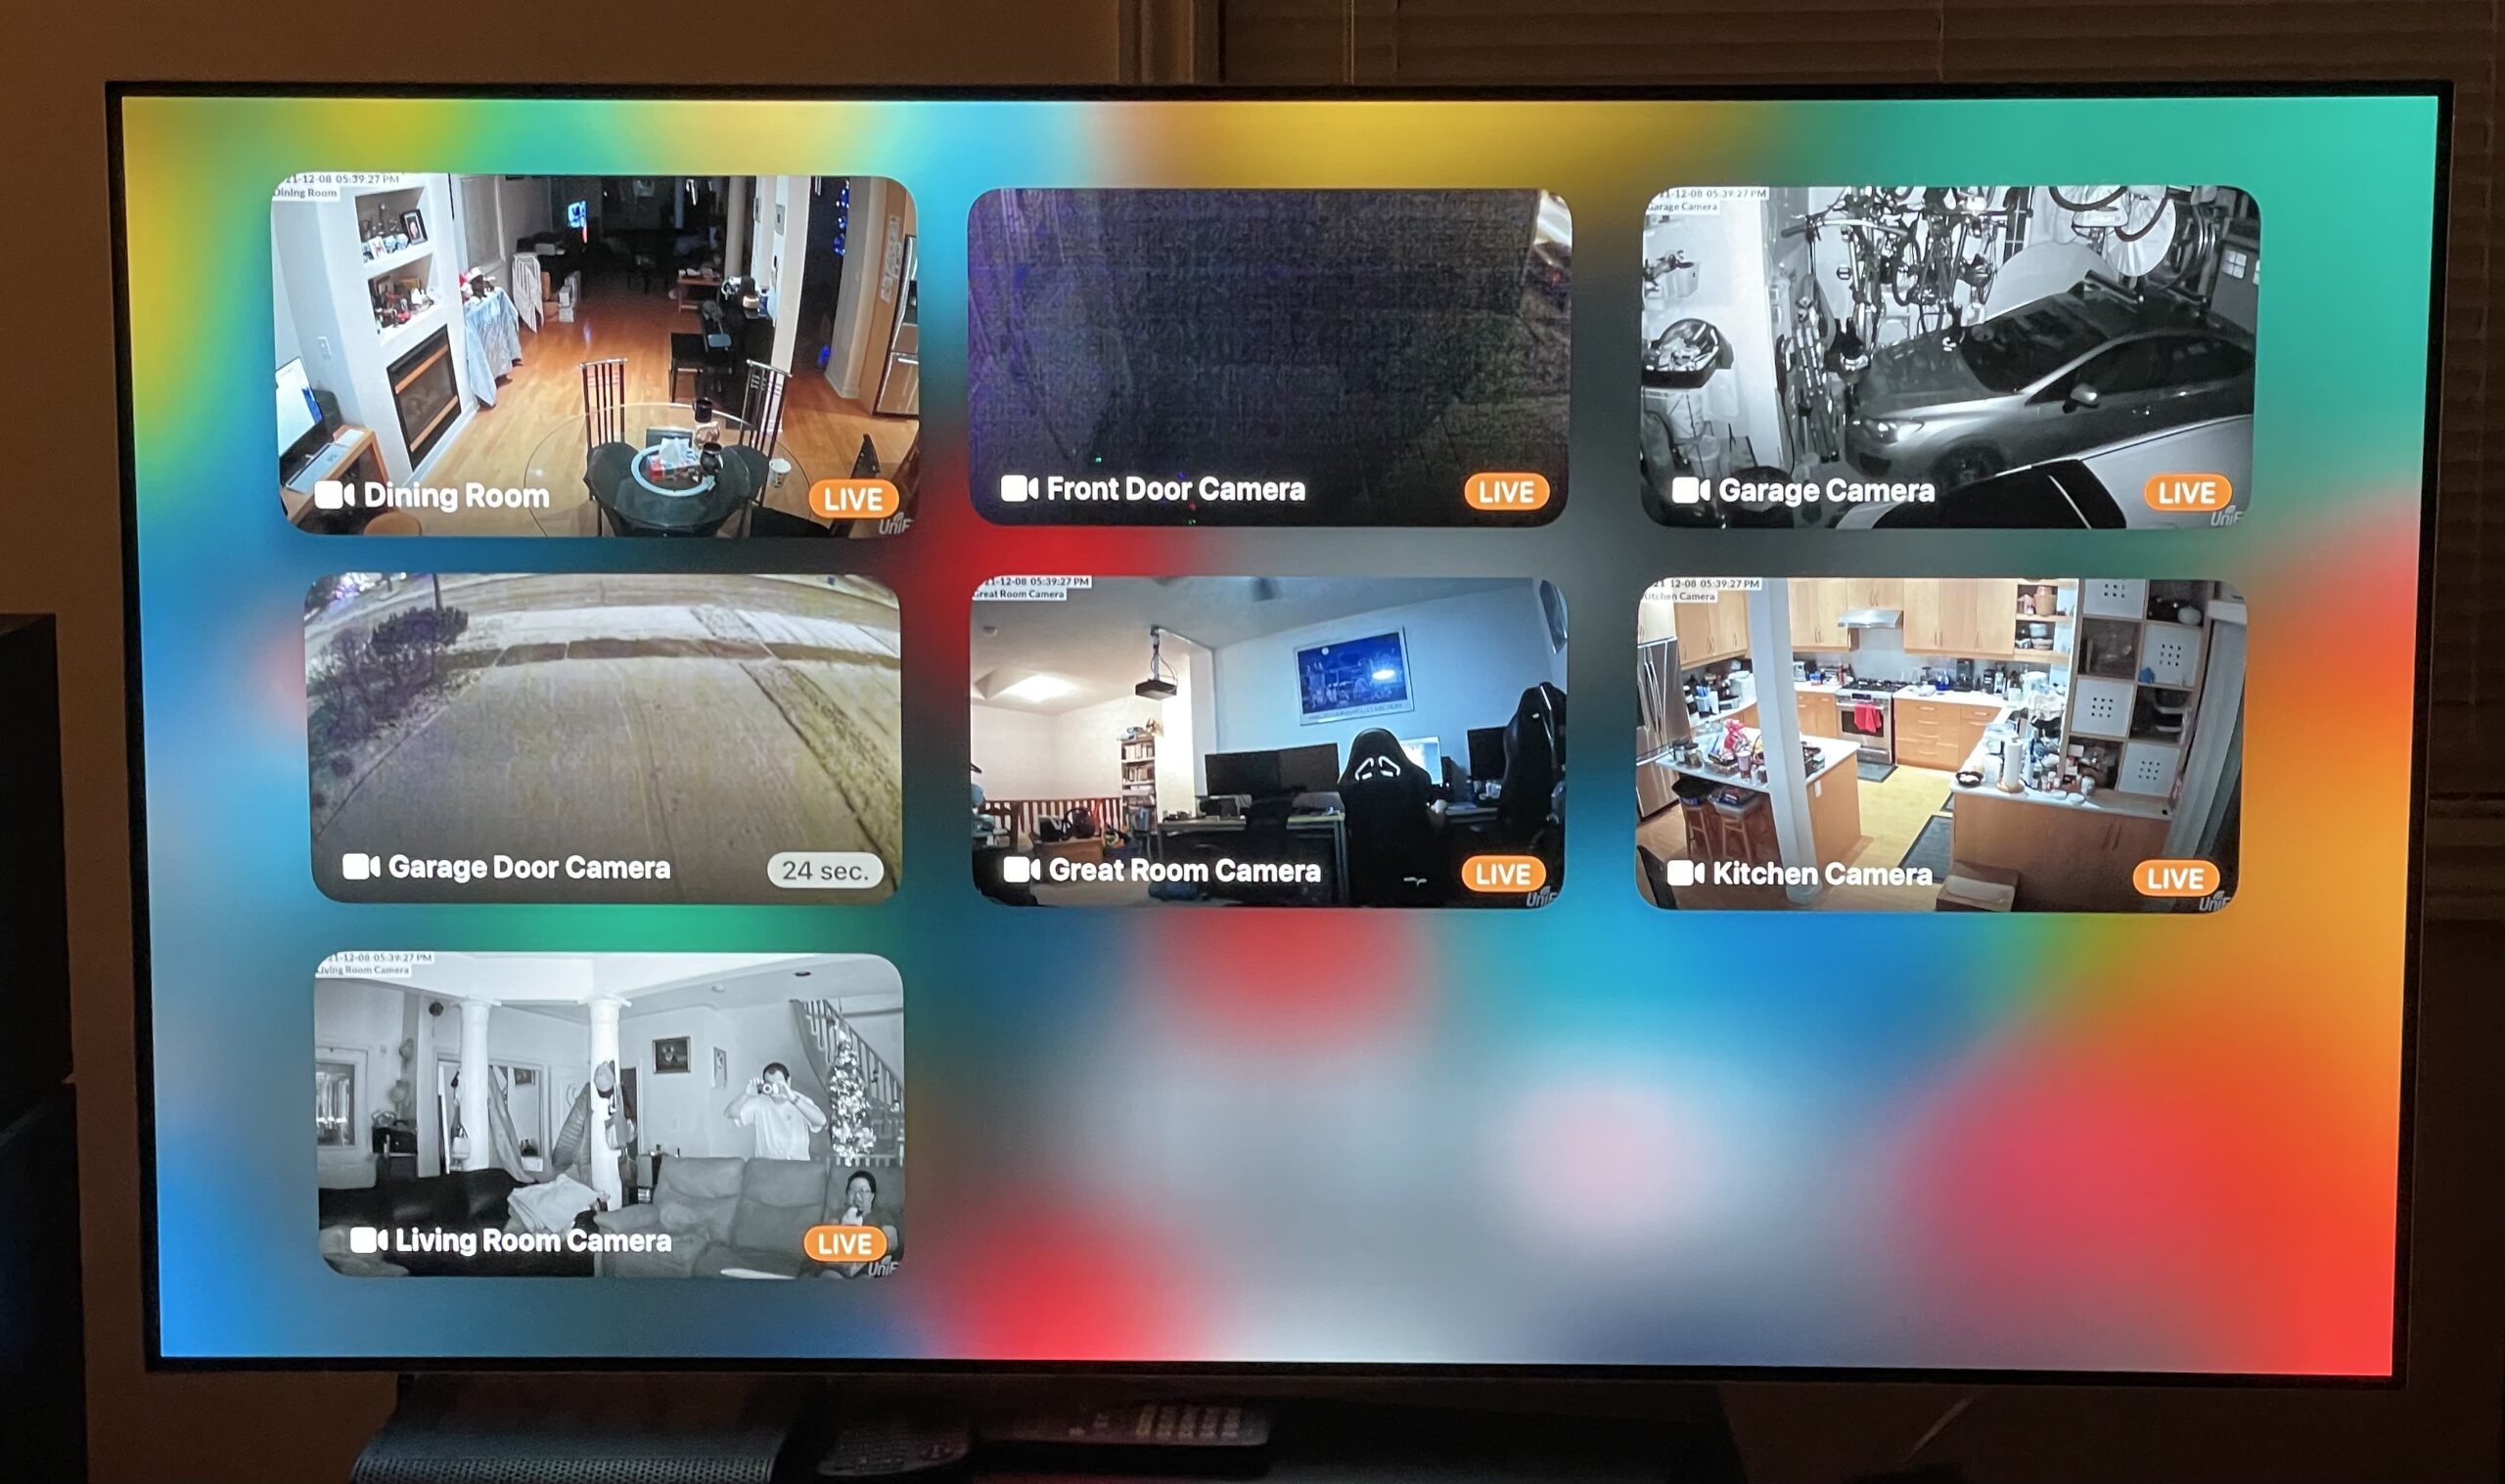
Now our inside security footages are recorded (up to a month), and motion detection is a lot faster. The application to find and view the videos are now more convenient. On top of that, live previews are also available within my Home App on my iPhone, iPad, as well as the Apple TV.
A gallery view from my 4K TV using Apple TV and HomeKit
The outdoor footages are still using Kuna, but I plan to perform a future upgrade using Unifi G4 Bullet cameras for the outside as well.
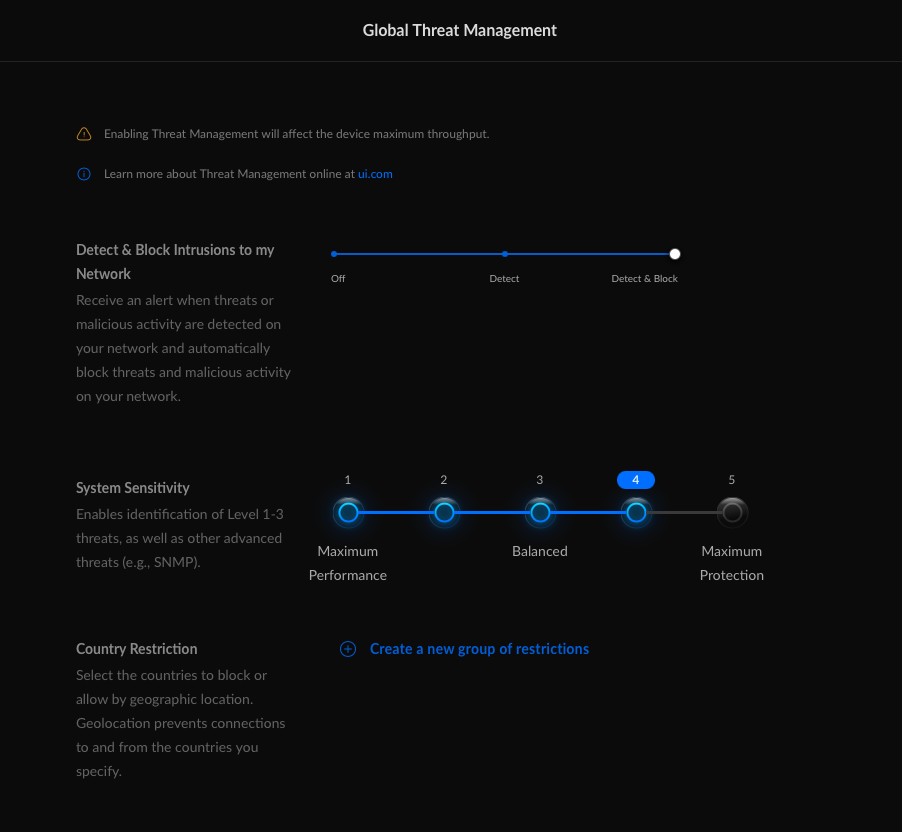
The last configuration I did was finally turned on Unifi’s Threat Management. I set it to level 4 to begin with and we may adjust it in the future.
click to enlarge
Last and certainly not the least, my NAS server is now more of a NAS and less of a networking controller, since all networking related monitoring and control is now being performed by a dedicated UDM Pro device. The UDM Pro can also handle the threat management at my full ISP 1Gbps download speed.
I will continue to post my upgrades here. If anything else, keep my future self informed.