I recently received a YouTube video from one of my uncles on the topic of the migration of Hakka (客家) Chinese from Mexian, China to Mauritius.
My maternal heritage is from Mauritius and I have made previous postings in this regard. You can simply do a quick search in this blog on the term, Mauritius, and you’ll see other related postings.
For keep sake, I’ve gathered the videos here for easy reference to share this knowledge with other relatives. It is also pretty amazing what you will find when searching for “Chinese in Mauritius” on YouTube.
Below are four videos which I personally found interesting. The first three videos are from Jeanette Lan’s YouTube Channel, kudos to her for sharing these videos. They are listed in chronological order of production.
Commemoration of the 178th anniversary of the Arrival of Indentured Immigrants to Mauritius (November 2nd, 2012)A Journey to Our RootsThe Cradle of Hakka CultureHakka History, Cooking, and Rhymes with the Toronto Hakka Heritage Alliance
We have a cat named Darci. During the summer time she likes to take strolls through our backyard, checking out other frequent visitors like rabbits, chipmunks, squirrels, birds, and the like. She does this on an extended leash so to avoid her chasing these visitors and get lost into the wild. If you are curious, then visit her on Instagram.
We of course turn on the air conditioner on most days of the summer, so when Darci wants to come back into the house, she sits by the backyard sliding door and await one of us to open the door for her. If we are busy, she waits patiently for quite some time. My wife came up with the door bell idea. Instead of scratching the glass pane of the sliding door, which is mostly silent, we will train her to hit a door bell, which will alert us to let her in.
This is how I was assigned the Darci Door Bell project. This is another excellent opportunity to create a gadget. My first thought is to create a Raspberry Pi with a camera that uses an AI image classifier on the backend. I thought this would be a good opportunity to get my feet wet in AI. However, when dealing with a camera, and a Raspberry Pi, we are now talking about power and the need to be “plugged in”. We wanted a gadget that is wireless and battery operated. A battery based solution will severely restrict the power budget, so back to a WiFi based remote door bell idea.
After more research, I decided to use an ESP8266 MCU with WiFi and a simple step-down buck converter to convert 9V to 3.3V. I had worked with the ESP8266 before when I was attempting to use it to create my garage door opener. That was over six years ago. ESP8266 just came out and has yet to be integrated into the Arduino platform. Today, it is now much easier to work with the ESP8266. Using the Arduino IDE, one can simply program the ESP8266 natively as an MCU without even requiring an Arduino board.
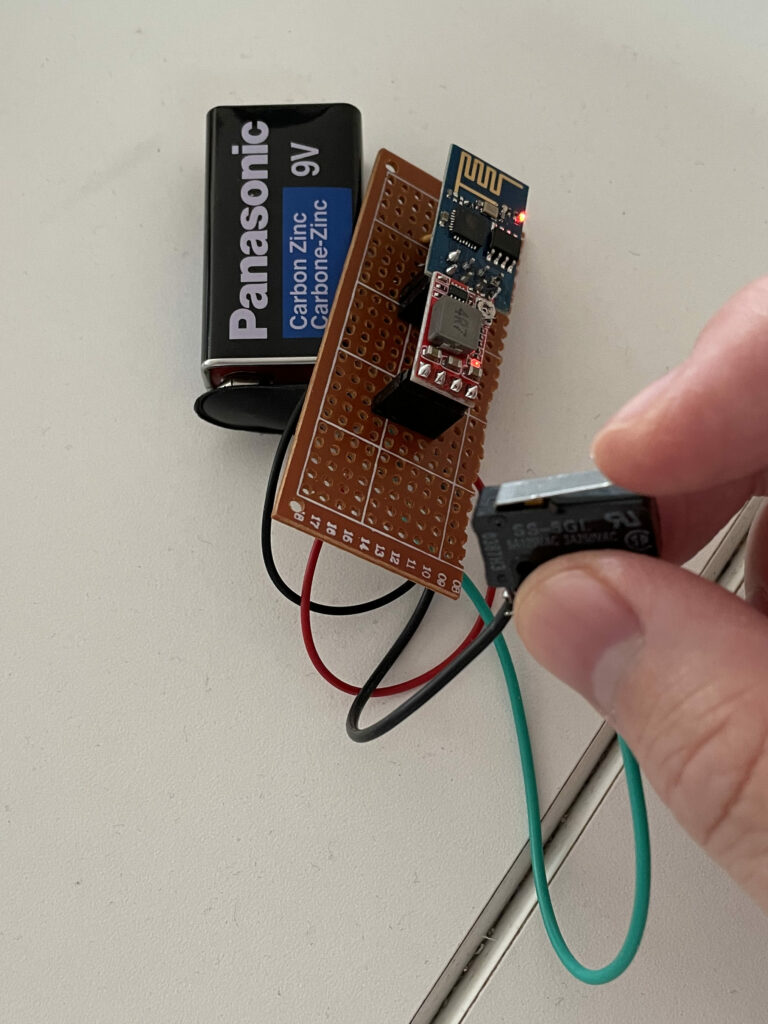
From a previous project, I built a small circuit using an USB FTDI interface that will accept the ESP8266 ESP-01 board. This way I can plug the ESP8266 using USB to my computer and program it with the Arduino IDE. I wrote the following sketch, and programmed the ESP8266 ESP-01 board.
The above program is pretty simple. When the board wakes up, it connects to my WiFi and then send an HTTP-POST request to my server that will handle the request based on the id, which in this case, it will be darciButton. As soon as the request is sent, the MCU will go into a deep sleep.
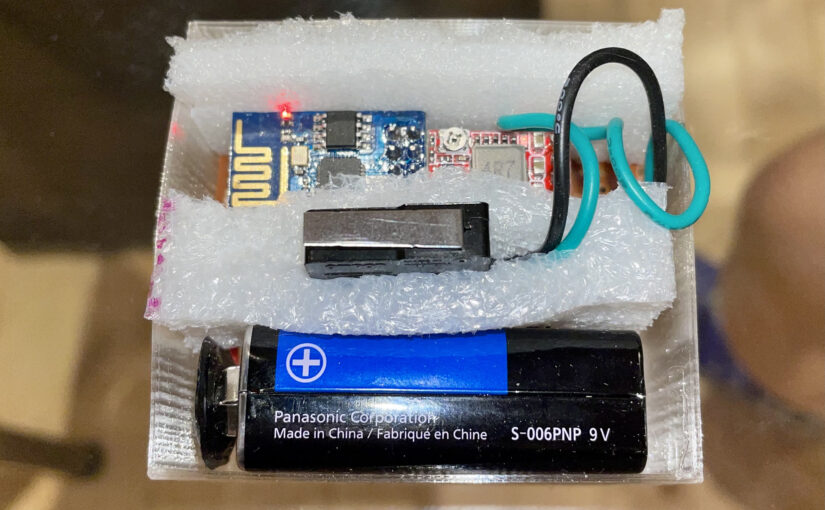
Completed Circuit
This way, the door bell will be a physical button that is hooked to the RST pin of the ESP8266 causing the ESP8266 to boot and send this POST request and immediately goes to sleep. The deep sleep is important, because while the device is in this deep sleep mode, the current draw from the 9V battery is negligible (<< 1mA). The only time the battery is used is when the button is pressed and released, and the ESP8266 is sending out the POST request. Using this power conservation approach, it is my hope that the 9V battery will last for the entire year of operation.
I used my 3D printer to print a little box for the whole thing and gave it some packaging padding, making sure the switch is on the top and properly supported. The final result looks something like this.
Packaged in a box
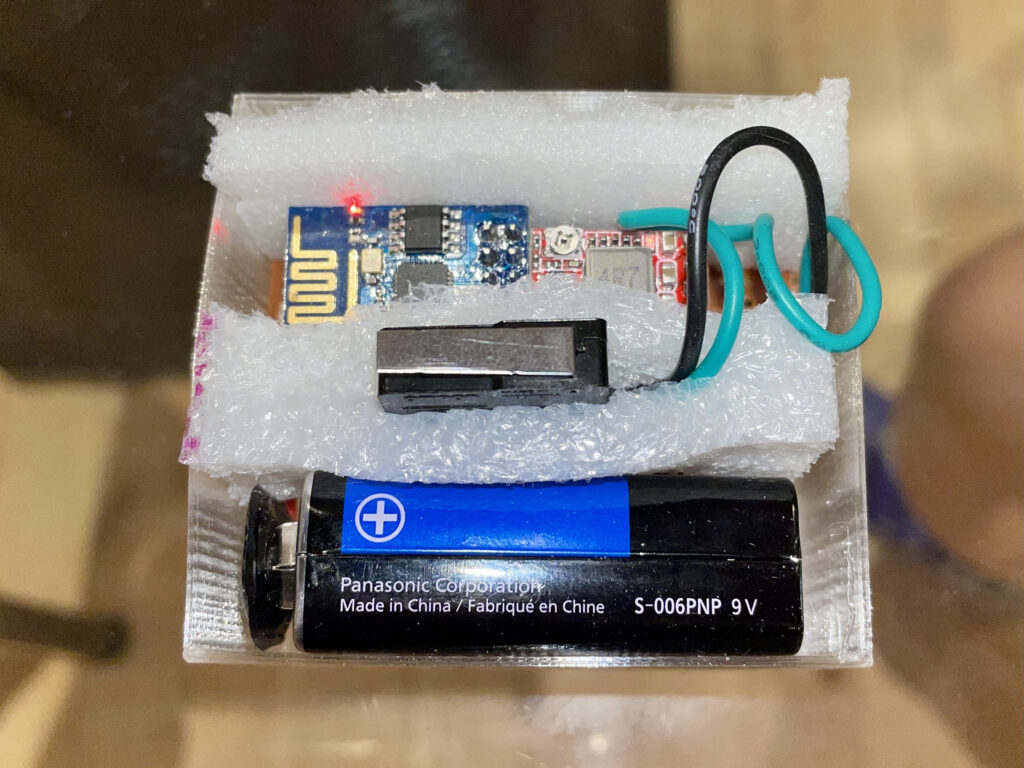
We then created a cardboard top cover that snugly fit the box, so that the top cover can freely move up and down the containing, plastic box. The switch itself has a little spring to it that allows the top cover to return back to its original position after being pressed. The finished product looks like this:
Finished Product
The top cover has a nickel on there so that Darci has a good target to train on.
Remember the server receiving the POST request? Well, I did some simple php programming on the server so that once the POST is received, I send out another HTTP request. This time to the Homebridge server with the homebridge-button-platform plugin installed. Homebridge is something that I already have and use to connect all non-compliant HomeKit accessories so that I can use those accessories via Siri. With this new plugin, I can connect this custom WiFi button to the HomeKit ecosystem within the house.
In effect, whenever this button is pressed, my HomeKit service will register an accessory button being pressed, and I can program a HomeKit scene that gets executed. I programmed a scene to play an audio file on all of my HomePods in the house. The audio file plays an audible door bell twice which I previously added to my Music library.
The final reward as shown by Darci herself. Watch the video below:
Darci Approves!
Of course with the button hooked up to HomeKit, we can now use this wireless button to do whatever HomeKit can do, unlock doors, turn lights on or off, etc. We will explore those possibilities in the future.
I was ticketed during 2019 for a minor offence in my neighbourhood. I requested a court hearing at the time and had an original court date set in the spring of 2020. Of course this coincided with the beginning of the Covid-19 pandemic, when almost all provincial services have decided to shutdown to adhere to the pandemic closure.
Throughout the remaining months of 2020 there were many emails and phone calls with the court services for me to find out the rescheduled date. After more than three follow up calls and many emails I finally received a “virtual” court date for March 17, 2021, earlier this month.
Let me detail my experience of my traffic offence virtual hearing. Hopefully you will find this useful in case you have to go through a similar event.
The meeting was conducted with Zoom. I have used Zoom before so I was pretty comfortable with the format and functionality. I joined the meeting 15 minutes prior to my scheduled court appearance. After waiting for a couple of minutes a prosecutor appeared and pre-registered me and briefed me to what will happen. The most important information is to mute your mic when you are not talking, and unmute when you are talking. I also had to remind myself to address the “Justice of the Peace” as your Worship.
I learned something new with Zoom during the session. Zoom has the ability to create rooms and the prosecutor can move individuals from one room to another. When I first joined Zoom, I was automatically sent to a virtual waiting room. Once the court room is made available, I was then transferred to the virtual court room. I thought this was a pretty good coordination and worked very well.
Once in the court room, the experience is pretty standard. You get to hear in great detail all of the other hearings that were scheduled with the same court room. There were more than 10 other individuals that were scheduled within the same time slot. I had to wait for about 40 minutes before I was called up by the prosecutor. Her Worship was very friendly and accommodating and my session did not take more than 10 minutes to conclude our business.
We reached a mutually agreeable arrangement, and I proceeded to pay my offence on paytickets.ca the next day. Overall it was good to get this monkey off my back without having to visit a physical court during the pandemic. The experience was more streamlined than I thought, so kudos to the Ontario Court Services.
It is tax season again in Canada. In the past I had a VirtualBox virtual machine that I would only bring up for the purpose of running the Windows version of TurboTax because the member of our family who files the taxes dislike the too simplified online version.
Unfortunately VirtualBox refuses to come up on macOS BigSur due to new security considerations enforced by macOS. The new System Integrity Protection (SIP) disallows the kernel extension required for VirtualBox. Instead of going around SIP via the crsutil disable command, I decided to move all of my virtual machines that is currently sitting on my Mac to my Ubuntu NAS, since the Ubuntu box is up 24 x 7 and should be more convenient.
Below is what I had to do on my Ubuntu 20.04.2 LTS server.
We then need to install the extension that enables RDP. The virtual machine is going to be hosted on a server without a graphics user interface, so we have to use a Remote Desktop Client (from Microsoft) on another machine (e.g. my Mac) to gain access.
For some reason my motherboard did not have the cpu virtualization mode enabled, so I had to do that with my BIOS settings. It was cryptically called AMD SVM (secure virtual machine).
I started the virtual machine with:
vboxmanage startvm win10 --type headless
However, I had issues with remote desktop. I had to set some permissions with the VirtualBox extensions. The following commands were executed to create a user and its password for Remote Desktop access.
Now, I can access the VM through Remote Desktop from my Mac. I continue through the process of installing Windows 10, and the VirtualBox guest additions.
The rest is pretty simple. Install Chrome, Buy TurboTax for 2020 tax year, and we are all set!
One final note, I shared a macOS folder to the VM using normal SMB protocol, so that once my taxes are completed, this VM is a throw away, until next year!
The Day After: Installed a security update in regards to virtualbox-dkvm and VirtualBox now refuses to boot from any bootable iso. I gave up and used Parallels on my MacBook Pro. I may try kvm later.
Today marks the opening day at York Region where appointments will be taken for covid-19 vaccine appointments for people who are 80+ years of age. We were instructed to visit the following link (york.ca/covid19vaccine).
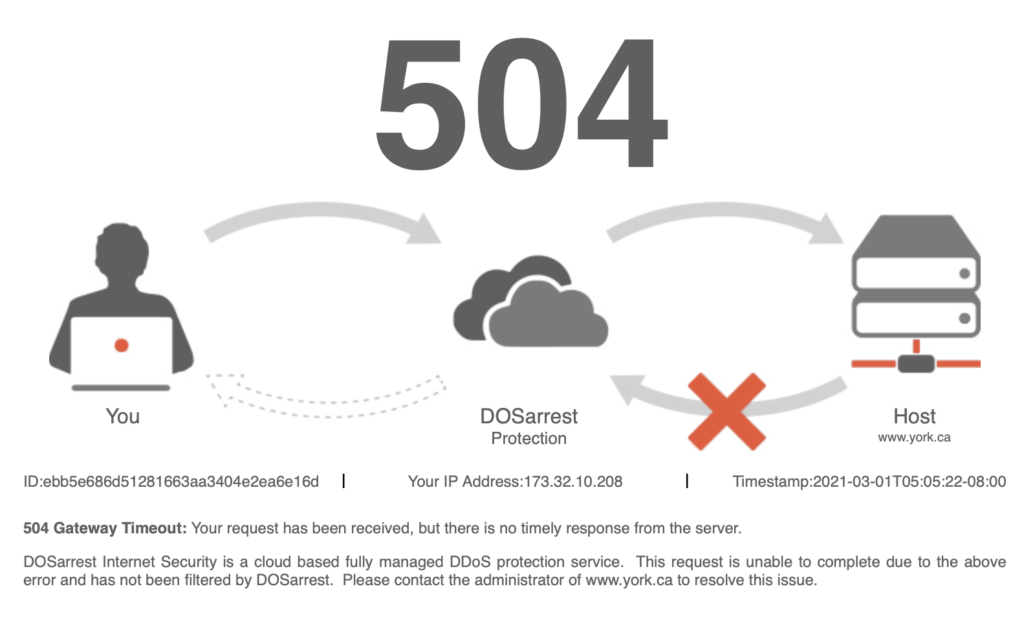
Since both of my parents are within this age group, I proceeded to the site this morning at 8am sharp to book their appointments. No surprise, the site was not available and I saw this:
At around 8:10am, the site was finally active. It was not immediately apparent to me how to book the vaccine, but after more reading, menu hunting, and a few clicks later I finally figured out. I had to choose the location first and then proceed to book an “activity” at that location.
At first, I was delighted to find out that there were hundreds of spots available at Richmond Green, a community facility just 10 minutes walk from our place. Unfortunately, when I proceeded with the booking, I had to create an account first. By the time I created the account, all the spots at Richmond Green were gone, and I had to book elsewhere. At around 9am, all spots from all locations were gone.
My advice is that if you don’t have a york.ca account now, go and create one before you make a booking.
Below is a video that may be useful to others showing how I navigated their web site to get to the booking. Good luck with your bookings!