This year like last year is another quiet holiday period. The persistence of the Covid-19 virus and its many variants, especially Delta and Omicron, has made holiday travel near impossible and unpredictable.
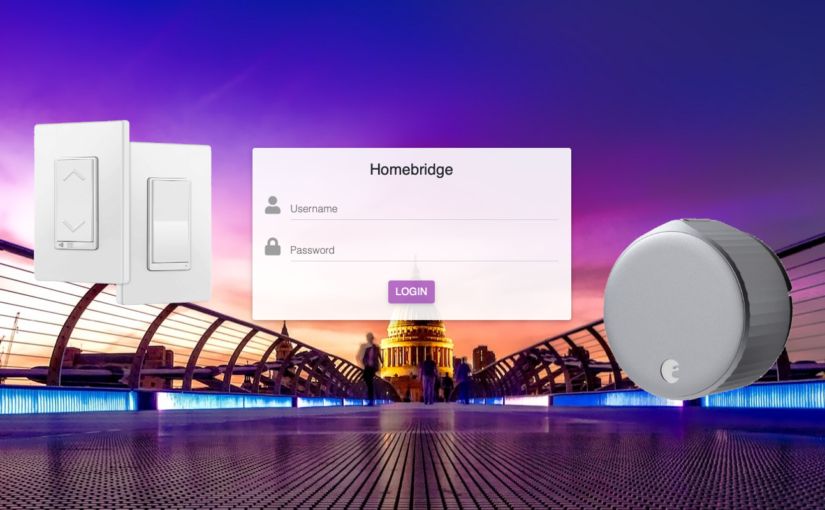
Other than getting our Pfizer vaccine booster on Christmas Eve, there is not much to do then to treat myself to another smart home improvement project. The smart switches have really come down in prices. With my previous experience on the Homebridge server, it is now possible to acquire non-HomeKit compliant switches on the cheap and installed them with Homebridge so that I can still get Siri and Home App access.
This is exactly what I did on Boxing Day. I ended up purchasing the following switches and smart lock from Amazon:
I used some extra TD Travel reward points that I am not going to use anytime soon on the smart lock.
The two HS220 dimmers are used for the pot lights in my basement. The simple HS200 switch is hooked up to my chandelier. The TopGreener 3 way dimmer will be used for my basement landing light underneath the stairs, and finally the smart lock will be used in the door between the laundry room and the garage. I already have the same August lock for the front door. With the above additions, all the light switches are now automated in the shared living areas of the house.
All of the above devices are on its separate Wi-Fi and are bandwidth limited as well as isolated from the our internal LAN.
I am looking forward to reconfigure my HomeKit Automations with the above capabilities.
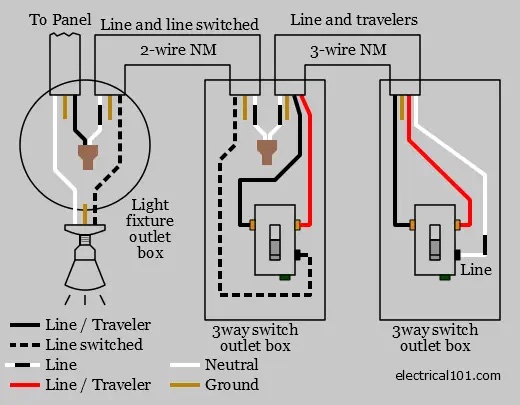
Update: I had to return the TOPGREENER. My basement landing light wiring had both switches at the end of the load, so I don’t have a close loop access to constant power, while the load / light is off. In effect, I thought I had access to a neutral wire, but it was just a piece of white wire connecting the hot lead. This just took 2.5 hours for me to figure it out.
I was couch surfing YouTube and came across this video:
Lawrence Technology Services detailing on the impact of Java Log4j
Since Unifi is my front line defence, I learned from the video that a patch from Unifi is already available for my Unifi Dream Machine (UDM) Pro. Of course, this prompted me to jump from my couch to my computer and immediately proceed to upgrade my Network application.
Thanks to Unifi, for addressing this so quickly. However, it was a release candidate so I could not upgrade it via the user interface. Instead I followed Unifi’s recommendation and did the following.
First remote shell via ssh into the UDM Pro.
% ssh udmpro
Welcome to UbiOS

By logging in, accessing, or using the Ubiquiti product, you
acknowledge that you have read and understood the Ubiquiti
License Agreement and agree to be bound by its terms.

  ___ ___      .__________.__
 |   |   |____ |__\_  ____/__|
 |   |   /    \|  ||  __) |  |   (c) 2010-2021
 |   |  |   |  \  ||  \   |  |   Ubiquiti Inc.
 |______|___|  /__||__/   |__|
            |_/                  http://www.ui.com

      Welcome to UniFi Dream Machine!

# unifi-os shell
root@ubnt:/# cd /tmp
root@ubnt:/tmp# ls
hsperfdata_unifi  local.list  unifi-network-status-response  uploads
Ensure there is no previous version of unifi_sysvinit_all.deb in the /tmp directory. If so, then remove it.
The next step is to download the release candidate version via curl, and then install it using dpkg.
root@ubnt:/tmp# curl -o "unifi_sysvinit_all.deb" https://dl.ui.com/unifi/6.5.54-3b5d40203c/unifi_sysvinit_all.deb
  % Total    % Received % Xferd  Average Speed   Time    Time     Time  Current
                                 Dload  Upload   Total   Spent    Left  Speed
100  126M  100  126M    0     0  27.1M      0  0:00:04  0:00:04 --:--:-- 28.7M

root@ubnt:/tmp# dpkg -i unifi_sysvinit_all.deb

(Reading database ... 65989 files and directories currently installed.)
Preparing to unpack unifi_sysvinit_all.deb ...
debconf: unable to initialize frontend: Dialog
debconf: (No usable dialog-like program is installed, so the dialog based frontend cannot be used. at /usr/share/perl5/Debconf/FrontEnd/Dialog.pm line 76.)
debconf: falling back to frontend: Readline
Unpacking unifi (6.5.54-16676-1) over (6.5.53-16673-1) ...
Setting up unifi (6.5.54-16676-1) ...
Processing triggers for systemd (241-5~bpo9+1) ...
#-> ubnt-dpkg-cache install
removing /data/dpkg-cache/stretch/packages/unifi_6.5.53-16673-1_all.deb ... done
unifi: action=install, package=/data/dpkg-cache/stretch/packages/unifi_6.5.54-16676-1_all.deb mark=manual
<-# ubnt-dpkg-cache install

root@ubnt:/tmp# rm unifi_sysvinit_all.deb
Once the installation is competed, we remove the Debian package.
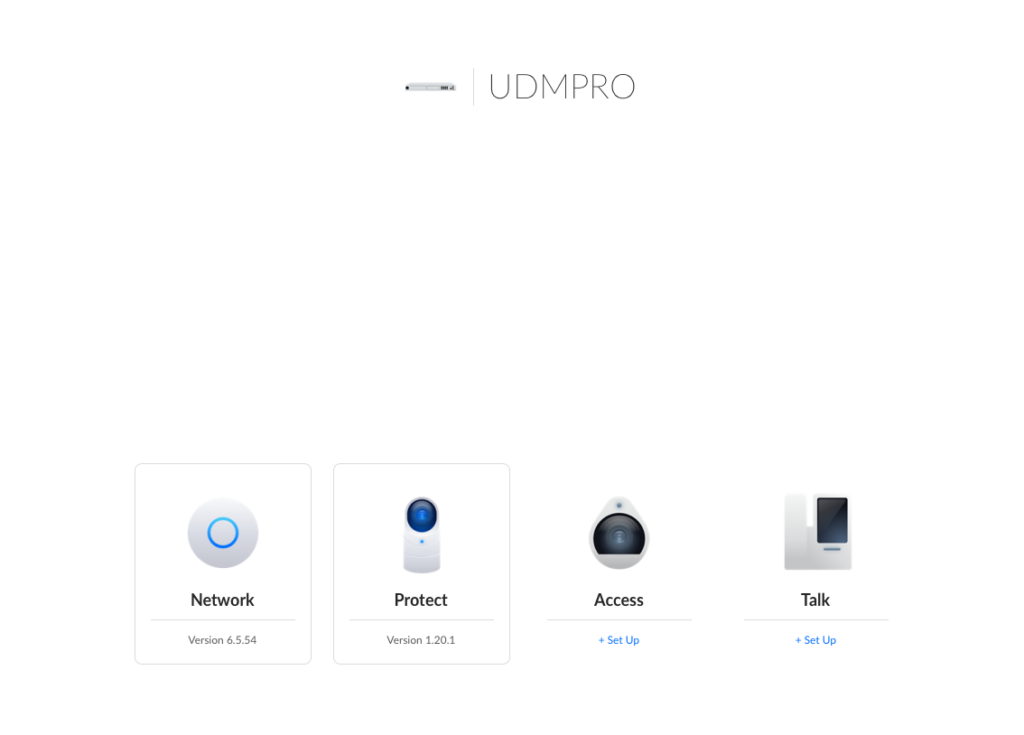
As you can see above, the Network application is now updated to 6.5.54.
Once again thanks to the folks at Unifi to come out with such a rapid fix.
Update:
I was curious whether my server is being attacked with this vector and sure enough there was an attempt logged at around 1pm today.
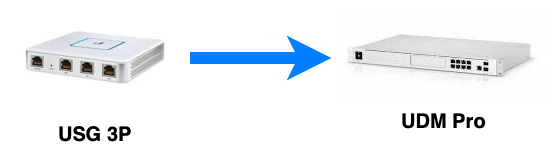
As I indicated in a previous post, I wanted to upgrade my old USG firewall to the new UDM Pro. In that post, I have outlined my reasons, so I will not repeat them here.
I wanted to perform the upgrade with a minimum amount of downtime. With several household members who are online constantly for both school work as well as for entertainment, any perceived downtime will result in a typical earful, which I would rather avoid.
In preparation for the upgrade, I performed the required backups for both the Unifi Video and the Unifi Network Controller applications that are both previously running on my NAS server. I copy the backups to an old MacBook Air that I will use as my console to setup the UDM Pro. I wanted to make sure that I stop both the unifi and unifi-video services on my Ubuntu NAS. We do not want to risk some sort of conflicts when we plug in the UDM Pro.
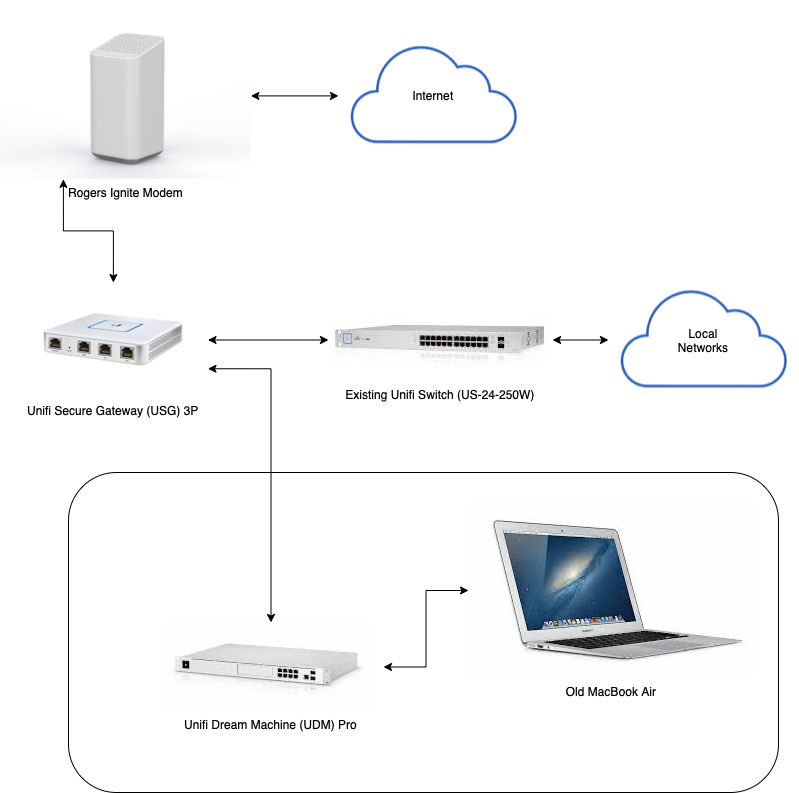
I also configured the old USG LAN2 port so that it will provision a network that has a separate IP subnet different from all of my existing networks. In my case, it was 10.10.11.1. I did this so that I can connect the UDM Pro into the LAN2 port of the old USG, which mimics my Internet Service Provider (ISP). This way, while I configure and setup the UDM Pro, my existing home network can continue to function and provide the require services to my household.
Connections used for UDM Pro setup
The setup connection layout looks like the above diagram. After the UDM Pro booted up, I used Safari to point to 192.168.1.1, which hosted the UDM Pro’s web administration interface. Since I already had a Unifi account, I used that to login initially. Once logged in, I proceeded to upgrade both the Network and Protect applications on the device. The Network application was upgraded to 6.5.53, and the Protect application was upgraded to 1.20.0. I am not planning to use the Access and Talk applications, but upgraded those any ways in case of any outstanding security holes.
I then open the Network application and performed a restore from the backup that I previously copied on to the MacBook Air. This restore worked without a hitch. All of my configurations and network and WiFi settings were ported over. The UDM Pro also automatically created another user from my old restore, which I promptly switched over, and disabled the external access to the UDM Pro, call me paranoid. I did a restart of the device to make sure that it boots back up smoothly. Once I have confirmed that everything is still okay, then I proceeded to shutdown the UDM Pro.
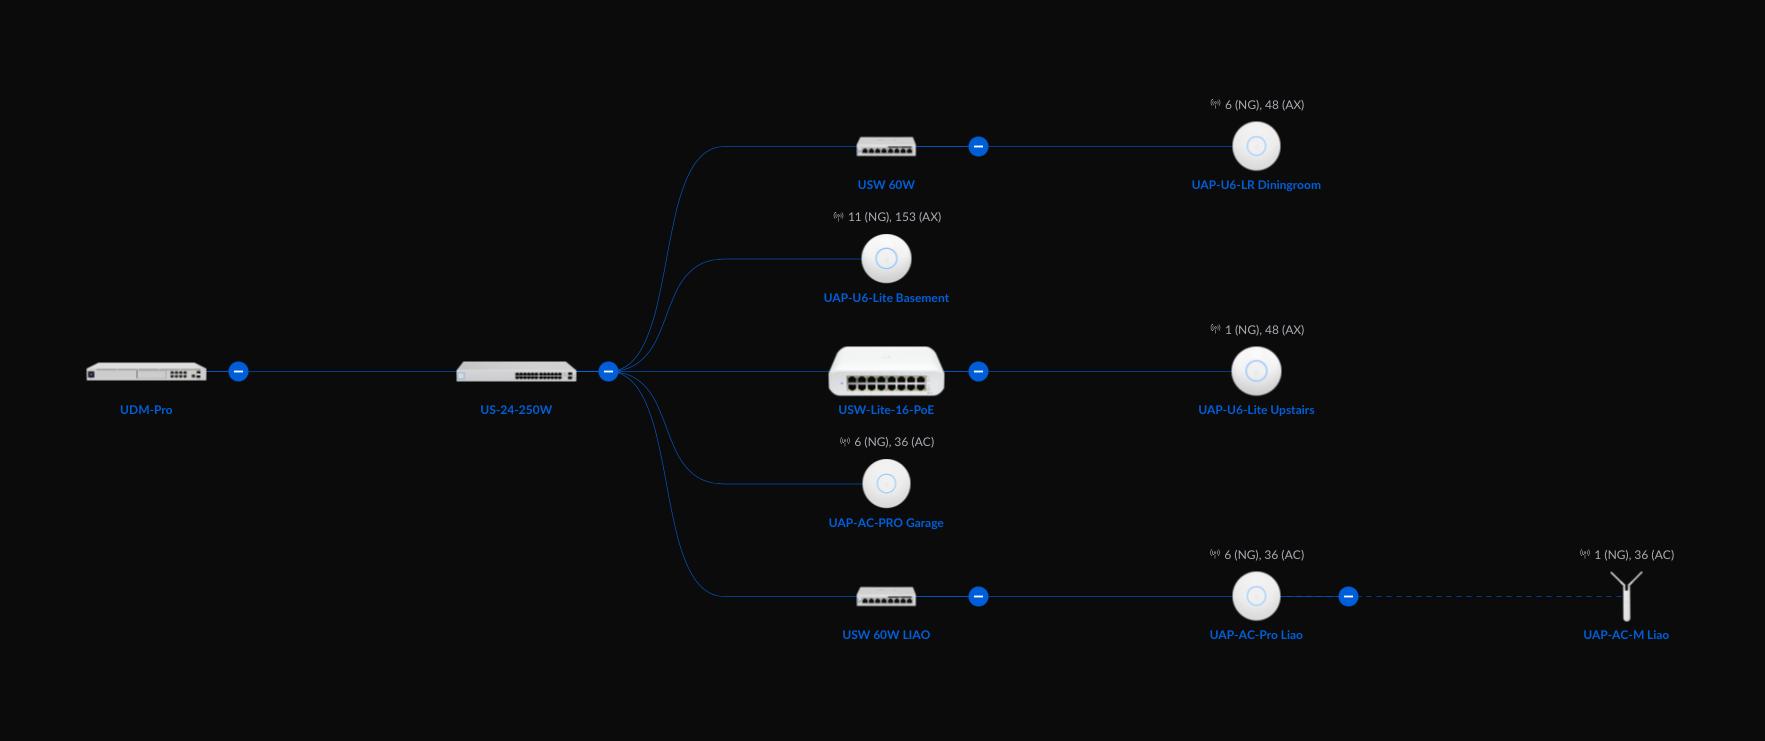
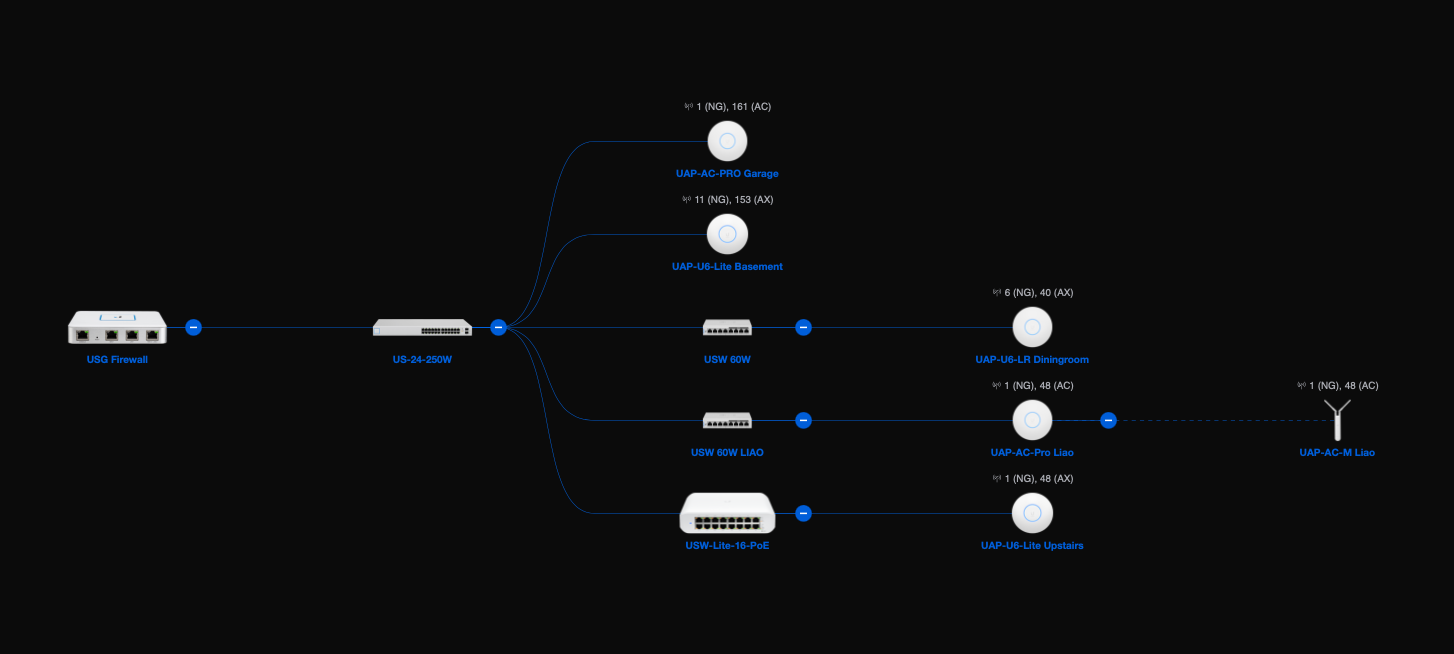
Before I make the physical swap, replacing the USG with the UDM Pro, I ssh into each Unifi managed device, switches and access points to ensure that the inform URL is reachable. Once I was satisfied of this, I then proceeded with the swap. Now my network looks like this:
Post upgrade layout (click to enlarge)
My expectation was that once the UDM Pro boots up and the Network application comes online, all the Unifi networking devices will automatically be managed by the UDM Pro. The reality however was slightly different. On the plus side, the network is fully functional and the only down time was the time it took to perform the swap and the boot up process of the UDM Pro, no more than 5 minutes. However on the down side, when I inspected all the devices (not clients) within the Network application, only one of all the devices successfully registered with the new Network application. I was a bit puzzled and miffed.
After about an hour’s investigation, apparently some devices did not like the inform URL to be http://unifi:8080/inform. I specifically picked the hostname instead of the IP address because it was changing from my NAS server to the UDM Pro. Unfortunately for some unknown reason, only a single Unifi access point UAP-AC-Pro made the jump and was successfully adopted by the UDM Pro. All the other devices went into a state of a repeated adoption loop. Even rebooting the devices did not help.
To remedy the situation, I had to ssh into each of the remaining devices and manually performed the following command (twice):
set-inform http://192.168.168.1:8080/inform
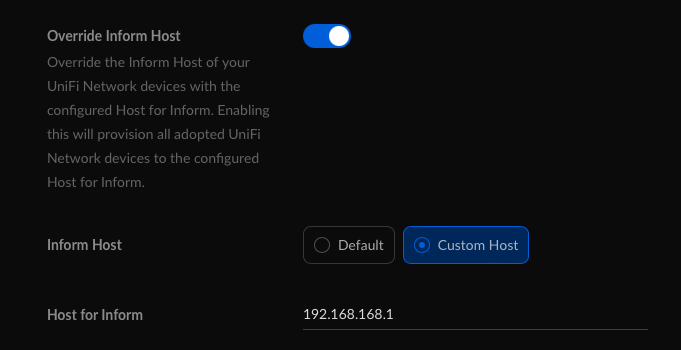
I am uncertain why I had to do it twice, but the first time did not work with the Network application. Once all the devices were adopted, I then proceed to configure the Override Inform Host settings on the UDM Pro. See below:
Note that the above settings were only in the New UI and missing form the Class UI
I had to set the above and not the default, because the will ubnt did not work, perhaps this had something to do with my Pi-hole configuration. Also, although by this point all the devices were connected, there were two remaining access points complaining about a STUN issue. When I check their respective logs, the STUN URL was incorrect because it retained the old unifi hostname. It was at this point, I decided to let the Network controller to push out an IP address based inform URL for all the devices.
I perform another reboot of the UDM Pro just to make sure we have transition stability over a power outage, and everything seems to be running smoothly now.
The restore of my Unifi Video configuration with the new Unifi Protect application on the UDM Pro was way more smoother. I dear say flawless. However, there was a minor hiccup. I run Homebridge at home to connect my Unifi Protect G3 Flex cameras to my HomeKit environment. This relied on an RSTP stream that was previously supported by Unifi Video. However the new Protect application used RSTPS, which is an encrypted version of the stream. Long story short, I had to switch from the Camera FFmpeg to the Unifi Protect plugin. Not a big deal, but I was super glad that the Unifi Protect plugin existed for Homebridge.
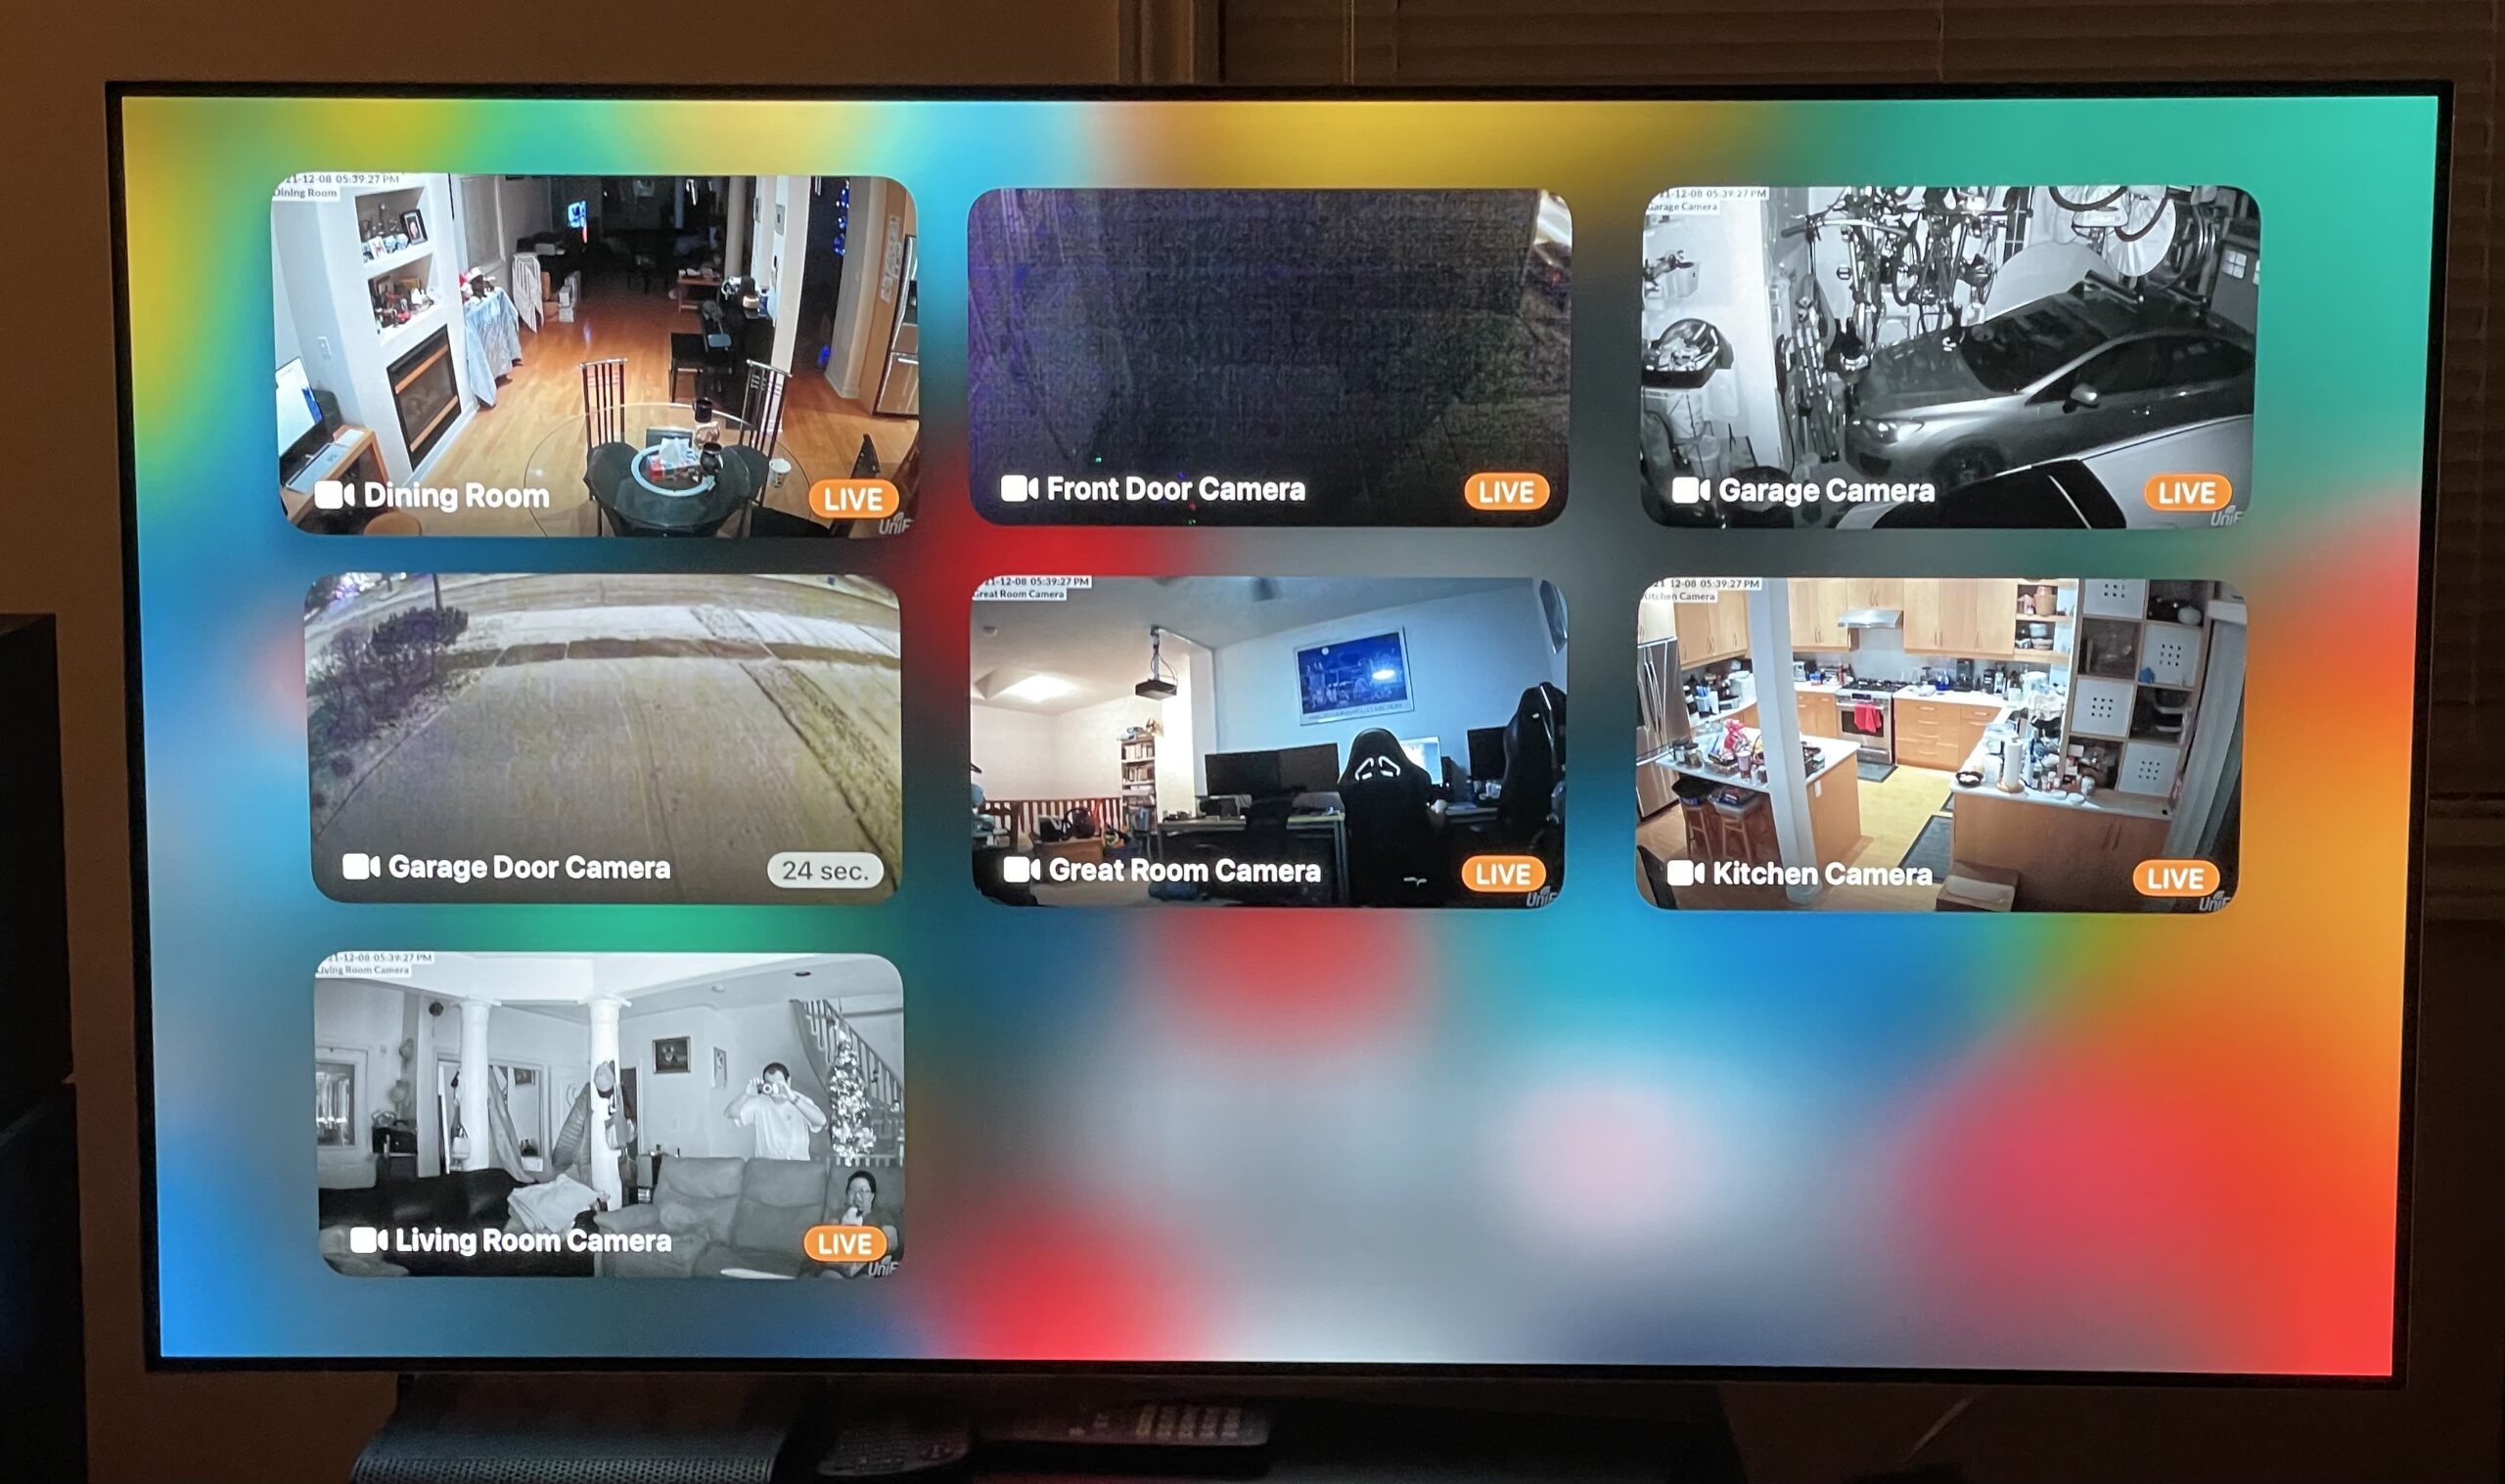
Now our inside security footages are recorded (up to a month), and motion detection is a lot faster. The application to find and view the videos are now more convenient. On top of that, live previews are also available within my Home App on my iPhone, iPad, as well as the Apple TV.
A gallery view from my 4K TV using Apple TV and HomeKit
The outdoor footages are still using Kuna, but I plan to perform a future upgrade using Unifi G4 Bullet cameras for the outside as well.
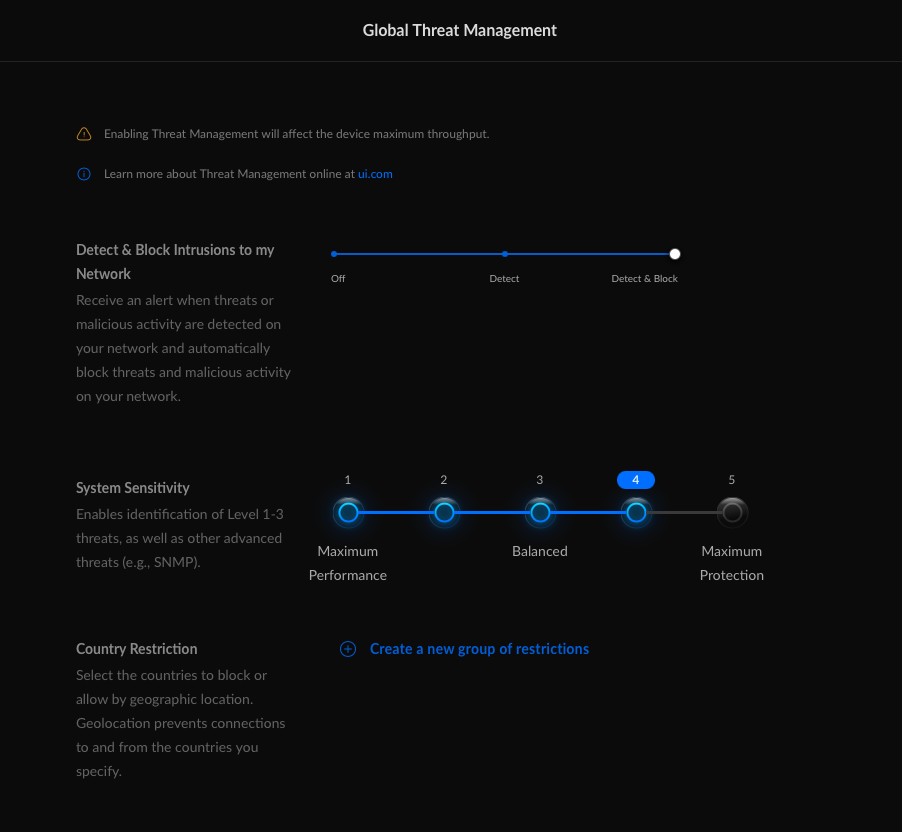
The last configuration I did was finally turned on Unifi’s Threat Management. I set it to level 4 to begin with and we may adjust it in the future.
click to enlarge
Last and certainly not the least, my NAS server is now more of a NAS and less of a networking controller, since all networking related monitoring and control is now being performed by a dedicated UDM Pro device. The UDM Pro can also handle the threat management at my full ISP 1Gbps download speed.
I will continue to post my upgrades here. If anything else, keep my future self informed.
We are all in with Unbiquiti’s Unifi lined of networking products. To date with the exception of a few unmanaged switches, all of our home networking switches and Wi-Fi access points are Unifi products.
Current Network Layout (click above to enlarge)
At the heart of our network is our USG Firewall (USG 3P). We’ve been using the secured gateway since December of 2017. During the holiday break, I plan to replace it with the new Unifi Dream Machine Pro (UDM Pro). The main reasons are:
The current USG 3P is limited to 85 Mbps when threat detection is turned on;
Run Intrusion Prevention System (IPS) and Intrusion Detection System (IDS) with the UDM Pro at full IPS speeds which for me is at 1 Gbps download and 30 Mbps upload;
Upgrade my current Unifi Video solution to Unifi Protect, since Unifi Video is no longer supported and I have five Unifi G3 Flex cameras;
Will most likely replace my current Kuna solution with Unifi Protect external cameras, so it is totally private, and my security video solution is unified;
The ability to connect Unifi Protect with my other devices using Homebridge;
The device has a capacity of up to 3.5 Gbps so we are future proofed for faster ISP speeds;
Move the UniFi Network Controller software that is currently running on my NAS server to a dedicated piece of hardware, the UDM Pro;
During my research with the UDM Pro, there is a slight regression in functionality that I currently use in my home. I currently use a functionality called static host mapping that allows me to give my NAS server several different host names so that I can use those host names to route to different in-home services, that is hosted by Apache2 server on my NAS. For example, the host name media.home routes to my home Plex server, and books.home routes to my Calibre server. Long story short, I need to run my own Domain Name Service to get this functionality back.
I have deployed and configured a DNSmasq installation before, but when I was exploring ways to reconfigure (hack) UDM Pro’s DNSmasq implementation, I came to the realization that it is probably best to offload the DNS functionality from the UDM Pro and run a dedicated instance on my NAS server. This way the upgrade path of the UDM Pro by Ubiquity in the future is nice and clean, and I can fully configure my own DNS the way I needed it.
With further research, I came across an alternative to DNSmasq, and that is Pi-hole with unbound, a full recursive DNS resolver. With this combination, I can essentially maintain my own local DNS records, satisfying my static host mappings, and also have a more private Internet experience for my entire home network when domain names are resolved by the authorized party.
I chose the Alternative 1 installation methodology on my NAS, but with a twist. Since I already have Apache2 installed, after the installation, I purged lighttpd from the installation, which came with the Pi-hole installation process. I also added the following to my Apache 2 configuration:
For extra security, I also added an .htaccess file containing:
% cat /var/www/html/.htaccess
<RequireAny>
    Require ip 192.168.167.0/24
    Require ip 172.17.168.1/24
</RequireAny>
The above ensures that only local computers or VPN clients on my network can gain access to Pi-hole. I also had to enable the above .htaccess file by adding the following in the main Apache 2 configuration file (/etc/apache2/apache2.conf):
<Directory /var/www/html/>
	AllowOverride All
</Directory>
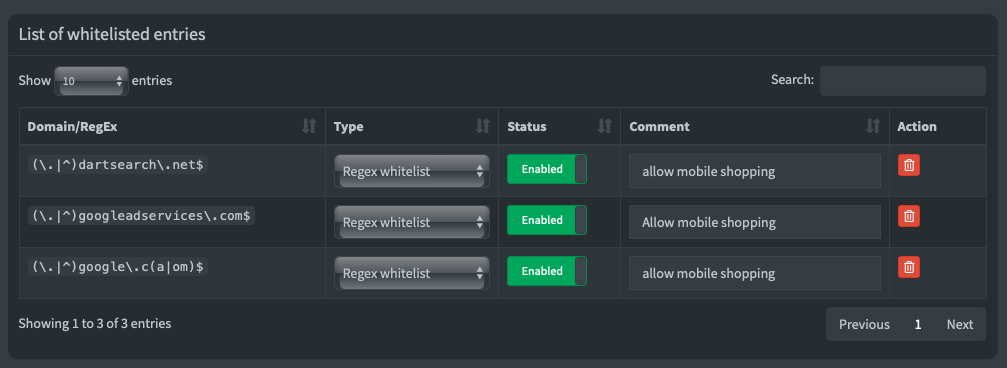
After a quick restart, Pi-hole is installed and operational. With an afternoon of testing, I noticed that some Google based shopping links have been blocked. We cannot have that during the holiday season, so I had to white list the following sites for them to work:
Click above to enlarge
Configuring unbound was really easy, I just had to follow the instructions here.
Now that I have my own DNS server running, I am no longer using Cloudfare or Google’s domain services. This translates to a little more privacy. I can also track which domains are being blocked and which domains are being accessed when I visit sites. Since this solution is site wide within my house, no additional work is required on iPhones, iPads, and client computers.
With this prerequisite step completed, I am now all set to migrate to the UDM Pro.