I like riding my bike but not cleaning my bike. Unfortunately cleaning my road bike especially the drive train is a necessity. Of course the most difficult part, the chain, is notoriously difficult to clean correctly.
In the past I have tried chain cleaners that look like the one on the right. In short, they don’t work.
SRAM Powerlink
The next evolution is to adopt a chain like the SRAM Powerlink or the Connex link, which can be easily taken apart. I still have to manually scrub the chain and it seems like no matter how many times you scrub the chain, it is still super dirty. Finally I came across the following YouTube video:
The host uses an ultrasonic cleaner and his result was really impressive. I went to Amazon and got myself one.
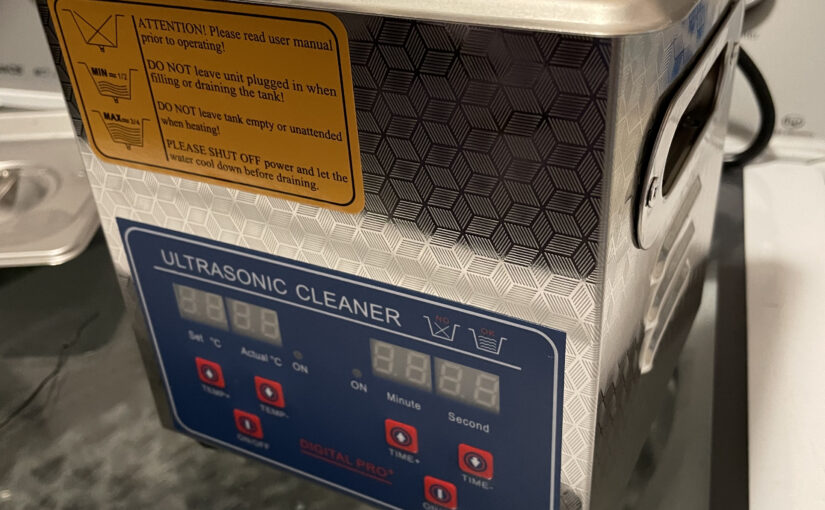
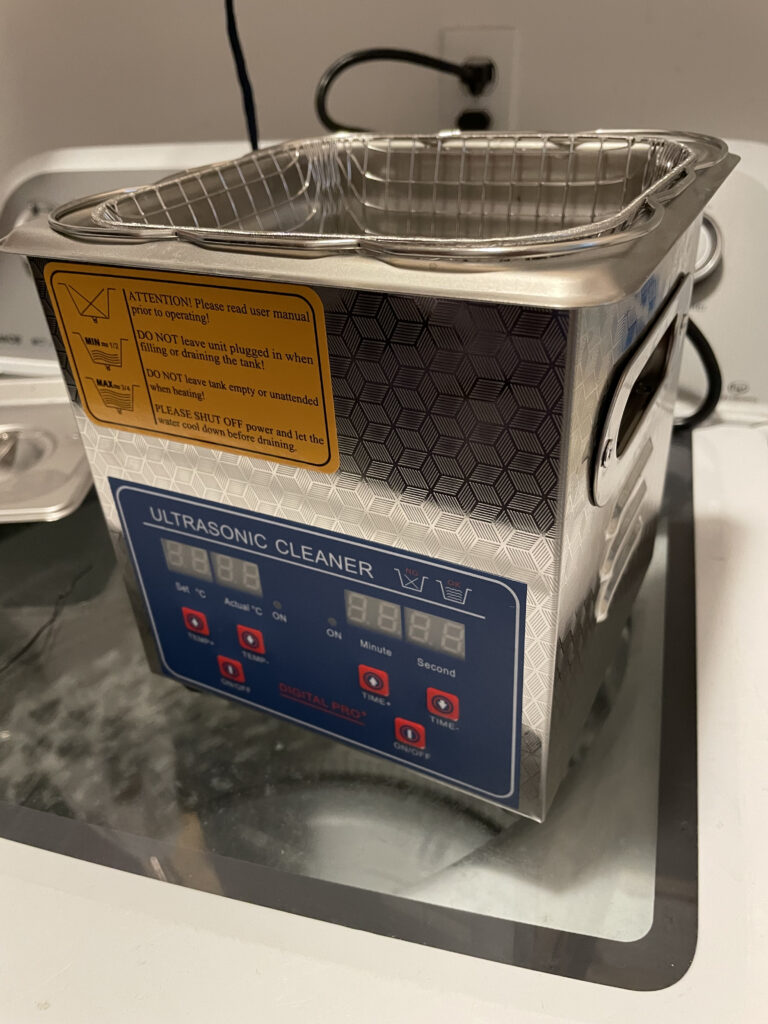
Flexzion Commercial Ultrasonic Cleaner 2L
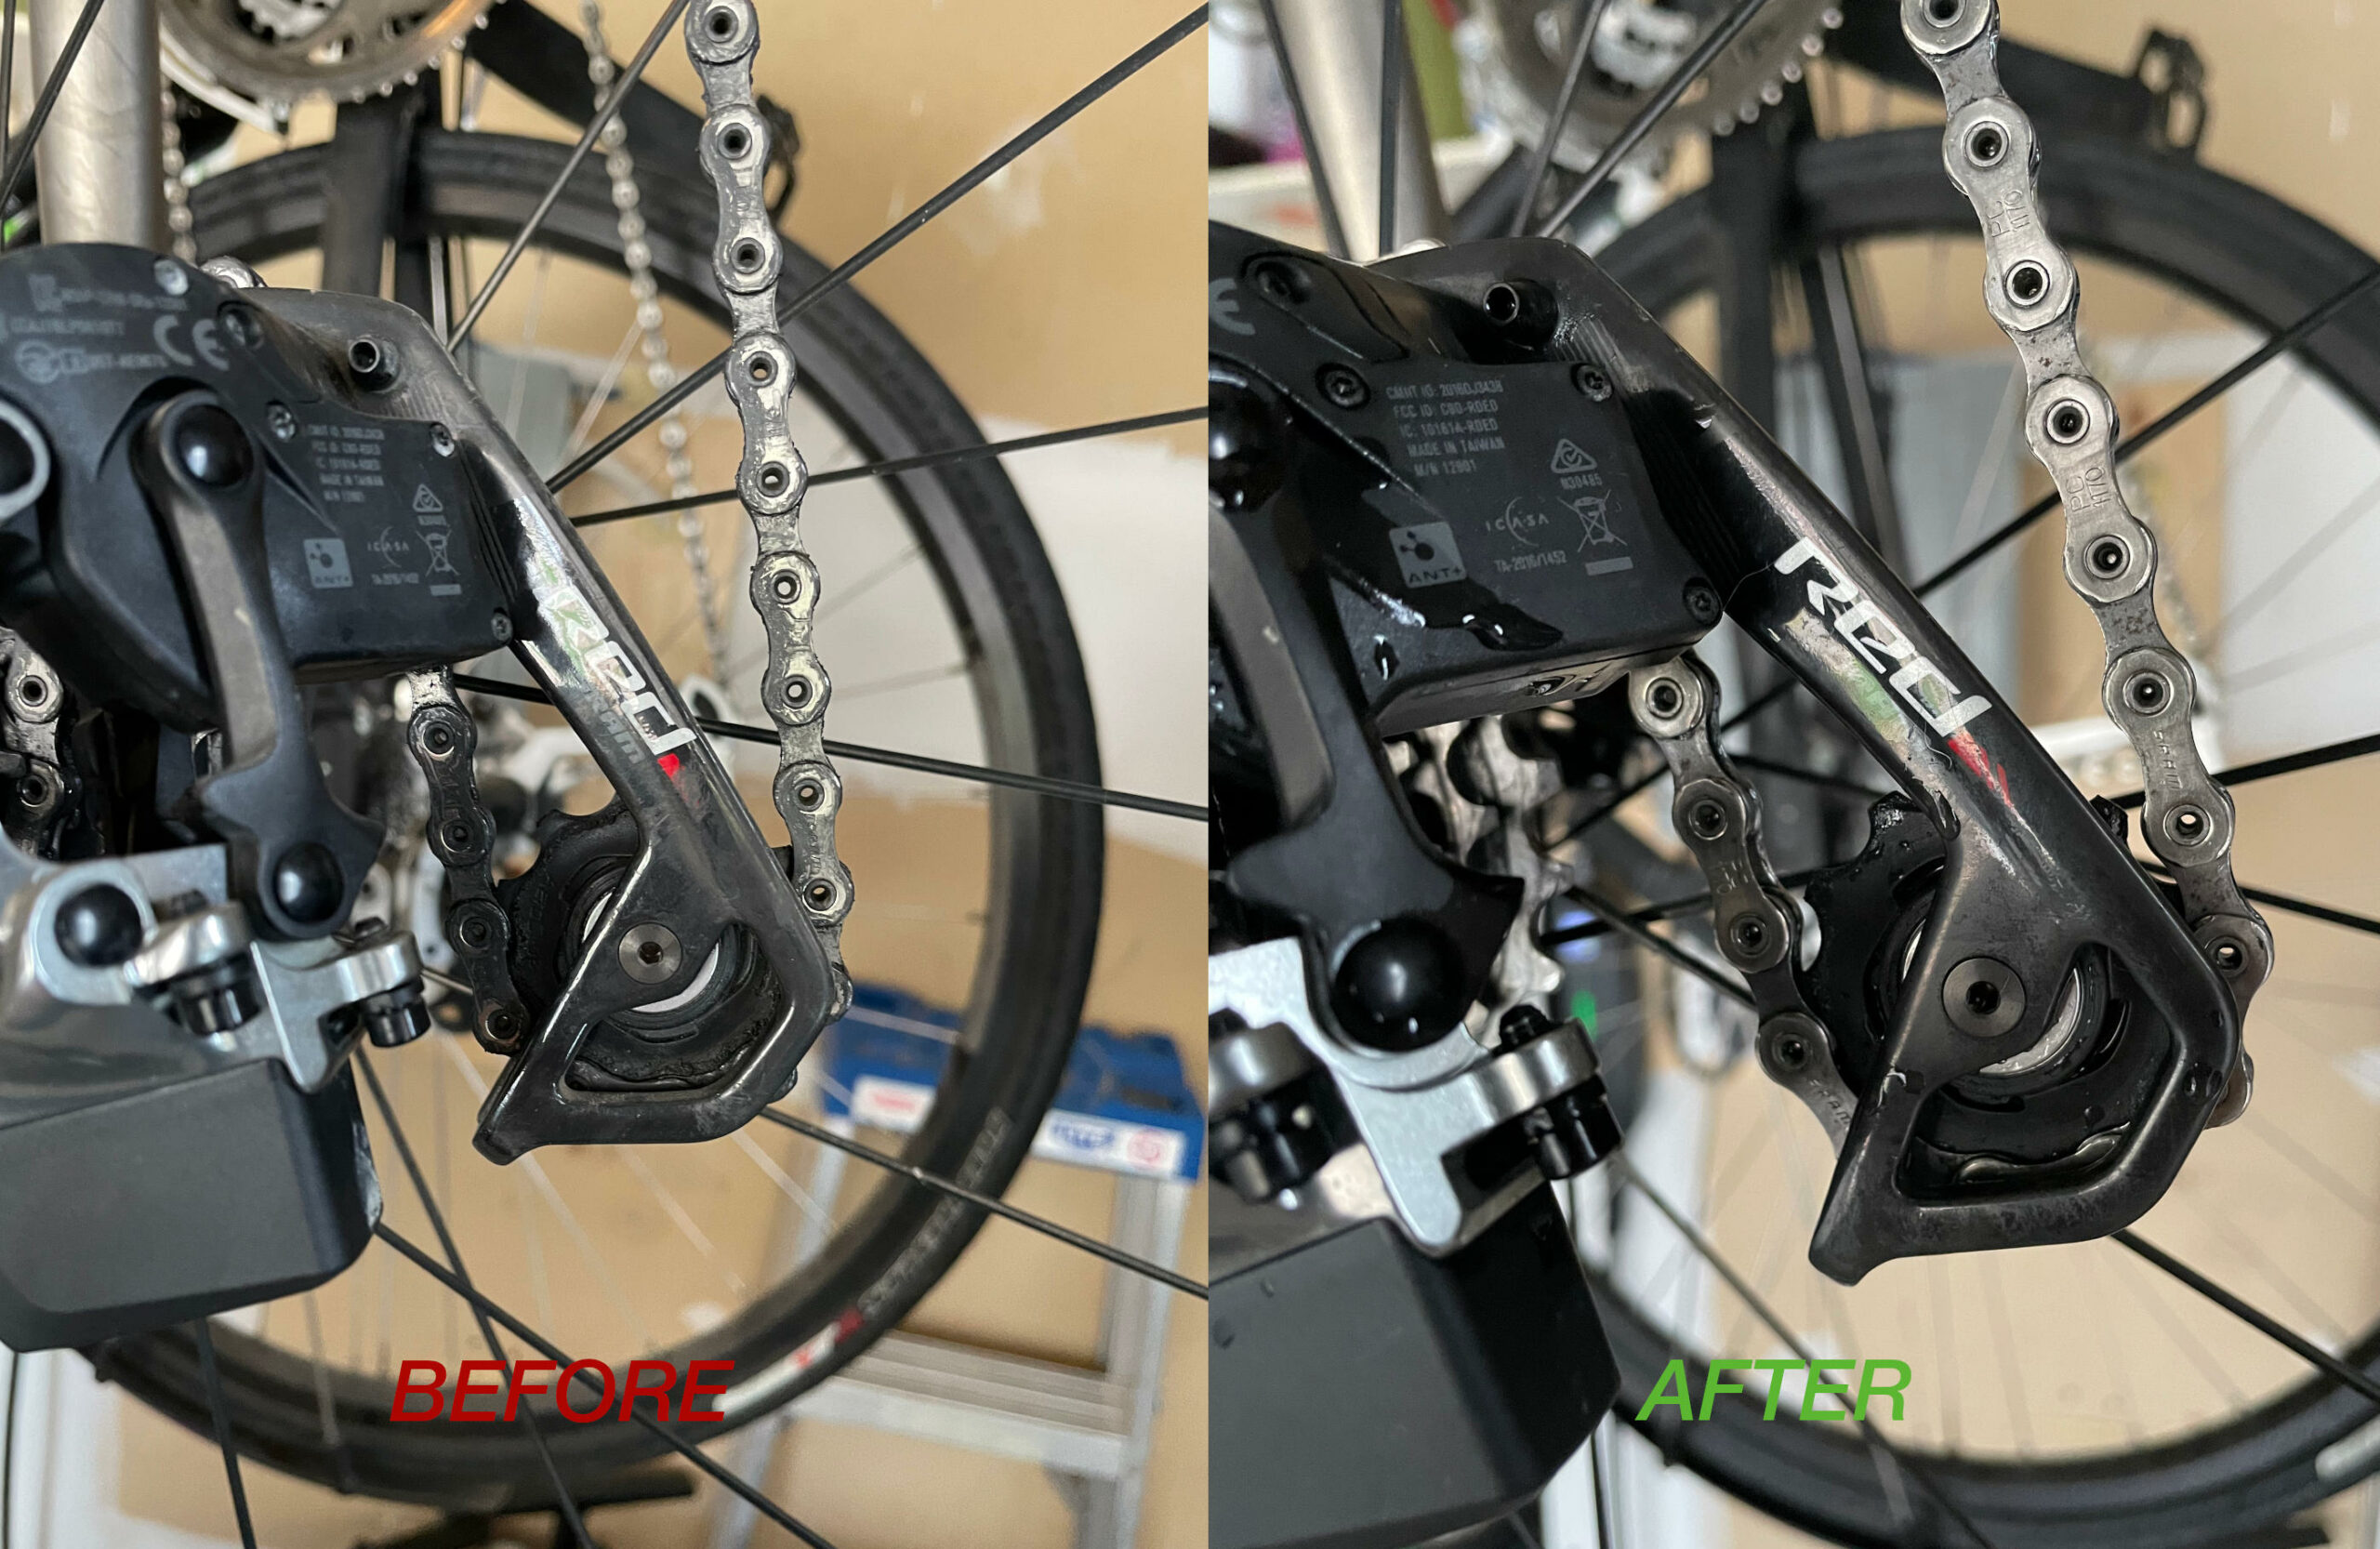
I took off the chain and put it in the ultrasonic cleaner with a “cap” full of Simple Green all-purpose cleaner from Canadian Tire with hot tap water. I then run the cleaner for 10 minutes. After the first cleaning, the chain already look pretty spectacular. I lift the chain and repositioned it in the cleaner and run it for another 10 minutes. Took the chain out, rinse thoroughly with my garden hose, and put it back on. Here is the result with no scrubbing:
Click above to enlarge
Another nice thing about using this technique is that while the ultrasonic cleaner is doing its job, you can scrub the bike down. This bike cleaning session is the easiest one yet.
In summary, I highly recommend that you get an ultrasonic cleaner!
Update: Someone asked about cleaning the ultrasonic cleaner. There was no issue whatsoever. The grease did not stick to the container, and all I had to do was pour the dirty liquid out and give it a quick rinse. That was it. Simple. I see others on YouTube use a ziplock bag to contain the chain and the detergent, but I opted not to do that.
At this point in time, all of our family members have our first dose of the Pfizer vaccine, and we are awaiting our second dose. As the Delta variant of the Covid-19 vaccine makes its way around the world, numerous reports are indicating that those who only have their first dose are only 33% protected from this variant.
Of course knowing this fact creates an a certain anxiety and urgency to get our second dose. Although we all have our second dose already scheduled when we got our first dose, those original schedules are weeks away. York Region today from 8am started taking appointments for rebooking second doses. This is of course very welcoming.
Unfortunately, as expected the scheduling web site experience leave very little to be desired.
I visited the site at around 7:50am, and it told me that I was in line and I had a 10 minutes wait. At this point, it is very reasonable, since it officially starts at 8am. I took the screen shot above, and as you can see the waiting time hasn’t really gone down and we have already passed our initial 10 minutes. To make matters worse, at around the 5 minutes mark, it immediately presented the booking form.
My sons who visited the site at 8am sharp got a waiting period of 1 hour. You can see how discouraging for some can be. Never mind vaccine hesitancy, it is these types of frictional booking experience that probably also discourages people from getting their doses. I really don’t understand why it is taking the organization so long to get there act together. Perhaps I’m being too harsh.
On the plus side, I did finally manage to book all members of my family for our second dose, because the site did allow me to make multiple bookings without having to virtually re-queue.
This is an update to my Sunroom Project that I detailed in a previous post.
After the installation of the solar panels, there was a question of whether the solar panels had enough juice to keep the batteries charge for cloudy days or night time operations. After a few days of operation, the observation is a definitive “no”.
The overall load of water pumps, fans, and temperature sensors amounted to be about 80W. The two solar panels (100W each, equaling 200W) during sunny days will only yield enough to cover this load. The less than optimal positioning on the sunroom’s roof will deprive the solar panels in operating in their optimal efficiency. Even on a really sunny day the panels may have a little surplus to give back to the battery, but nothing close to offer a continuous charge to the battery. Most of the time, the solar power is just enough to power the load and leave the battery as is. Left unattended, the batteries will slowly drain to nothing, as it is being discharged during cloudy days and at night times.
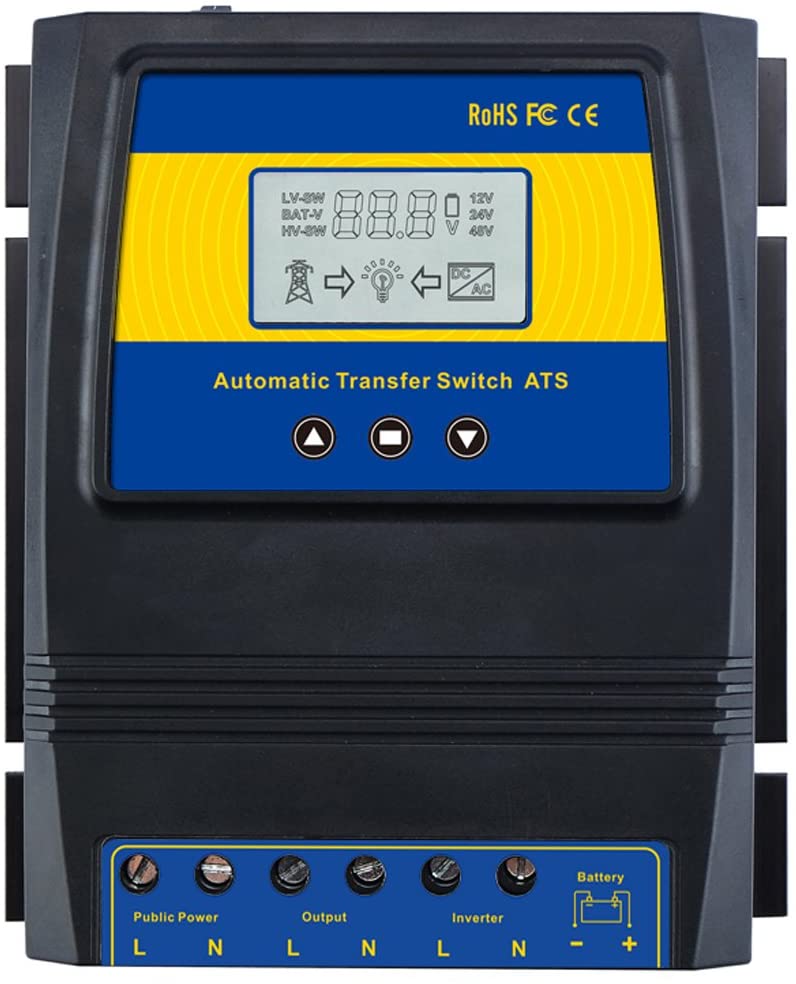
Automatic Transfer Switch from Amazon
So much for going entirely off grid! Since it is a sunroom, the roof based real estate is a bit precious, and two panels is as much as we wanted to take away from the sunshine that feed the plants. Not all bad news, we still have the opportunity to time shift our power needs from the grid, from peak time to non-peak time.
For the past few days, I had to go out to the sunroom during the evenings and switch the battery from solar power and back to the grid via the 480W DC Power Supply, so that it will charge itself back during the night. This is of course super inconvenient. What I needed is an Automatic Transfer Switch (ATS). Something like the one shown on the left offered by Amazon.
The price was pretty exorbitant, over $150.00, much more than what I wanted to spend. When there is a need, there is an opportunity to invent. I thought this is such a good opportunity to create my own ATS.
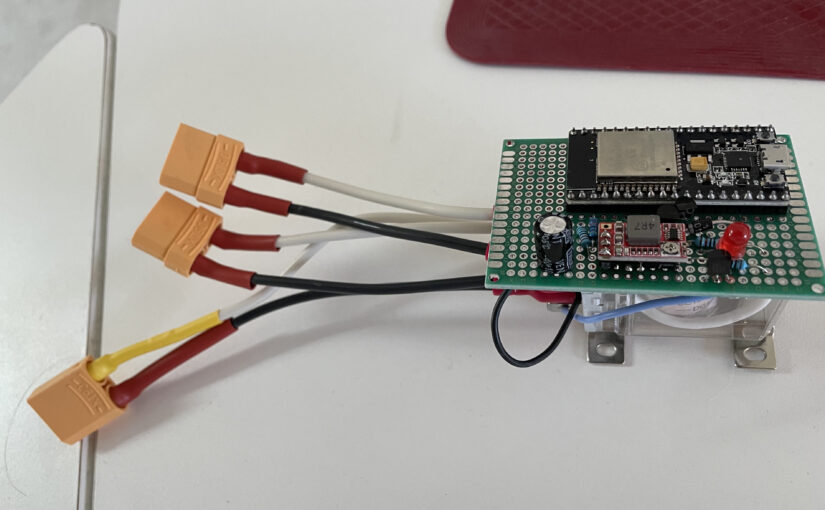
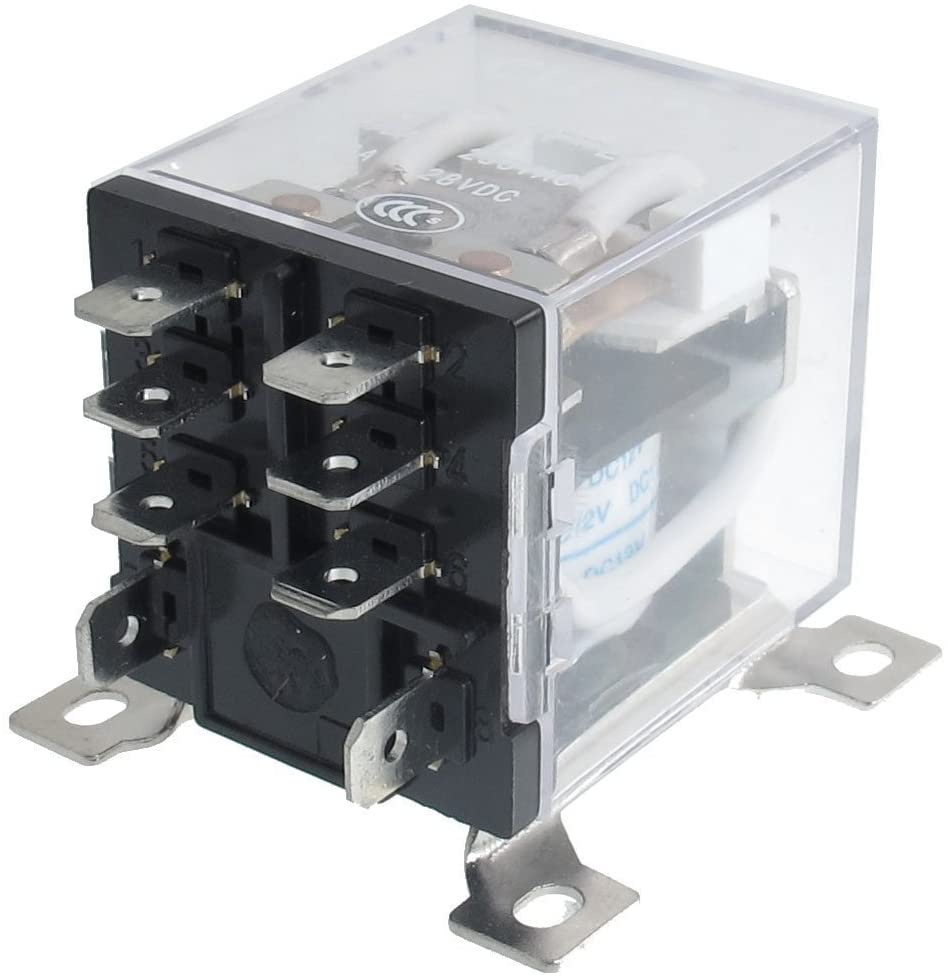
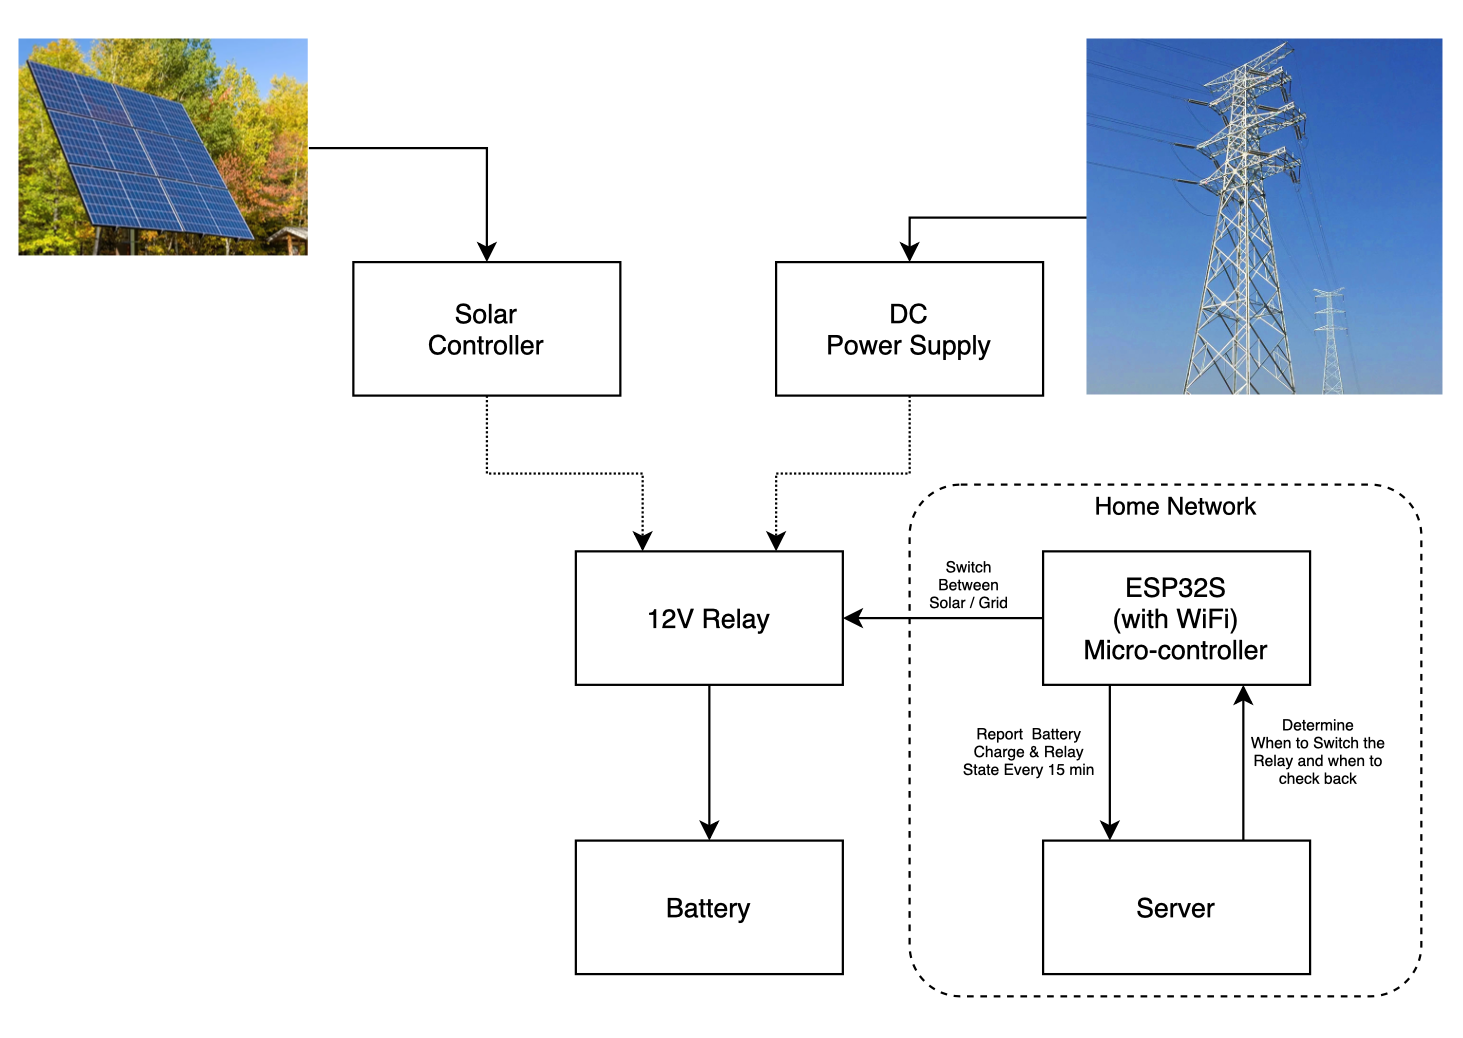
My ATS will be a simple 12V relay powered by the battery itself, and controlled by a WiFi capable microcontroller like the ESP32S that is perfect for the job. With a bit of searching on Amazon, I found this gem, a simple 12V relay that is only around $16.
URBEST 8 Pin JQX-12F 2Z DC 12V 30A DPDT
At most, the relay only needed to handle 10A, so the 30A rating is a total overkill, but good enough for my purpose.
I already have an ESP32S that I purchased earlier from AliExpress or Ebay. This is a WiFi enabled micro controller that can be programmed with the popular Arduino IDE. They were less than $5 a piece when I got them, and was literally sitting on my shelf awaiting for a project such as this. The master plan is as follows:
click to enlarge
The EPS32S will remotely control the relay, which physically makes contact between the battery with either of the solar controller or the power supply. The when is determined by a remote server on the same home network. The ESP32S will periodically post the battery voltage status and the current state of the relay to the server.
Using this approach, I can place the majority of the smarts on the server instead of the micro controller. I can also change the logic without having to reprogram the ESP32S.
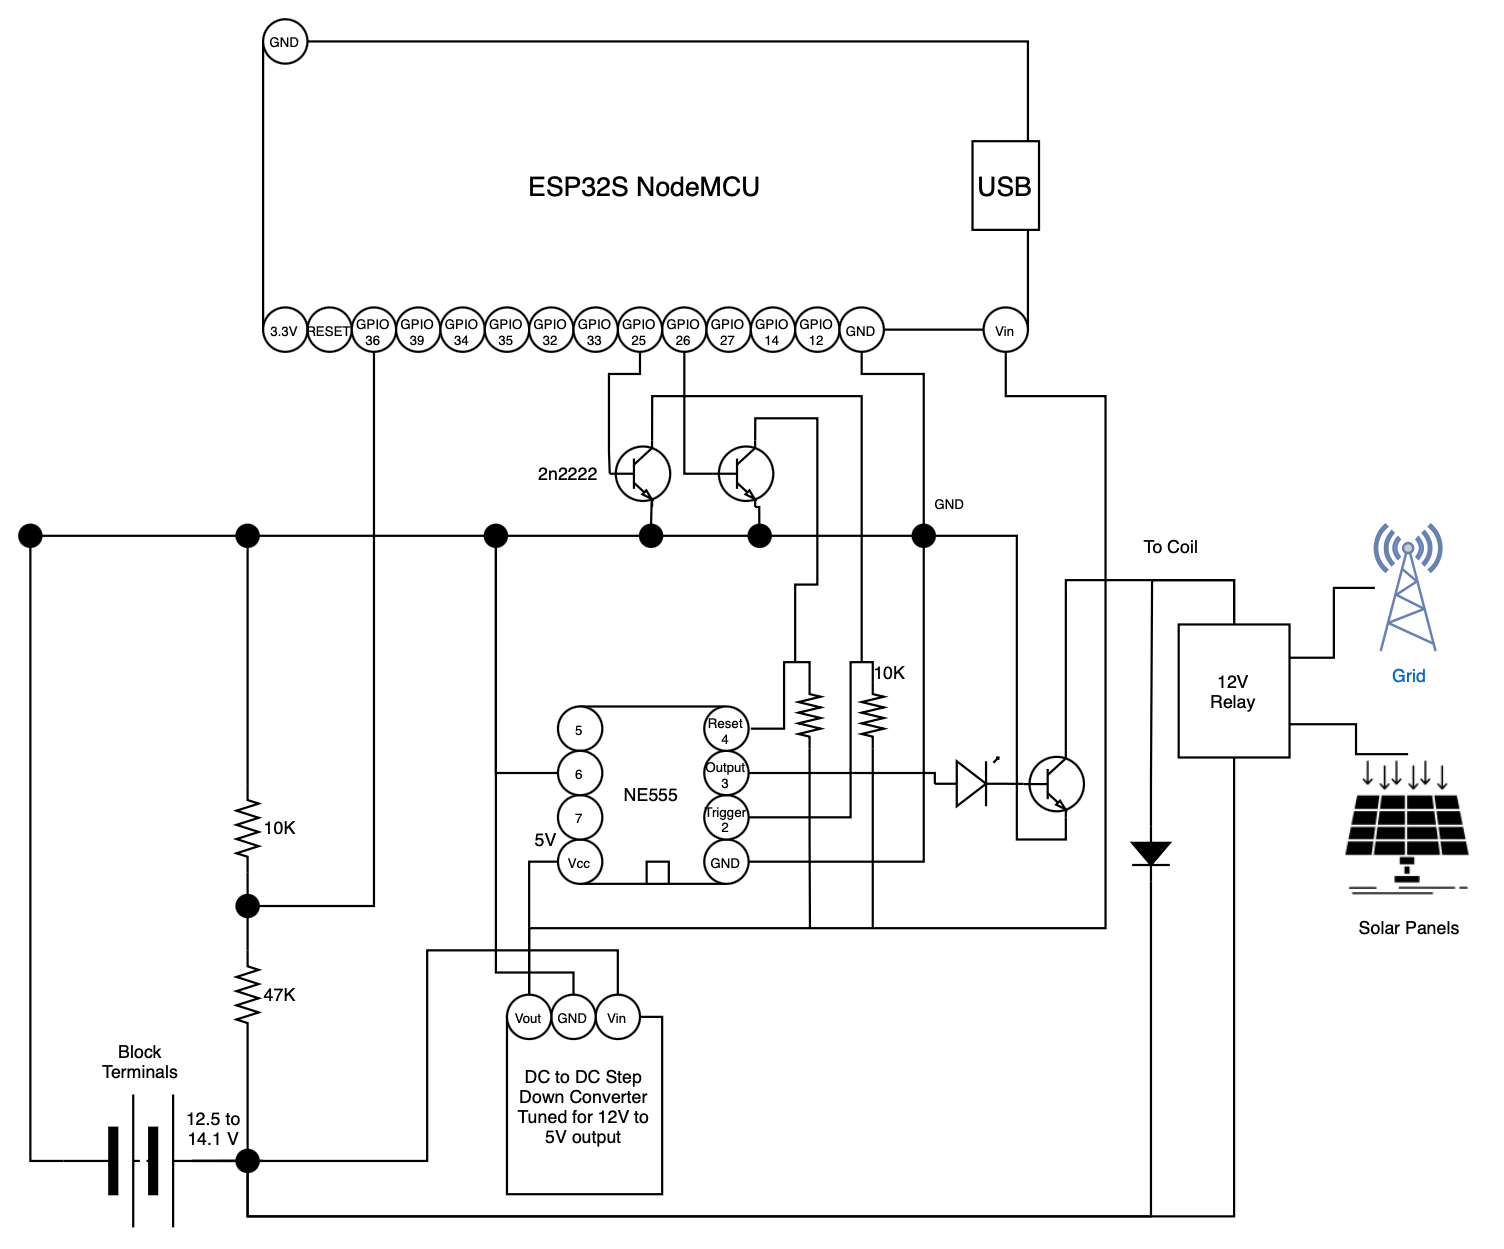
The ESP32S comes with many GPIO pins. We will make use of three of the GPIO pins, one to detect battery voltage via a voltage divider. The other two will send a pulse to a simple latch that will drive the switch position of the relay. The latch will use a popular NE555 chip in bistable mode. Here is a simple schematic that I put together.
click to enlarge
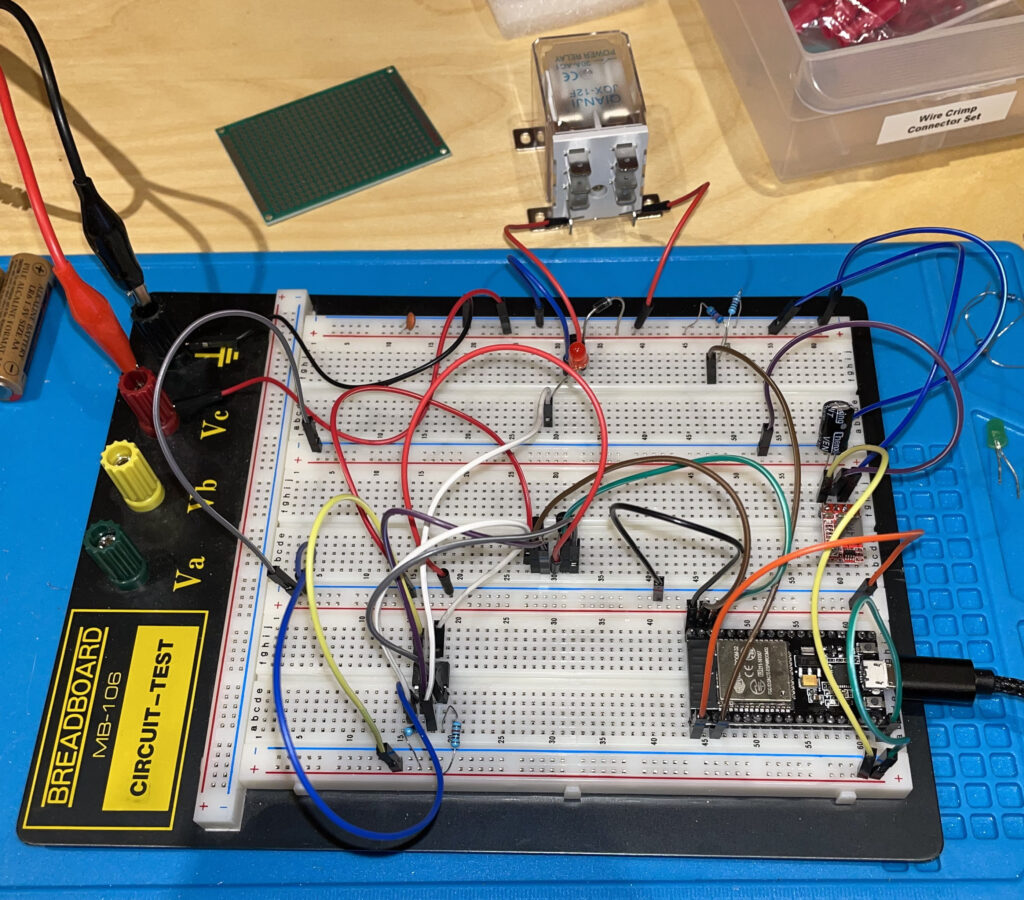
I prototyped the above circuit on a breadboard and using a desktop power supply to simulate the battery.
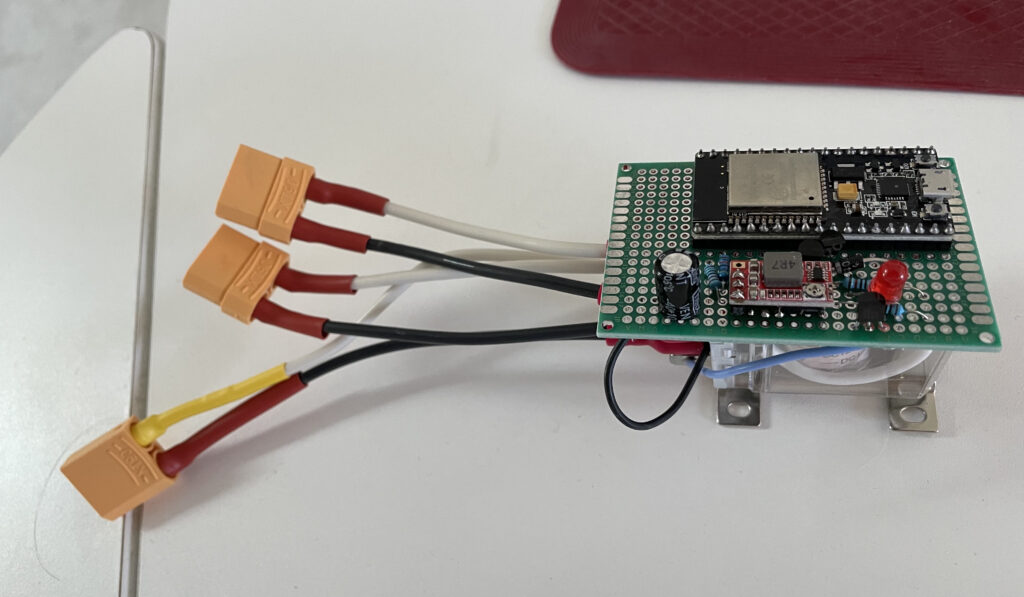
Everything worked as expected, and I proceeded to solder everything up on a PCB.
Below is the Arduino sketch that I wrote for the ESP32S to report the battery voltage and the relay switch state to my server.
#include <WiFi.h>
#include <HTTPClient.h>

/* Server and WiFi configurations are fake */

#define SERVER_IP "192.168.1.5"

#ifndef STASSID
#define STASSID "##############-iot"
#define STAPSK  "##################"
#endif

#define uS_TO_S_FACTOR 1000000

#define BATT_VOLTAGE_GPIO 36
#define GRID_PULSE_GPIO 25
#define SOLAR_PULSE_GPIO 26

float volt = -1.0;
RTC_DATA_ATTR int currentState = -1;

void setup() {

    pinMode(BATT_VOLTAGE_GPIO, INPUT);
    pinMode(GRID_PULSE_GPIO, OUTPUT);
    pinMode(SOLAR_PULSE_GPIO, OUTPUT);

    digitalWrite(GRID_PULSE_GPIO, LOW);
    digitalWrite(SOLAR_PULSE_GPIO, LOW);

    Serial.begin(115200);

    Serial.printf("Connecting to %s..\n", STASSID);

    WiFi.begin(STASSID, STAPSK);
    while (WiFi.status() != WL_CONNECTED) {
        delay(250);
        Serial.print(".");
    }

    Serial.print("\nConnected with IP: ");
    Serial.println(WiFi.localIP());
}

void pulse(int pin) {
    digitalWrite(pin, HIGH);
    delay(200);
    digitalWrite(pin, LOW);
}

// the loop function runs over and over again forever
void loop() {

    WiFiClient client;
    HTTPClient http;

    digitalWrite(LED_BUILTIN, HIGH);

    float v = 0;
    for (int i = 0; i < 200; i++) {
        v += analogRead(BATT_VOLTAGE_GPIO);
        delay(2);
    }
    volt = v / 200.0;

    Serial.print("Voltage Read: ");
    Serial.println(volt);

    http.begin(client, "http://" SERVER_IP "/autoTransferSwitch.php"); //HTTP
    http.addHeader("Content-Type", "application/x-www-form-urlencoded");

    // start connection and send HTTP header and body
    String postStr = "id=sunroom";
    postStr += "&volt=" + String(volt);
    postStr += "&state=" + String(currentState);

    int httpResponseCode = http.POST(postStr);
    digitalWrite(LED_BUILTIN, LOW);

    Serial.printf("Response code: %d\nResult: ", httpResponseCode);

    String instructions = http.getString();
    Serial.println(instructions);

    String result = "nothing";
    long sleepTime = 5L;

    char buffer[100];
    strncpy(buffer, instructions.c_str(), 100);

    const char d[2] = ",";
    int field = 0;
    char* token = strtok(buffer, d);
    while ( token != NULL ) {
        if (field == 0) {
            result = String(token);
        }

        if (field == 1) {
            sleepTime = atol(token);
        }
        token = strtok(NULL, d);
        field++;
    }

    if (result.equals("solar")) {
        pulse(SOLAR_PULSE_GPIO);
        currentState = 1;
    } else if (result.equals("grid")) {
        pulse(GRID_PULSE_GPIO);
        currentState = 0;
    } else {
        digitalWrite(GRID_PULSE_GPIO, LOW);
        digitalWrite(SOLAR_PULSE_GPIO, LOW);
    }

    http.end();

    Serial.print("Sleeping for seconds: ");
    Serial.println(sleepTime);

    esp_sleep_enable_timer_wakeup(uS_TO_S_FACTOR * sleepTime);
    esp_deep_sleep_start();
}
One nice thing about the ESP32S is its ability to go into a deep sleep where it can keep its state with almost zero power. This way, the micro controller doesn’t act as a power sink for the entire system. I took advantage of this feature, so that the server can also tell the ESP32S how long it should sleep.
On the server side, I have a simple PHP script that will take into account time of day, and the current battery charge.
<?php

date_default_timezone_set('America/Toronto');

// I've changed the location to protect my own privacy

$lat    = 42.9293;
$log    = -102.9478;
$zenith = 90;

$nextWait = 900;

// The voltage levels are ADC readings from ESP32 (divided by 10) and not actual volts

// voltage level when battery is fully charged and can either be used or be charged with solar
$solarChargeLevel = 280;

// voltage level when battery is okay to be used with or without solar (come off of grid)
$okChargeLevel    = 260;

// voltage level when battery must be charged (get on grid)
$mustChargeLevel  = 252;

$now = time();

$sr = date_sunrise($now, SUNFUNCS_RET_TIMESTAMP, $lat, $log, $zenith);
$ss = date_sunset($now, SUNFUNCS_RET_TIMESTAMP, $lat, $log, $zenith);

$srStr = date("D M d Y - h:i:s", $sr);
$ssStr = date("D M d Y - h:i:s", $ss);

$logFile = "/home/kang/log/autoTransferSwitch.log";
$dateStr = date("Y-m-d H:i:s");

header("Content-Type: text/plain");

$id      = isset($_POST["id"]) ? $_POST["id"] : null;
$batVolt = isset($_POST["volt"]) ? $_POST["volt"] : null;

// -1 = initial, 0 = grid state, 1 = solar state
$currentState = isset($_POST["state"]) ? intval($_POST["state"]) : -1;

file_put_contents($logFile, "$dateStr, " .
    "device reported: battery voltage: $batVolt and current state: $currentState\n",
    FILE_APPEND);

if (!is_null($id)) {

    if ($id === "sunroom") {
        $action = "nothing";
        $b      = intval($batVolt) / 10.0;

        // During day is defined by one hour after sunrise and one hour after sunset
        $duringDay   = (($sr + 3600) <= $now && $now <= ($ss - 3600));
        $duringNight = (!$duringDay);

        if ($currentState == -1) {
            if ($b <= $mustChargeLevel) {
                $action       = "grid";
                $currentState = 0;
            } else {
                $action       = "solar";
                $currentState = 1;
            }
        } else if ($currentState == 0) {

            // We are charging from the grid

            if ($duringDay && $b >= $okChargeLevel) {

                // During the day we want to use solar or the battery as much as possible;
                // This is a trickle charge so that we can take advantage of the sun.

                $action       = "solar";
                $currentState = 1;

            } else {

                // Otherwise charge until battery is full

                if ($b >= $solarChargeLevel) {
                    $action       = "solar";
                    $currentState = 1;
                }

            }

            if ($b >= 0.985 * $solarChargeLevel) {
                // We are getting closer to fully charge so
                // reduce communication interval from 15 min to 5 min
                $nextWait = 300;
            }

        } else if ($currentState == 1) {

            // We are either using the battery or the solar panels

            if ($b <= $mustChargeLevel || $now > $ss + 3600) {

                // Charge the batteries if we must or one hour past sunset

                $action       = "grid";
                $currentState = 0;
            }

            if ($b <= 1.025 * $mustChargeLevel) {
                // We are getting closer to require charging so reduce
                // communication interval from 15 min to 5 min
                $nextWait = 300;
            }

        }

        // for testing purpose
        // $nextWait = 15;
        echo ($action . "," . $nextWait);

        file_put_contents($logFile, "$dateStr, $batVolt, $action, " .
            "sun: [$srStr - $ssStr], new state: $currentState, wait: $nextWait\n",
            FILE_APPEND);
    }

}
The above state transition logic is pretty simple to follow so I am not going to explain it in depth here. There are a couple of features that I like to expand on.
By default, the sleep time is 15 minutes, but the server will shortened it to a shorter interval of 5 minutes when the battery is near empty or full. This sample frequency should be enough for the server to make the appropriate switching decision. Once a switch in the relay has occurred, the sleep time can be reverted back to 15 minutes. For debugging purposes, I can also change the server script to a very fast sample rate of every 15 seconds.
The other feature is the account of day and night time. This first version of the algorithm will attempt to use solar and/or battery during the day, and only charge from the grid when it is absolutely necessary. If we do charge from the grid during the day, we don’t need to fill it up, but only charge it to a level that can be used again. We will then attempt to top up the battery about 1 hour after sunset.
My ATS is now installed and operating for an entire day, so far so good and I don’t have to go into the sunroom any more to perform a manual switch. The algorithm can be further enhanced by getting additional readings from the solar controller, but I didn’t want to go through the trouble. I think what I have so far should be sophisticated enough. We’ll see.
2021-06-18 Update: After several days of operation, I noticed that the ATS, more specifically the ESP32 micro-controller hangs or fails to wake from deep sleep after a few hours of operation. Upon further investigation, it may be a combination of unstable supply voltage (from the battery), memory leaks of the standard WiFi libraries or the usage of String types. I am not sure. I had to re-write my ESP32 Arduino sketch to include a watch dog reset as well as perform a timed, software triggered hardware reset of the controller itself every 30 minutes or so. I also eliminated the deep sleep functionality and simply resorting to delays and resets. It has been running for about a week without any hiccups.