Last year on July 27, 2021, I placed a reservation for a RAV4 Prime with a Toyota dealer. It is now over one year, and the latest news from the dealer is that I am in position number three. However, they are currently only getting one or two cars a year!
Our initial take on the RAV4 Prime is that it is a hybrid, so it eliminates any range anxiety while still satisfies any day-to-day trips with a 60km all battery range. We have good experience with our Prius Prime which offers us a similar hybrid experience but with only a 35-40 km battery range.
Toyota RAV 4 Prime
While we continue the wait, it looks like many more electric vehicles (other than Tesla’s) are coming on the scene. There are recent additions from BYD, Polestar, Ford, Hyundai, and KIA. What caught my eye from a recent YouTube-surfing-session is the Hyundai Ioniq 5. This vehicle was introduced last December and is now “available for sale” in Canada. It has comparable range (~400km) and charge speed (350 kW DC) with the Tesla Model Y, sans the hefty price tag.
KIA EV6
The styling and look of the Ioniq 5 was not appealing to my taste. I then learned that the KIA EV6 is essentially the same vehicle but has a more traditional and sporty styling. Also a quick online build & price investigation showed that the Ioniq is a couple of thousand more expensive if we want to match the AWD long range trims.
So after much YouTube and online research, today I placed another car reservation for the KIA EV6. I opted for the trim named, AWD Long Range with GT-Line Package 1. I skipped the sunroof and the more fancied seats.
The bad news is that the sales guy is projecting a “three years” wait! He says that much of this will depend on supply chain issues. There is a good chance that it will be much sooner than the current projection.
On a side note, here is something else I discovered relating to KIA quality.
I did not realize KIA ranked so high. The Buick and Dodge brand frankly surprised me as well. I wonder the accuracy on the above report, so take it for what it’s worth.
Nevertheless, I am keeping the RAV 4 reservation to see what options I have in 2023. Today, I also discovered that the Model Y may get a price cut and start sporting the new LFP batteries from CATL.
We will see! Who knew that buying an EV in 2022 is so difficult! This does not bold well for the planet.
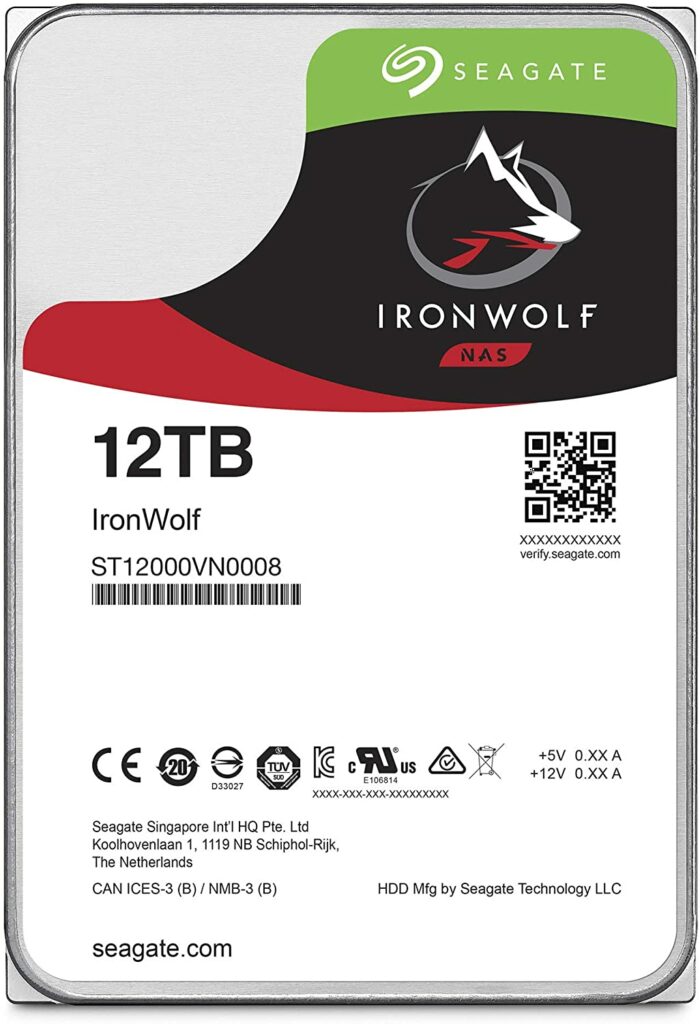
Our home Network Attached Storage (NAS) media server is going below 4 Terabytes of free space. The Seagate IronWolf 12TB hard drives were on sale with Amazon offering them below $300. I figure that I swap out two old 6TB drives with these new 12TB drives resulting in a net increase of a further 6TB of storage.
The last time this was done was around two years ago when I replaced 4TB and 6TB hard drives with 10TB hard drives.
So far the mdadm and LVM storage architecture has proven to be very flexible. I am able to mix drives of different sizes and able to grow our media storage volume over time.
Previously I had to make two swaps, each swap for each drive in the array. Effectively I am changing two 6TB drives for two 12TB drives because they are in a Raid 1 array. I cannot swap both at the same time, because I have to incrementally sync the data from the old drives to the new ones.
This has always been inconvenient because it means opening the physical server twice. However, this time I used my USB 3.0 HDD dock. I inserted one of two 12TB new drives into the dock, and then I temporarily created a three disks Raid 1 array. Once the sync is completed, which took 10+ hours, I remove one 6TB drive from the array configuration and I then physically replace both 6TB drives with both 12TB new drives in the server chassis, and place one old 6TB drive into the dock. The 6TB drive in the dock is the one that is still in the array configuration. I then add the second 12TB drive that is already in the server chassis to the three disk array. Once again, a sync is required to accommodate the second 12TB drive. This also took 10+ hours. Once the second sync is completed, I can finally remove the second 6TB drive in the dock from the array and have the array returned back to a two disk Raid 1 array.
The above description is probably quite confusing, but this technique allowed me to just have a single down time for the server instead of two when swapping hard drives in the server chassis.
There will be an additional downtime when I grow or resize the LVM volume and file system.
After this upgrade I should have the following Raid 1 (fully mirrored) arrays:
An array with 2 x 8TB
An array with 2 x 10TB
An array with 2 x 10TB
An array with 2 x 12TB
The above four arrays are combined into a logical volume using LVM that results in a total volume size of 40TB (fully mirrored) or a little over 36TiB of usable space (increasing from the old 31TiB).
We now have been running our net smart meter for more than a day now. I mentioned that we got our new net meter on this previous post.
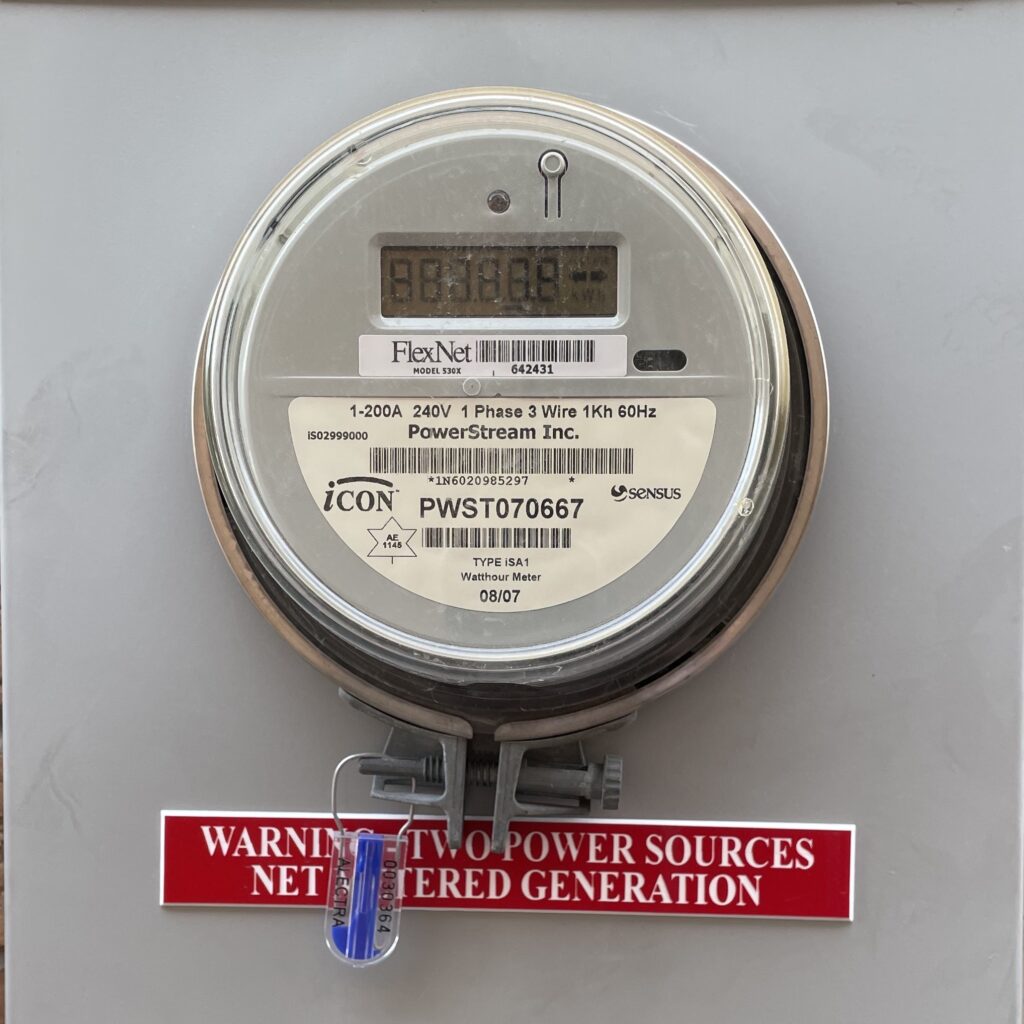
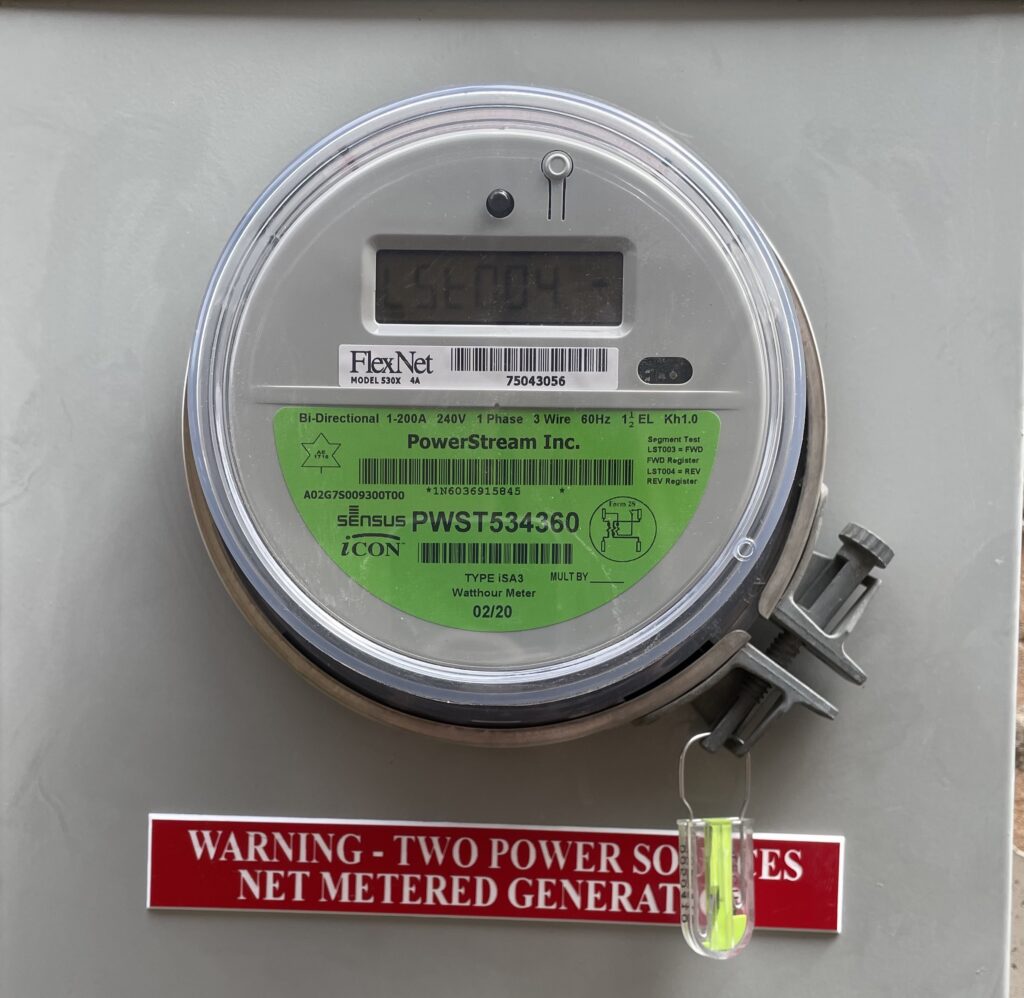
Of course I am now curious how to read the meter so that I can decipher how much electricity we sent back to the grid. Here is a short video of what the meter is showing:
Meter Display Sequence
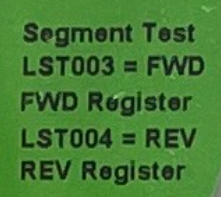
Initially the displayed information is quite cryptic, but looking at the meter’s label, I found this group of small prints.
These labels essentially tells us what is going on. The LED display cycles through 5 modes in total. The initial display is a segment test, which means all segments of the LED are displayed. This is a simple test to ensure that the LED display itself is functioning correctly. Next, it shows LST003, indicating that the next number it shows will be the amount of kWh of electricity that we ended up consuming or using. This is followed by LST004, another label indicating that the following number is the amount of kWh of electricity that is sent back to the grid.
Now with this new found knowledge, the above video shows that we used 13 kWh and exported 103 kWh since the meter was installed in the afternoon of May 4th.
In about 1.5 days, and bright sunny day yesterday, we generated and provided to our community electricity grid with a net of 90 kWh of energy.
Excerpt from the CBC article from Oct. 8th, 2021
There are 4 people in our house right now, and according to a recent CBC article our average carbon footprint is about 14.2 tonnes of CO2 per person. Doing a little more research, I found this white paper titled, “A Clearer View on Ontarios Emissions June 2019“. On page 8 of this paper, we see an annual average emissions factor (AEF) of 31 grams of CO2 per kWh. One tonne is 1,000,000 (a million) grams. This means to offset one individual, we need to offset 14,200,000 grams of CO2, and using the AEF this is equivalent to approximately 458,065 kWh!
To put this big number in perspective, I think our last month’s electricity bill only shows us using around 1,200 kWh of electricity.
It is clear that we will not be able to offset one of us, never mind all four of us by just using solar ourselves (at least not in Ontario). The idea of carbon neutrality is still a long ways off, and the above numbers show that we cannot do it alone. It will require every industry to do its part.
Update 2022-05-26 2:45pm: Took another reading outside. Used 313 kWh, Exported 1018 kWh, a net of 705 kWh. This with about 23 days of operation since May 04th.
Today is a good day. Alectra finally installed the net meter. From my previous post, I noted that without a net meter, any excess energy being sent back to the grid will be interpreted as usage. With the addition of the net meter, we can finally export our excess electricity from our solar panels without being charged for the generation. Instead, we can start earning and storing credits for the excess energy that we will supply to the grid.
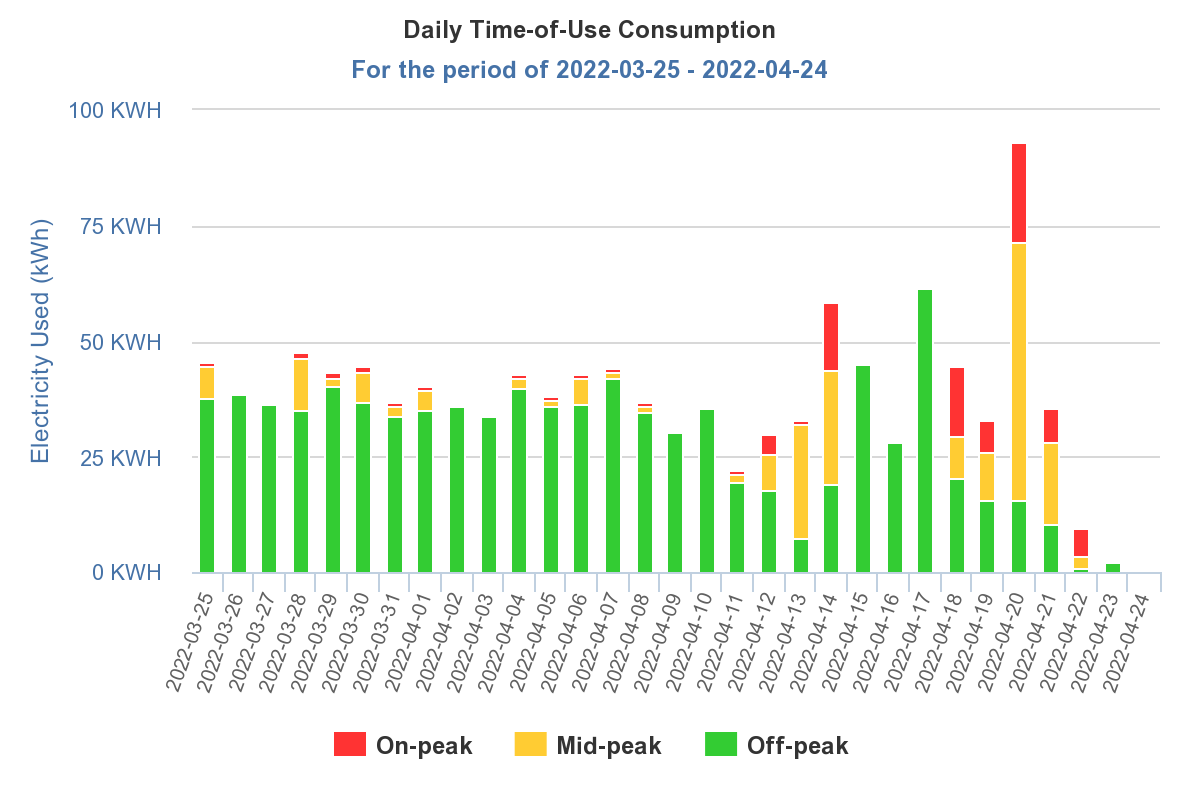
Prior to the presence of the net meter, we gained plenty of experiences on going off grid. Effectively even on a cloudy day, we were able to generate enough energy for the house and charge our batteries to get us through the night. Below is a depiction of our energy utilization from Alectra.
Started to go off grid on April 23rd
The process of getting this net meter installed was not an easy feat! It took 22 days from the time of ESA inspection (April 12th) to Alectra installing the net meter. In summary, we played with the solar system to see what it can do for 11 days (April 12th to 22nd), while paying for the excess generation, and went off grid for the remaining 12 days (April 23rd to May 4th).
The small usages from the 23rd to the 30th that you see above were primarily charging our Toyota Prius Prime from the garage. That circuit is still grid tied and is independent of our Solar system. I cannot get an updated chart that contains data all the way up to today. Perhaps Alectra is doing something in the background in preparation for them to switch to net metering. In summary, we were pretty much off grid from April the 23rd to around 2pm today (May 4th). There was one exception, when we charged our backup batteries during off-peak hours from the grid on the evening of the 26th. We didn’t have to, but I was bit anxious with the battery at 50% whether it will last through the night and to the next evening, so this was more of an insurance. As we get more experience, we now have the confidence that even during cloudy / rainy days in the month of April, we should have no problem charging the batteries from solar that will last to the next night time operation.
Our old unidirectional meter
Our new bidirectional net meter
Once again, I have to thank New Dawn Energy Solutions for their correspondence and baby sitting the net meter installation process, as well as closing out the building permit from Richmond Hill. I am certain there was plenty of red tape that must be cut by them to get to where I am today, so kudos to them!
Today was also the day when we completed our second audit with Enertest. Once again Nick Crosby, A Certified Energy Advisor did a professional job. This audit is mandatory for the participation of the Canada Greener Homes Grant program.
If you are thinking of installing solar, New Dawn and Enertest are partners and experts in your endeavours.
In my previous post, all major installations were completed. Since that time, the ESA inspection was completed and we validated our batteries so that we have confidence that they will last for more than a day in the worst case scenario (no sun). However at the time of this writing, we are still waiting for Alectra Utilities to switch out our old meter to a new one that is net-meter capable. Until this meter replacement occurs, every watt-hour (Wh) of energy we produce and send back to the grid, Alectra will charge us for it as if we are using that energy instead of producing it. Here is a summary of the timeline from panel installation:
Solar panels installation completed on April 8th;
ESA Inspection on April 12th;
New LiFePO4 batteries installed on April 18th;
From April 18th onwards, we tested the system through a series of scenarios;
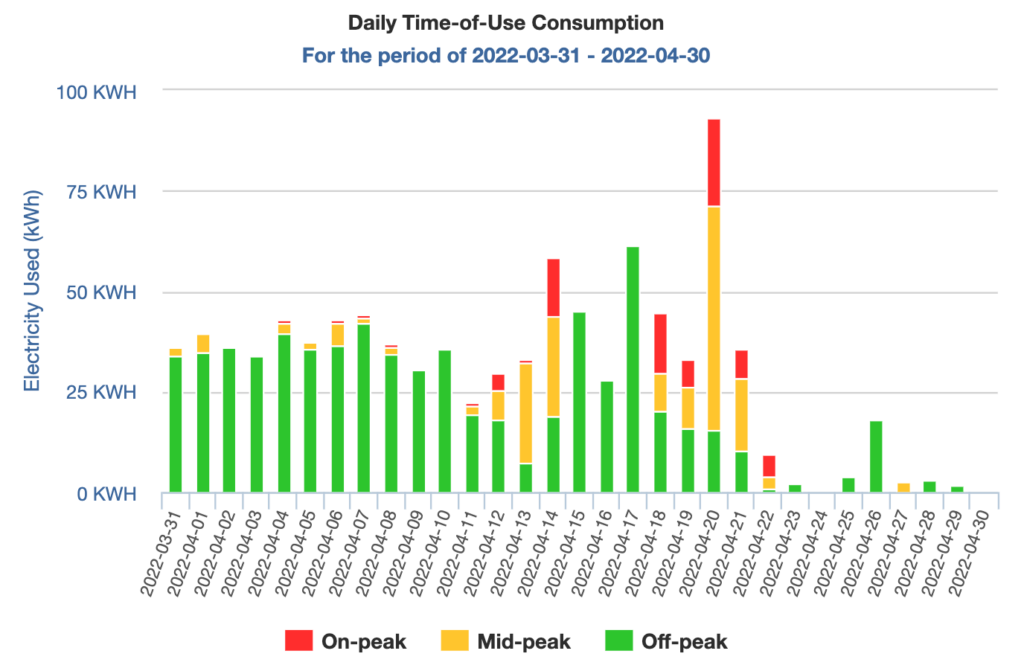
Our Utilization Chart from Alectra Utilities (click to enlarge)
So prior to the ESA inspection on April 12th, we continue our on-peak time shifting. You can see that there has been very little on-peak usage (red indicator) before April 12th. Once the ESA inspection is completed, we turned on our solar panels for the first time.
The erratic “usage” indicated in the above chart after April 12th, is a direct result of excess solar energy being exported back to the grid. Since our net meter has yet to be installed, Alectra sees it as usage, and unfortunately I will have to pay for that generation, very ironic if you ask me.
Nevertheless, we gathered much data in the last couple of weeks. We tested the system for both on grid and off grid operations. We tested with washer and dryer loads. Today on a bright sunny day, I even tried our air conditioner when we are off grid. The air conditioner started without any issues and worked with just solar energy, impressive. I will try again at night when we only use the batteries.
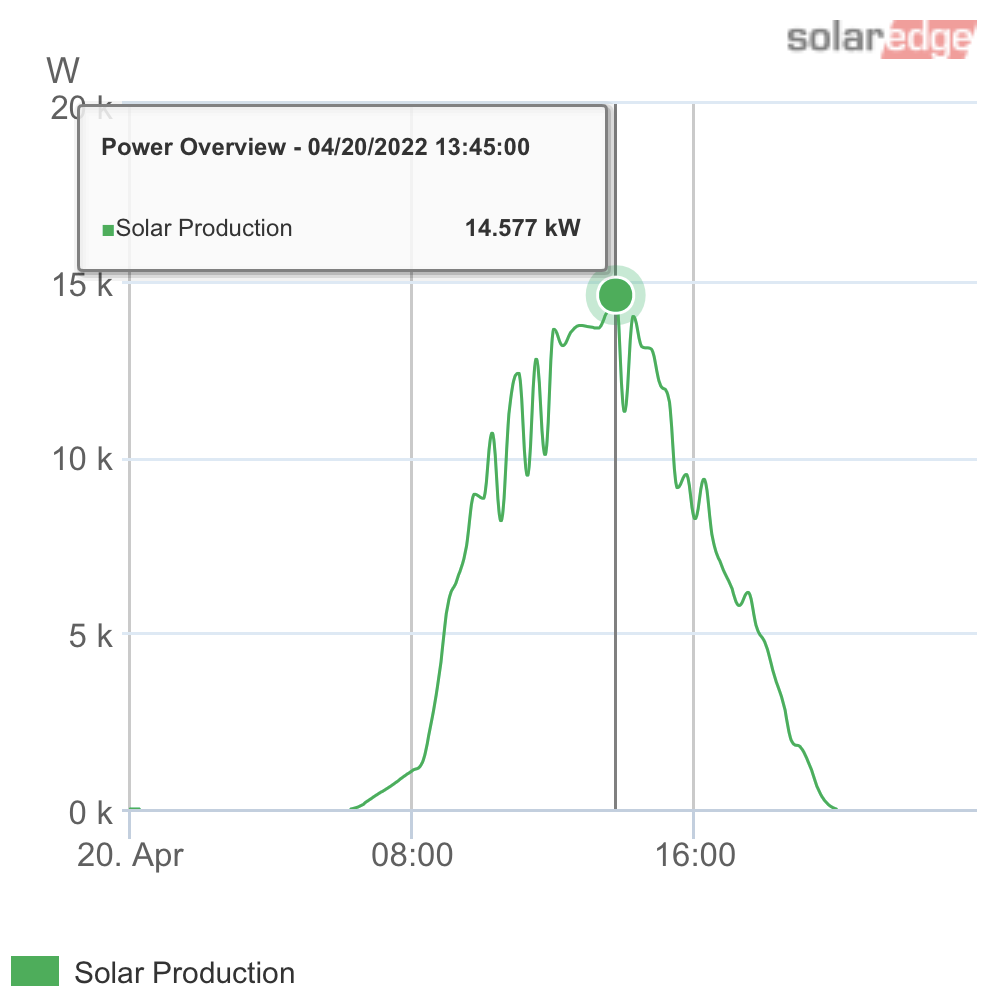
Let us take a look at our energy generation data that we collected so far. The information here is a surprise to us in a good way. The best way to show this is to provide the data for our best day performance to date.
Our best performance day (April, 20th), 103.63 kWh generated
On April 20th we had a beautiful sunny day. We generated 103.63 kWh of electricity, since the house could not use it all, we fed most of it back to the grid. This is an excellent run and really show what the panels are capable of. For comparison, our average daily use is between 30 to 40 kWh. This means our solar generation ability on a sunny day can easily cover 2.5 to 3 days. For those Tesla drivers out there, we can generate enough power to fill your “tank”.
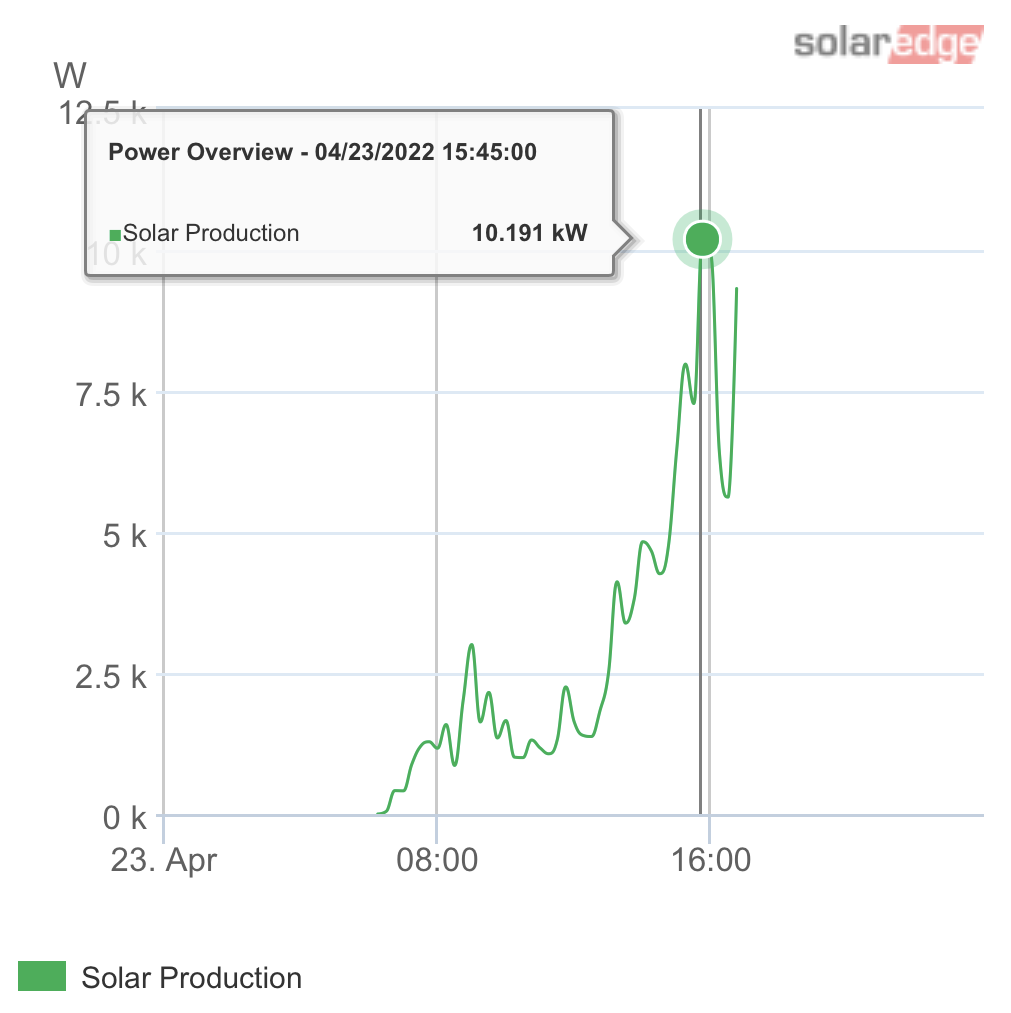
A rainy and cloudy morning and the sun came out at around 3pm. Total generation: 32.53 kWh (not whole day)
Yesterday was a rainy and cloudy morning, and the power generation on average kept up with house load usage. We woke up with the batteries at about 50% charged and the system managed to gain around 10% of battery charge at 3pm. After 3pm, the sun started to come out and the batteries charged rapidly. It easily reached 87% state of charge, and I had to shut the solar generation down at around 5pm, otherwise the energy would have no place to go, which leads to another major dilemma for off grid operation.
During on grid operation, the grid can regulate and absorb the excess energy generated by our solar panels. This is a huge convenience, which until we have the net meter, we really cannot take advantage of.
During off grid operation, we must use all the energy generated. Our supply must match demand and vice versa. This is where the batteries come in. They help to buffer or store the excess, and supplement any shortages. However, when the batteries are full and our usage cannot keep up with the generation, then the best option is to shutdown the solar, and shift our energy consumption to the batteries. Using the batteries will create more “empty” capacity, which we can later use to store more sun energy. I assumed, incorrectly, that this power regulation will be handled by the Schneider inverters. This is not the case, at least not fully. I am not going to go into details of Frequency Shift Power Control and other inverter deficiencies here, but suffice it to say that they are really not that smart. We will have to investigate on a more flexible power regulation mechanism for off grid operations in the future.
In the meantime, I have developed something myself that will monitor battery usage and solar power generation, so that I can determine when to turn on the solar and when to turn it off. Note that this is only for off grid operations. Once we have the net-meter, we can go back to on grid operations, and the convenience of the grid can act as the main regulator of power.
However, this is excellent experience as it teaches us some of the off grid challenges. There is no substitute for living through the experiences.
We hope the net-meter will arrive soon. Until then, we will challenge ourselves to see how many days we can stay off grid! You can already see our progress on the 23rd and the 24th of this month from the above Alectra utilization chart.
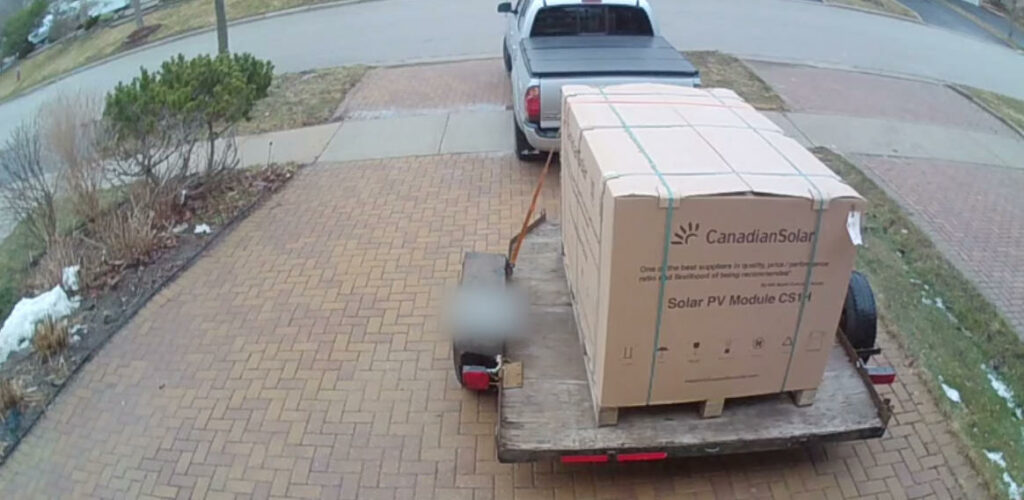
On March 31st, I saw the following picture from my garage security camera:
The Panels Have Arrived!
It took several days to install the 56 335W panels from Canadian Solar. We just finished the installation yesterday and we are now awaiting for ESA inspection and commissioning the system.
The weather was borderline cooperative, being wet and fairly high wind situations (gusting near 50 to 100 km/h at times). However the installers from New Dawn Energy Solutions soldiered on and completed the installation yesterday.
Instead of me blabbing about how the install went, here is a short video on the near daily progress.
Near Daily Progress of Installation
The system is now ready to generate power as soon as ESA inspection is completed and our power meter is changed for net metering. Hopefully this will happen in the next week or so.
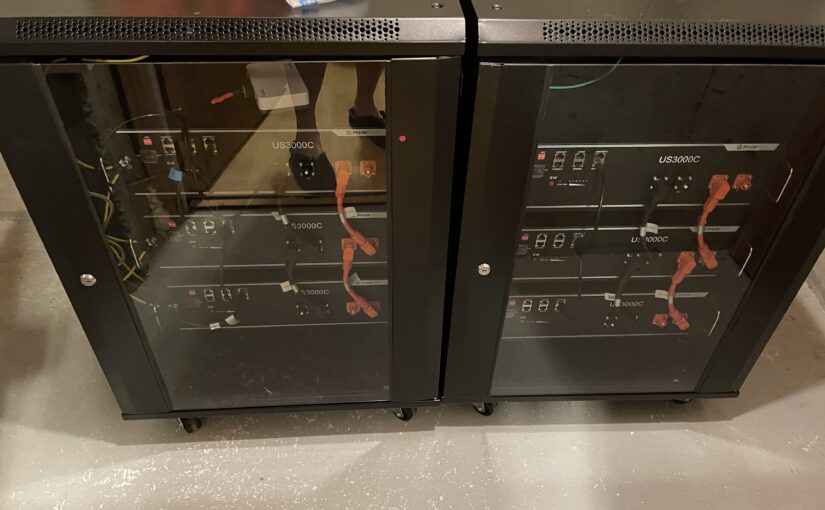
In an earlier posting, I outlined how we initiated our solar panel project. Although the current weather condition prevents us from installing the solar panels at this point, we can install all of our required inverters and backup batteries.
On February the 22nd, we connected our Schneider Hybrid inverters to the grid, and on the 23rd, we connected the Pylontech LiFePO4 (LFP) batteries.
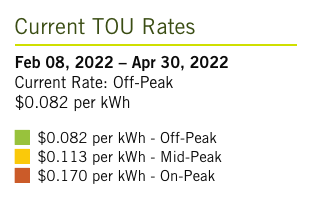
We configured the inverters so that the batteries will be discharged during the peak hours and charged during off-peak hours, effectively performing consumption time-shifting so that we can take advantage of the lower rates:
From Alectra Utilities
As you can see the savings are quite significant, more than 50%.
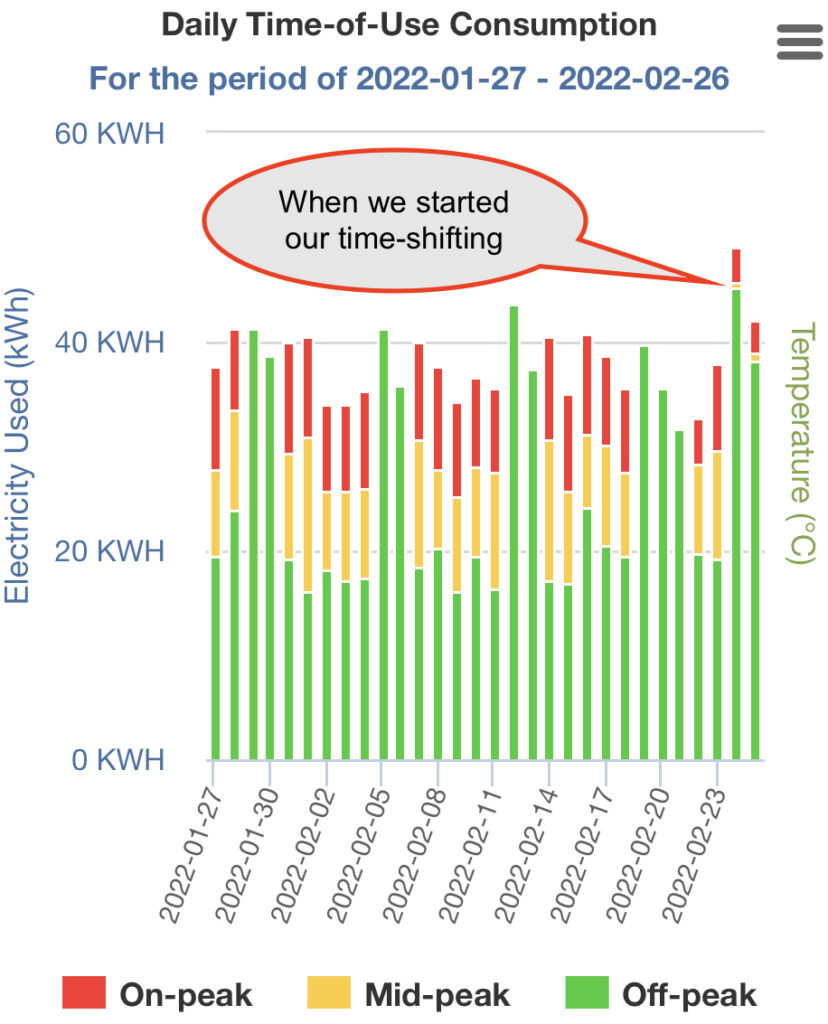
On February the 24th, was our first full day of usage when we tested our time-shifting configuration, and we found that it worked quite well. The battery capacity was enough to cover all of our on-peak hours usage save for the last remaining on-peak hour period.
Notice that we have more green in the off-peak hours because we are storing that capacity in the form of battery storage. I will play around with the configuration some more to see if I can shift the uncovered, on-peak hour to the mid-peak period, so that I have enough battery capacity left to cover all the on-peak periods.
I want to give a big shout out to New Dawn Energy Solutions. They have been very professional and really know their stuff. Any one thinking of installing a solar and/or a battery backup solution within the Greater Toronto Area, should seriously consider them. I highly recommend them and hope to do more business with them in the future.
Stay tune, and I will continue my progress here on the blog.
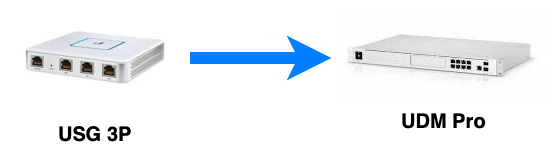
As I indicated in a previous post, I wanted to upgrade my old USG firewall to the new UDM Pro. In that post, I have outlined my reasons, so I will not repeat them here.
I wanted to perform the upgrade with a minimum amount of downtime. With several household members who are online constantly for both school work as well as for entertainment, any perceived downtime will result in a typical earful, which I would rather avoid.
In preparation for the upgrade, I performed the required backups for both the Unifi Video and the Unifi Network Controller applications that are both previously running on my NAS server. I copy the backups to an old MacBook Air that I will use as my console to setup the UDM Pro. I wanted to make sure that I stop both the unifi and unifi-video services on my Ubuntu NAS. We do not want to risk some sort of conflicts when we plug in the UDM Pro.
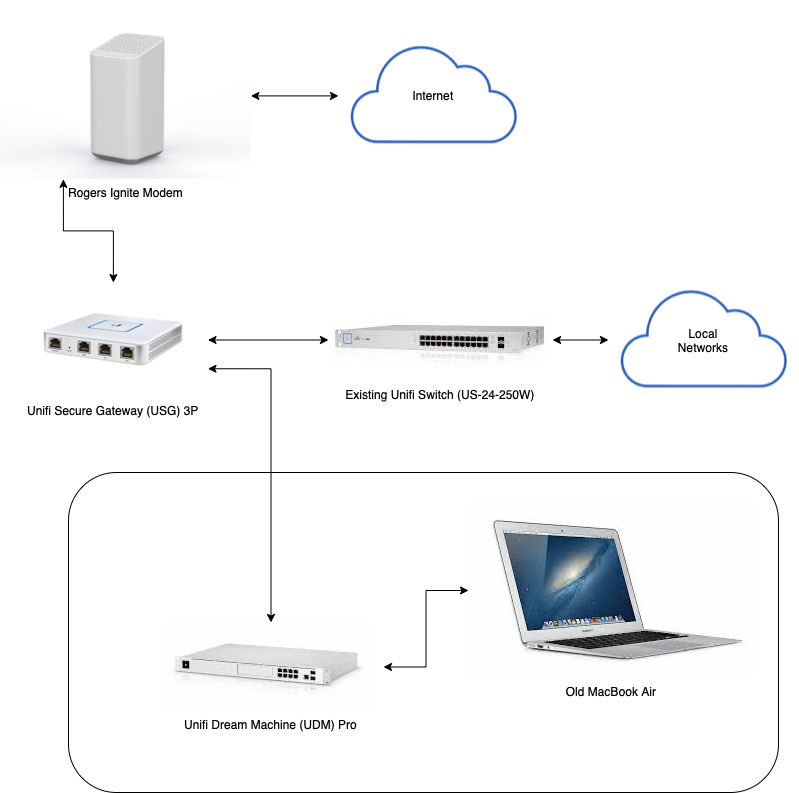
I also configured the old USG LAN2 port so that it will provision a network that has a separate IP subnet different from all of my existing networks. In my case, it was 10.10.11.1. I did this so that I can connect the UDM Pro into the LAN2 port of the old USG, which mimics my Internet Service Provider (ISP). This way, while I configure and setup the UDM Pro, my existing home network can continue to function and provide the require services to my household.
Connections used for UDM Pro setup
The setup connection layout looks like the above diagram. After the UDM Pro booted up, I used Safari to point to 192.168.1.1, which hosted the UDM Pro’s web administration interface. Since I already had a Unifi account, I used that to login initially. Once logged in, I proceeded to upgrade both the Network and Protect applications on the device. The Network application was upgraded to 6.5.53, and the Protect application was upgraded to 1.20.0. I am not planning to use the Access and Talk applications, but upgraded those any ways in case of any outstanding security holes.
I then open the Network application and performed a restore from the backup that I previously copied on to the MacBook Air. This restore worked without a hitch. All of my configurations and network and WiFi settings were ported over. The UDM Pro also automatically created another user from my old restore, which I promptly switched over, and disabled the external access to the UDM Pro, call me paranoid. I did a restart of the device to make sure that it boots back up smoothly. Once I have confirmed that everything is still okay, then I proceeded to shutdown the UDM Pro.
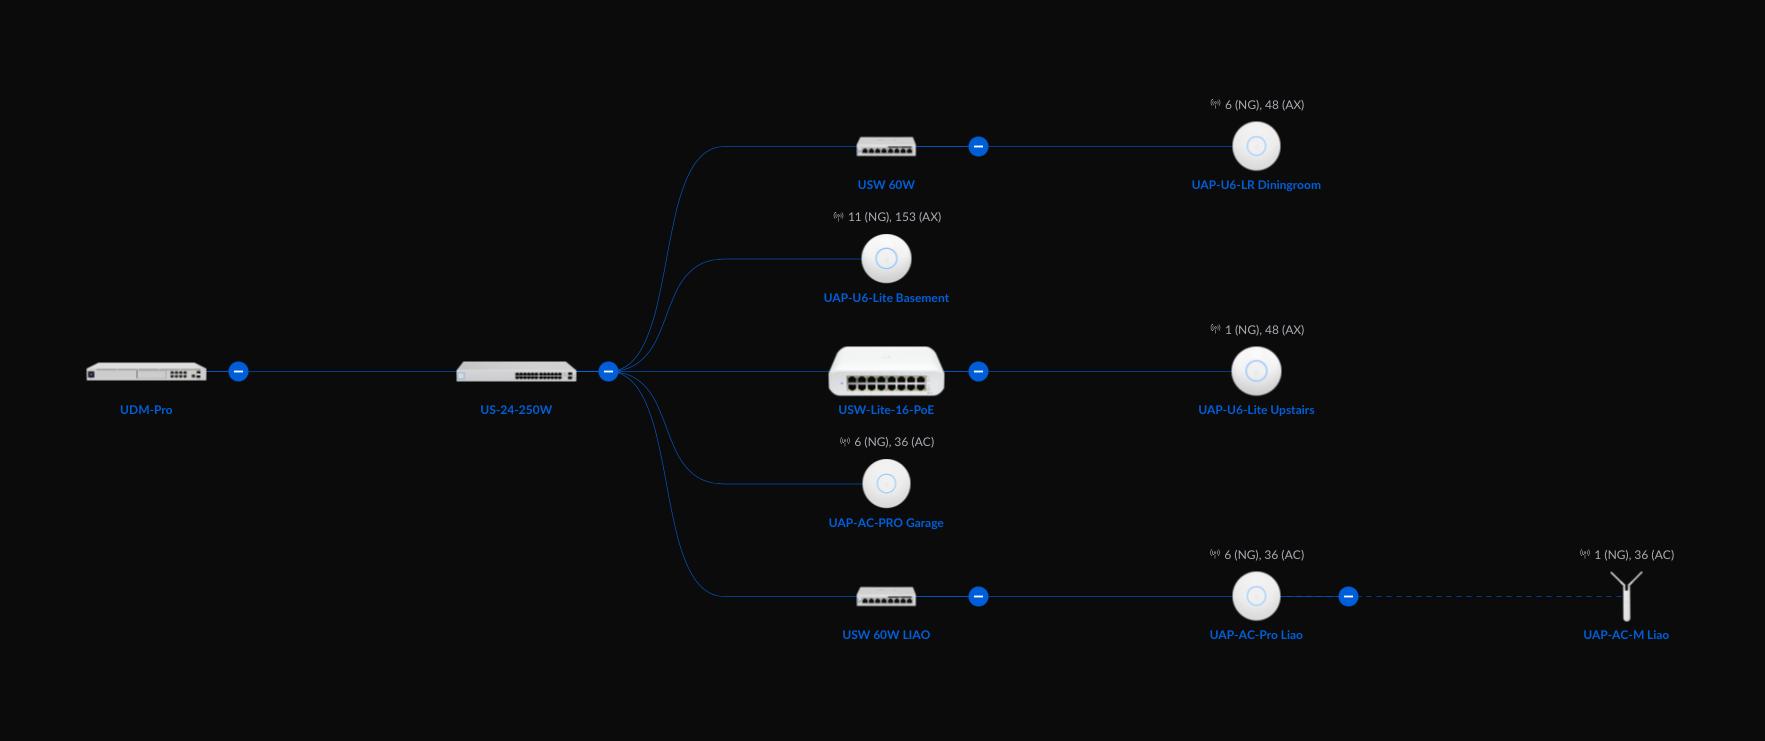
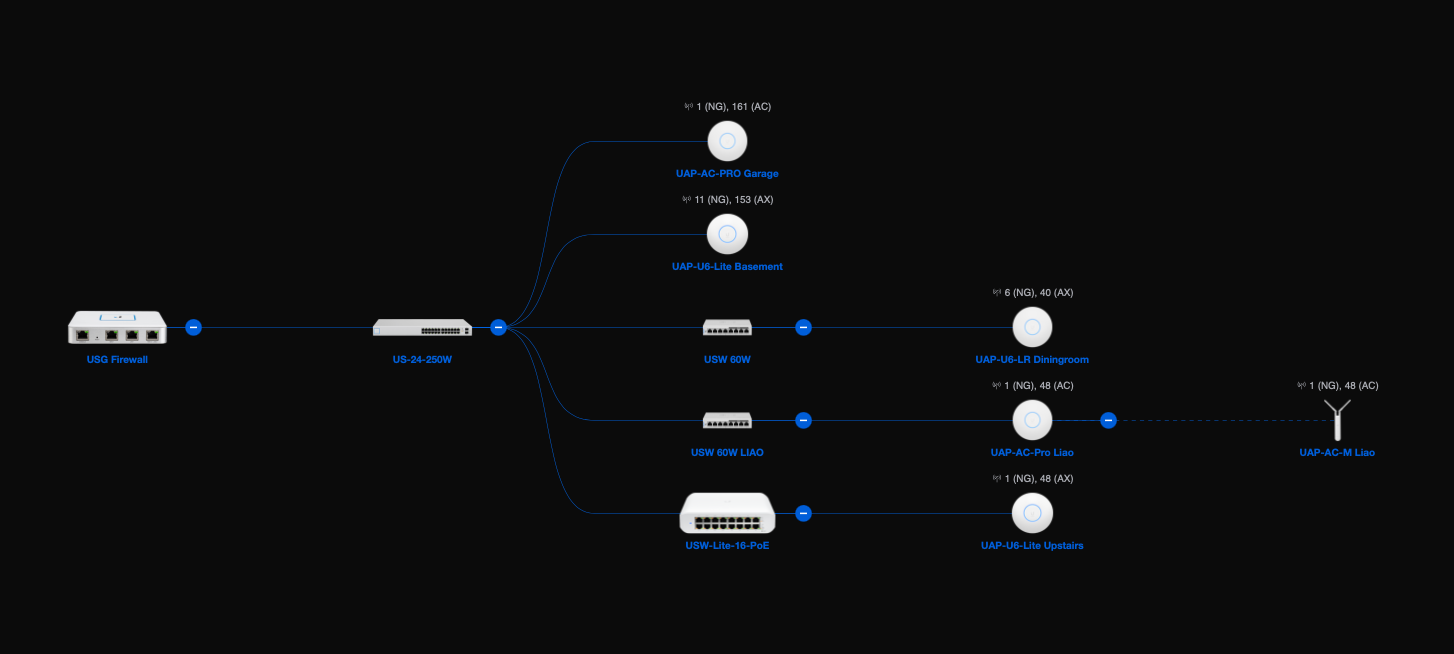
Before I make the physical swap, replacing the USG with the UDM Pro, I ssh into each Unifi managed device, switches and access points to ensure that the inform URL is reachable. Once I was satisfied of this, I then proceeded with the swap. Now my network looks like this:
Post upgrade layout (click to enlarge)
My expectation was that once the UDM Pro boots up and the Network application comes online, all the Unifi networking devices will automatically be managed by the UDM Pro. The reality however was slightly different. On the plus side, the network is fully functional and the only down time was the time it took to perform the swap and the boot up process of the UDM Pro, no more than 5 minutes. However on the down side, when I inspected all the devices (not clients) within the Network application, only one of all the devices successfully registered with the new Network application. I was a bit puzzled and miffed.
After about an hour’s investigation, apparently some devices did not like the inform URL to be http://unifi:8080/inform. I specifically picked the hostname instead of the IP address because it was changing from my NAS server to the UDM Pro. Unfortunately for some unknown reason, only a single Unifi access point UAP-AC-Pro made the jump and was successfully adopted by the UDM Pro. All the other devices went into a state of a repeated adoption loop. Even rebooting the devices did not help.
To remedy the situation, I had to ssh into each of the remaining devices and manually performed the following command (twice):
set-inform http://192.168.168.1:8080/inform
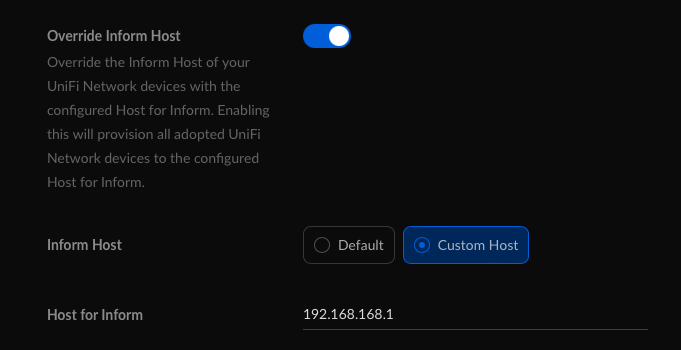
I am uncertain why I had to do it twice, but the first time did not work with the Network application. Once all the devices were adopted, I then proceed to configure the Override Inform Host settings on the UDM Pro. See below:
Note that the above settings were only in the New UI and missing form the Class UI
I had to set the above and not the default, because the will ubnt did not work, perhaps this had something to do with my Pi-hole configuration. Also, although by this point all the devices were connected, there were two remaining access points complaining about a STUN issue. When I check their respective logs, the STUN URL was incorrect because it retained the old unifi hostname. It was at this point, I decided to let the Network controller to push out an IP address based inform URL for all the devices.
I perform another reboot of the UDM Pro just to make sure we have transition stability over a power outage, and everything seems to be running smoothly now.
The restore of my Unifi Video configuration with the new Unifi Protect application on the UDM Pro was way more smoother. I dear say flawless. However, there was a minor hiccup. I run Homebridge at home to connect my Unifi Protect G3 Flex cameras to my HomeKit environment. This relied on an RSTP stream that was previously supported by Unifi Video. However the new Protect application used RSTPS, which is an encrypted version of the stream. Long story short, I had to switch from the Camera FFmpeg to the Unifi Protect plugin. Not a big deal, but I was super glad that the Unifi Protect plugin existed for Homebridge.
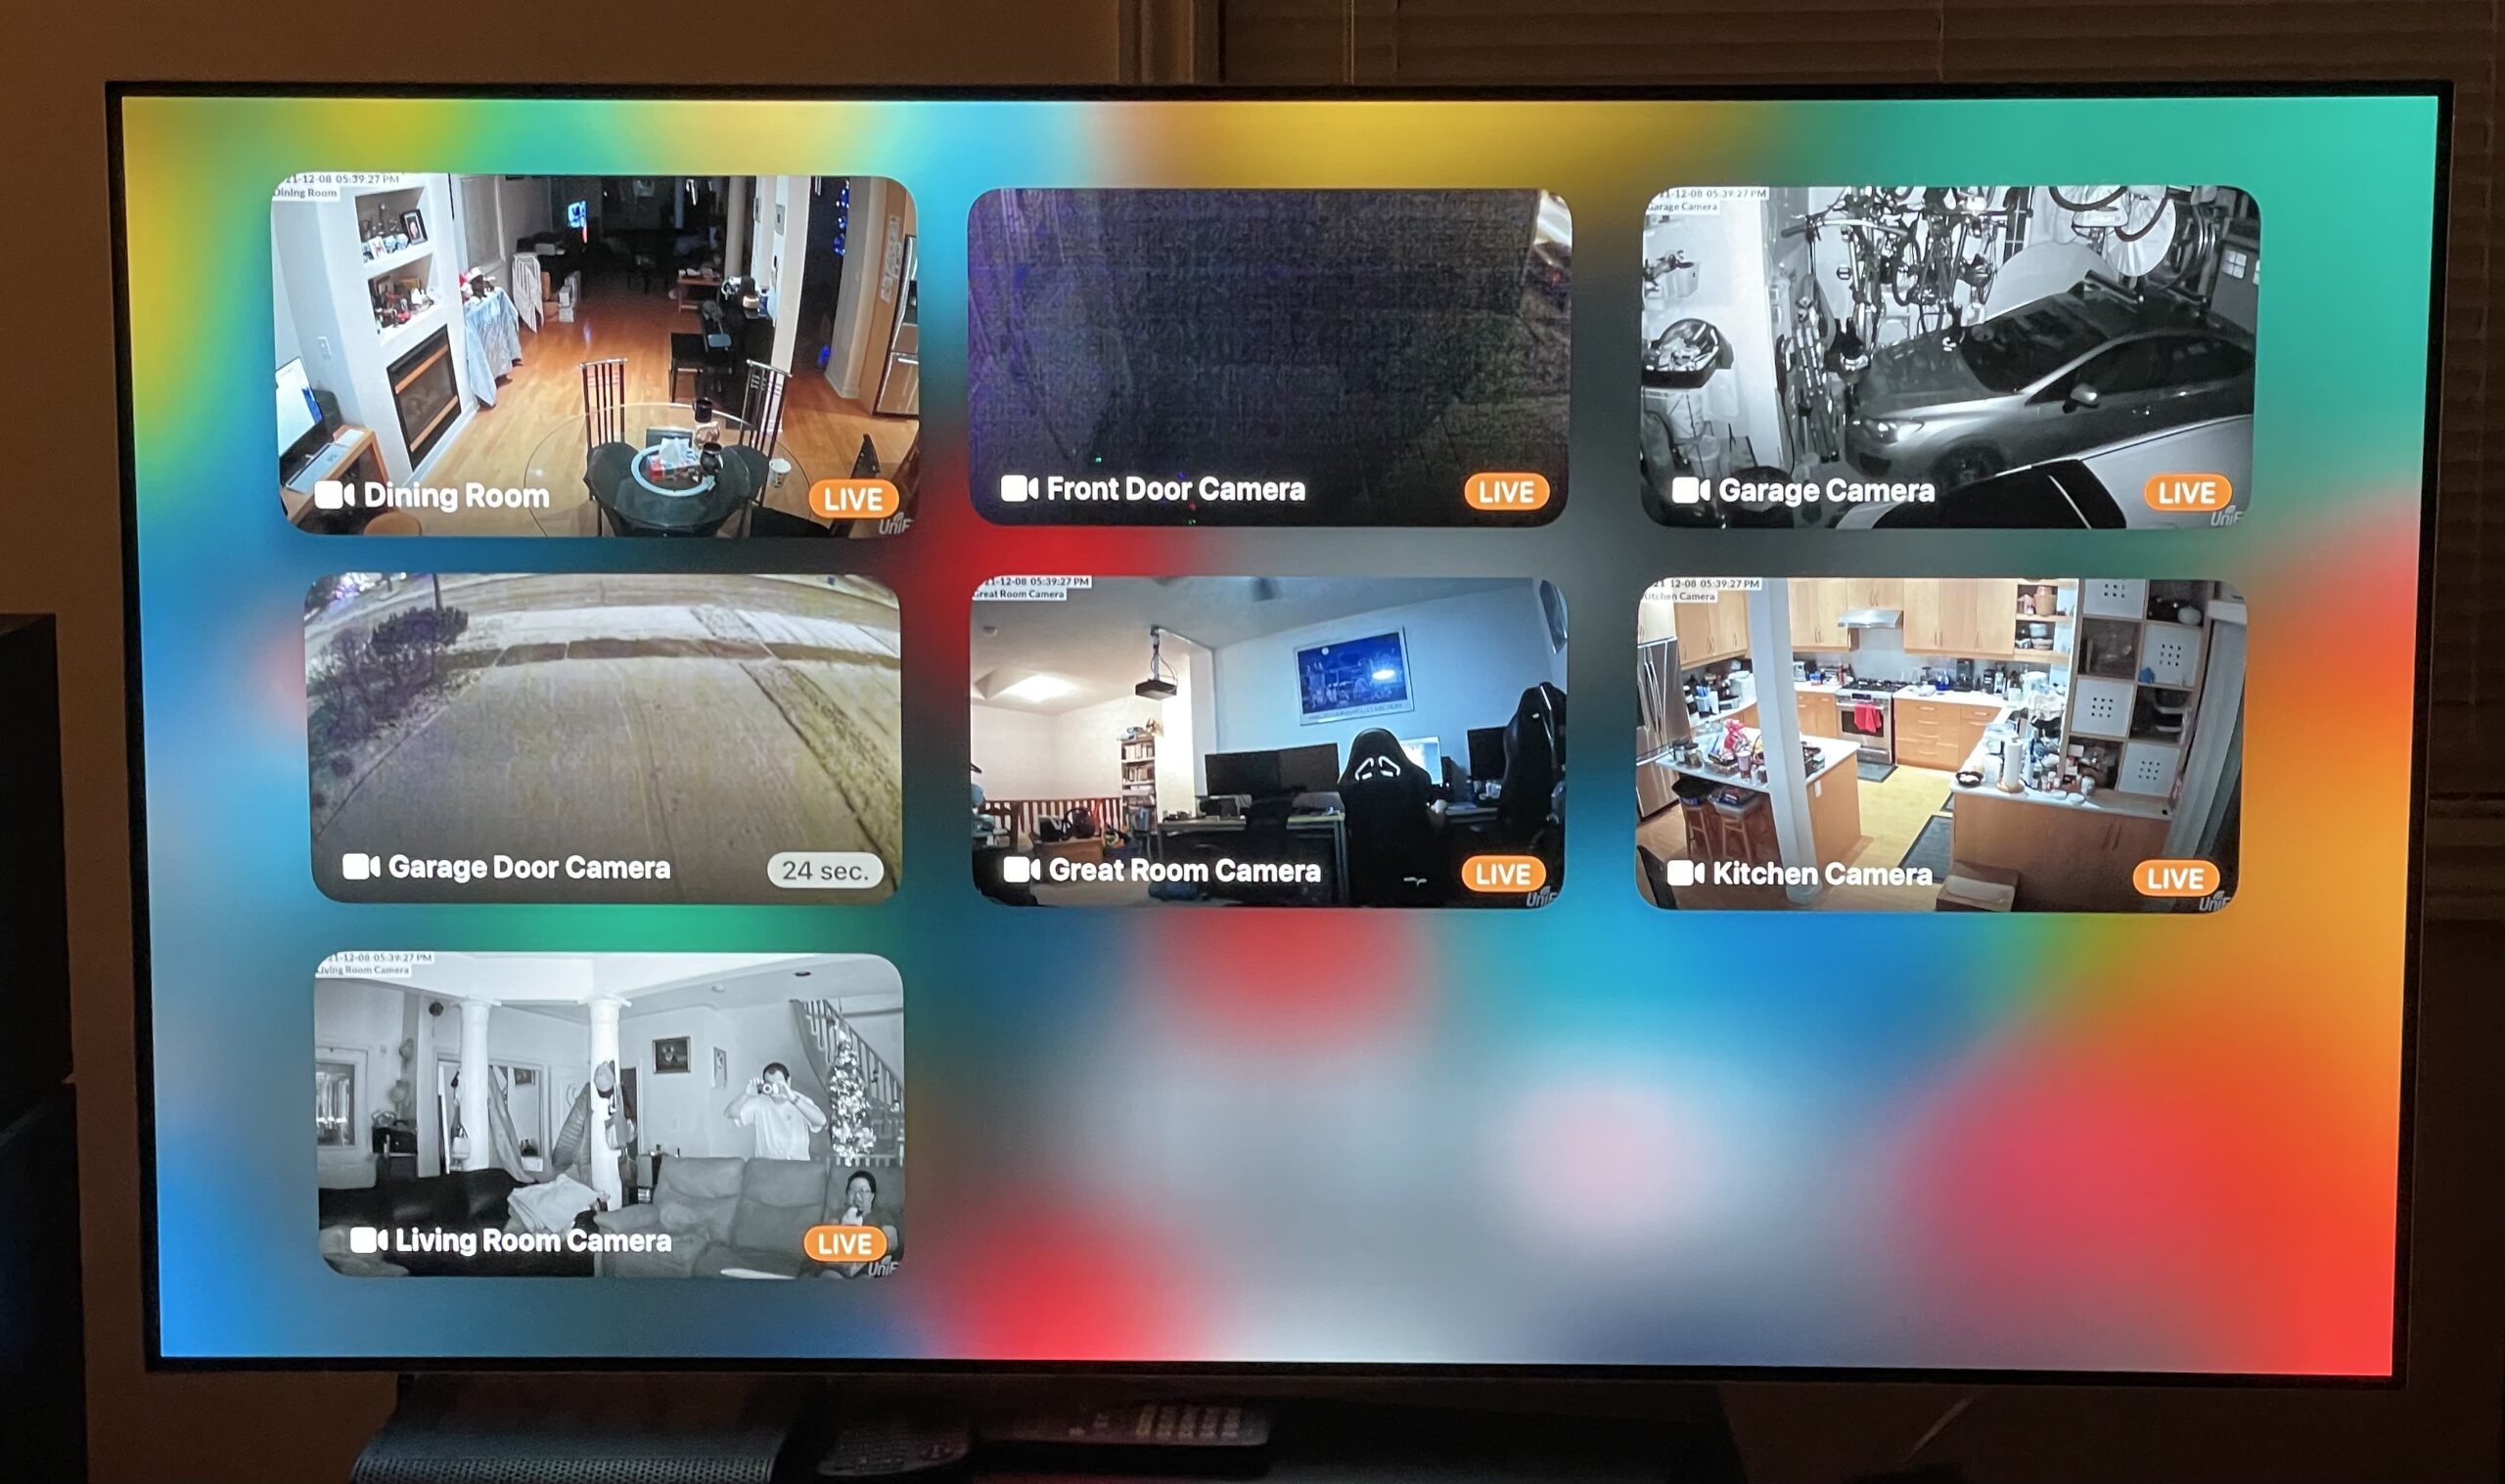
Now our inside security footages are recorded (up to a month), and motion detection is a lot faster. The application to find and view the videos are now more convenient. On top of that, live previews are also available within my Home App on my iPhone, iPad, as well as the Apple TV.
A gallery view from my 4K TV using Apple TV and HomeKit
The outdoor footages are still using Kuna, but I plan to perform a future upgrade using Unifi G4 Bullet cameras for the outside as well.
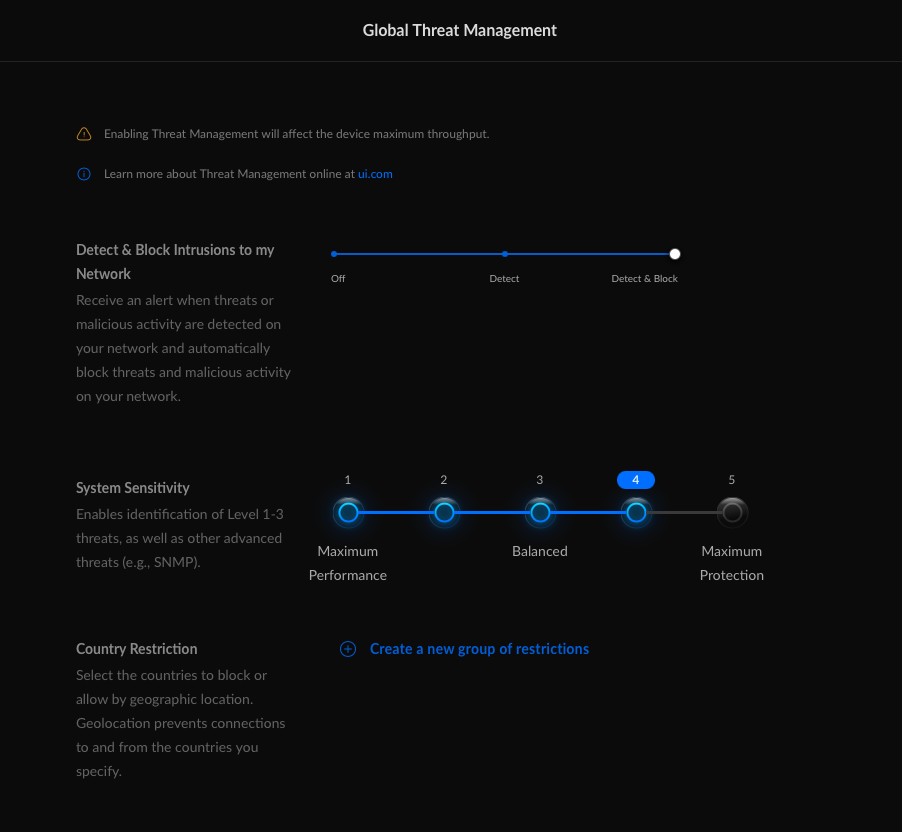
The last configuration I did was finally turned on Unifi’s Threat Management. I set it to level 4 to begin with and we may adjust it in the future.
click to enlarge
Last and certainly not the least, my NAS server is now more of a NAS and less of a networking controller, since all networking related monitoring and control is now being performed by a dedicated UDM Pro device. The UDM Pro can also handle the threat management at my full ISP 1Gbps download speed.
I will continue to post my upgrades here. If anything else, keep my future self informed.
We are all in with Unbiquiti’s Unifi lined of networking products. To date with the exception of a few unmanaged switches, all of our home networking switches and Wi-Fi access points are Unifi products.
Current Network Layout (click above to enlarge)
At the heart of our network is our USG Firewall (USG 3P). We’ve been using the secured gateway since December of 2017. During the holiday break, I plan to replace it with the new Unifi Dream Machine Pro (UDM Pro). The main reasons are:
The current USG 3P is limited to 85 Mbps when threat detection is turned on;
Run Intrusion Prevention System (IPS) and Intrusion Detection System (IDS) with the UDM Pro at full IPS speeds which for me is at 1 Gbps download and 30 Mbps upload;
Upgrade my current Unifi Video solution to Unifi Protect, since Unifi Video is no longer supported and I have five Unifi G3 Flex cameras;
Will most likely replace my current Kuna solution with Unifi Protect external cameras, so it is totally private, and my security video solution is unified;
The ability to connect Unifi Protect with my other devices using Homebridge;
The device has a capacity of up to 3.5 Gbps so we are future proofed for faster ISP speeds;
Move the UniFi Network Controller software that is currently running on my NAS server to a dedicated piece of hardware, the UDM Pro;
During my research with the UDM Pro, there is a slight regression in functionality that I currently use in my home. I currently use a functionality called static host mapping that allows me to give my NAS server several different host names so that I can use those host names to route to different in-home services, that is hosted by Apache2 server on my NAS. For example, the host name media.home routes to my home Plex server, and books.home routes to my Calibre server. Long story short, I need to run my own Domain Name Service to get this functionality back.
I have deployed and configured a DNSmasq installation before, but when I was exploring ways to reconfigure (hack) UDM Pro’s DNSmasq implementation, I came to the realization that it is probably best to offload the DNS functionality from the UDM Pro and run a dedicated instance on my NAS server. This way the upgrade path of the UDM Pro by Ubiquity in the future is nice and clean, and I can fully configure my own DNS the way I needed it.
With further research, I came across an alternative to DNSmasq, and that is Pi-hole with unbound, a full recursive DNS resolver. With this combination, I can essentially maintain my own local DNS records, satisfying my static host mappings, and also have a more private Internet experience for my entire home network when domain names are resolved by the authorized party.
I chose the Alternative 1 installation methodology on my NAS, but with a twist. Since I already have Apache2 installed, after the installation, I purged lighttpd from the installation, which came with the Pi-hole installation process. I also added the following to my Apache 2 configuration:
For extra security, I also added an .htaccess file containing:
% cat /var/www/html/.htaccess
<RequireAny>
    Require ip 192.168.167.0/24
    Require ip 172.17.168.1/24
</RequireAny>
The above ensures that only local computers or VPN clients on my network can gain access to Pi-hole. I also had to enable the above .htaccess file by adding the following in the main Apache 2 configuration file (/etc/apache2/apache2.conf):
<Directory /var/www/html/>
	AllowOverride All
</Directory>
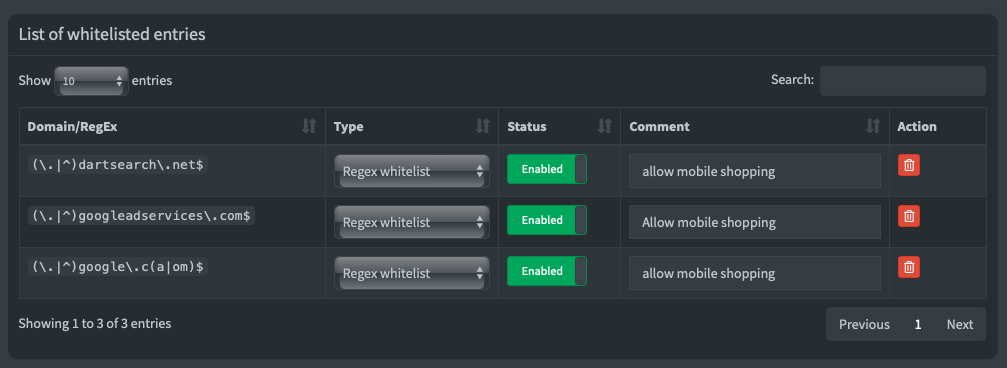
After a quick restart, Pi-hole is installed and operational. With an afternoon of testing, I noticed that some Google based shopping links have been blocked. We cannot have that during the holiday season, so I had to white list the following sites for them to work:
Click above to enlarge
Configuring unbound was really easy, I just had to follow the instructions here.
Now that I have my own DNS server running, I am no longer using Cloudfare or Google’s domain services. This translates to a little more privacy. I can also track which domains are being blocked and which domains are being accessed when I visit sites. Since this solution is site wide within my house, no additional work is required on iPhones, iPads, and client computers.
With this prerequisite step completed, I am now all set to migrate to the UDM Pro.
I thought it would be a good idea for me to give a a small tutorial on basic home networking issues, which many may find useful when diagnosing connectivity issues.
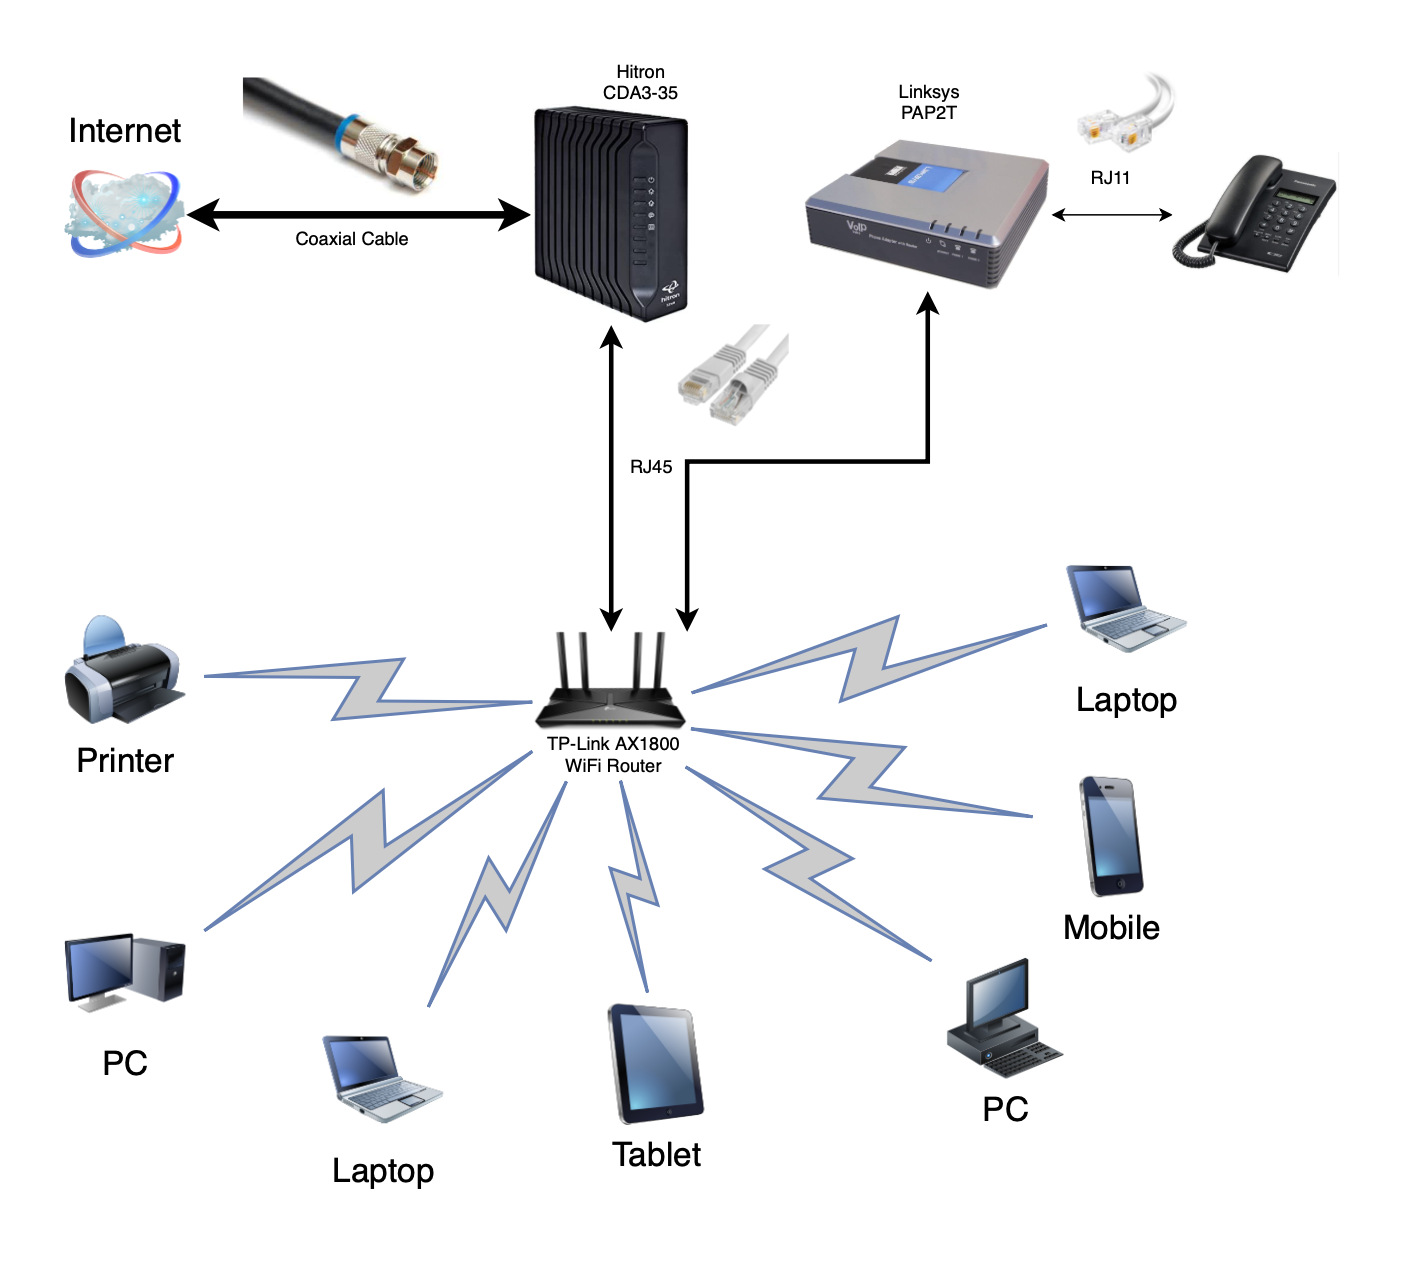
A modern, typical home network may look something like this:
Typical Network (click to enlarge)
Most people in our neighbourhood will have a cable based Internet access.1 Internet comes through via the coaxial cable, like the traditional cable that you used for your cable TV. This cable is connected to a cable modem, which in our case is the Hitron CDA3-35. The cable modem then makes the Internet accessible via classic networking cables with RJ45 plugs. Think of the cable modem as your main door to the Internet and nothing else. Since this box is typically provided by your cable company, you should probably not trust it, so it is a main door without a lock.
Some cable modems also do Wi-Fi, like the new Rogers Ignite Hubs. For best performance and better security,2 I would recommend configuring the cable modem in bridge mode and not in gateway or router mode. This means that it should not be the box provisioning and managing your network, and it will have its Wi-Fi functionality turned off. This also avoids double NAT-ing, something to be avoided in your home, in my opinion.3
You should invest in your own Wi-Fi access by purchasing something like the TP-Link AX1800 WiFi Router.4 This box provisions your residential network and your local Wi-Fi. You can purchase more advance / expensive Wi-Fi solutions here depending on the size and complexity of your residential layout.
If you have more than one Wi-Fi access point, I would recommend that they all have the same SSID but on different Wi-Fi channels. This will make it convenient and optimal for your Wi-Fi devices. Also keep in mind that some old / cheap IoT devices only like the 2.4GHz band. If you are in that situation, then you should create a specific 2.4GHz network with a different SSID.
If you want to try out VOIP (Voice-Over IP), you may also connect a VOIP Adapter. In our example, we have the Linksys PAP2T box. I am not going to go into details of how to acquire VOIP, or set it up, but this box effectively converts Internet traffic into voice traffic. Traditional landline phones can be linked up to the VOIP adapter using normal phone cables.
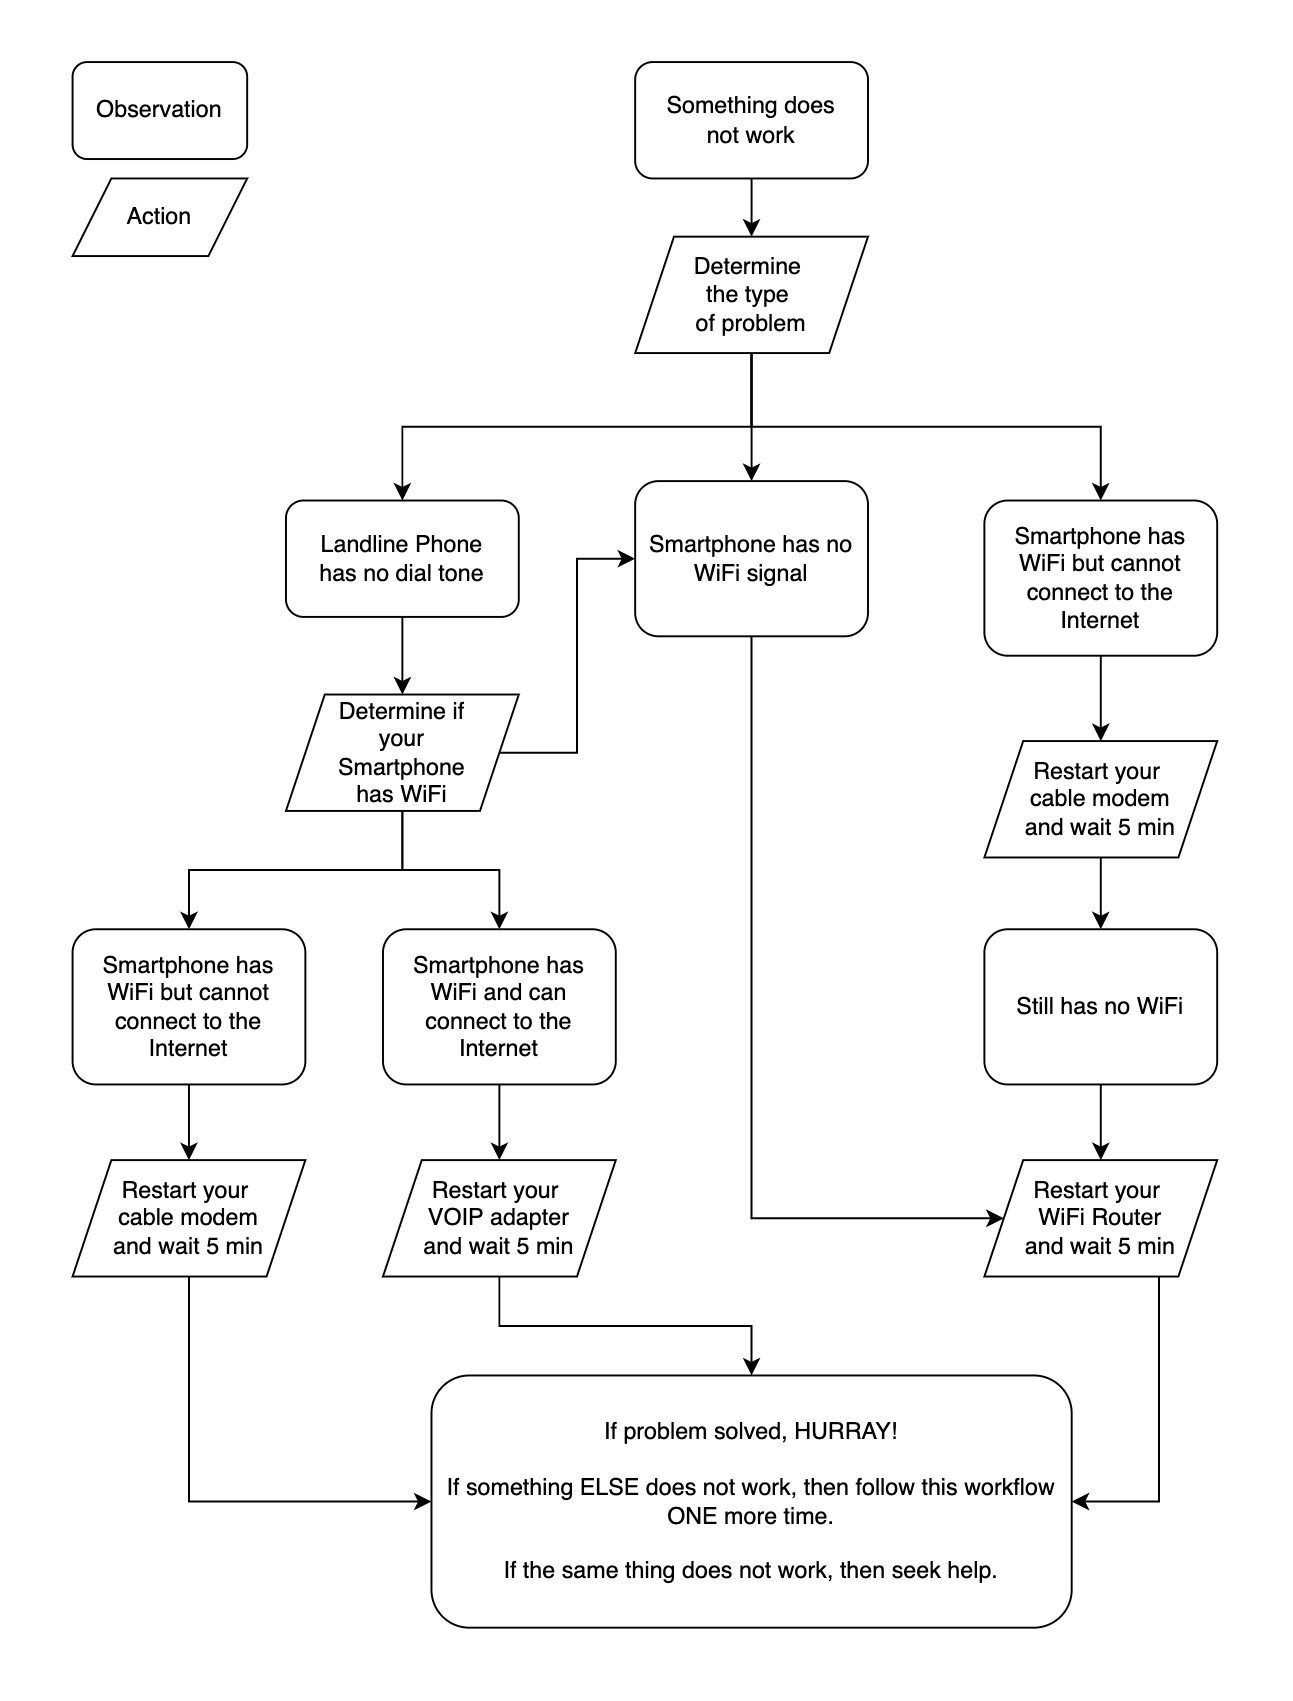
Okay, now that we have the different parts of the network defined, let us present a basic diagnostic workflow.
Basic Diagnostic Workflow
I hope the above introduction to the different parts of your home network and a workflow that you can follow will assist you in resolving some common connectivity issues in your home.