Wi-Fi 6 Upgrade with HomeKit Headaches

I recently upgraded all my WiFi access points to the Unifi UAP-U6-LR and UAP-U6-Lite. This will elevate my home to Wi-Fi 6 capable.

This was extremely exciting as my 802.11ax capable devices can now get between 100Mbps to 400Mbps depending on where we are in the house. It seems even the 802.11ac devices got about a 30% speed bump.

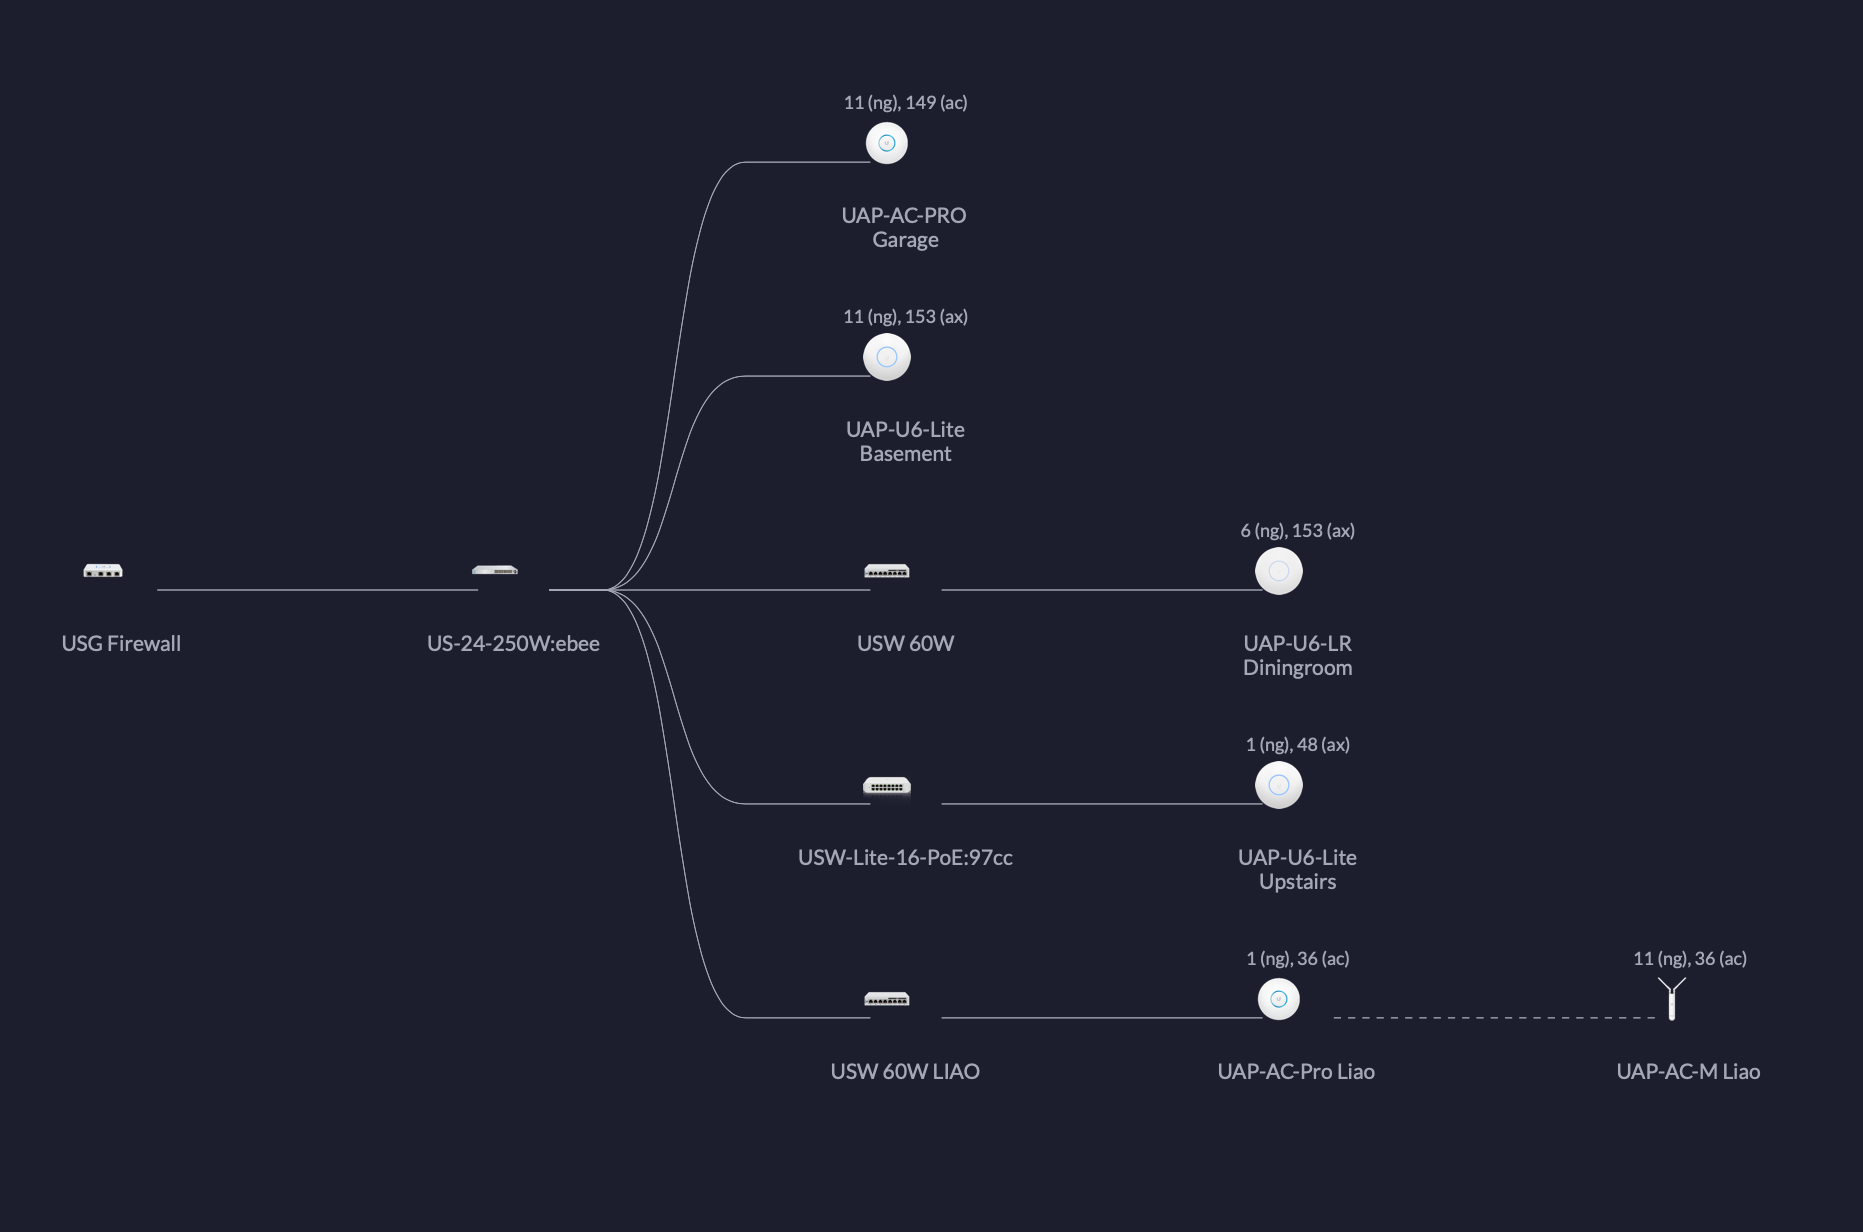
As a result of this upgrade, two UAP-AC-M mesh and one UAP-AC-Pro access points were retired from my house. I don’t recommend buying these devices any more since the Wi-Fi 6 devices from Ubiquiti are way more capable with higher performance and increase range than their 802.11ac access points.

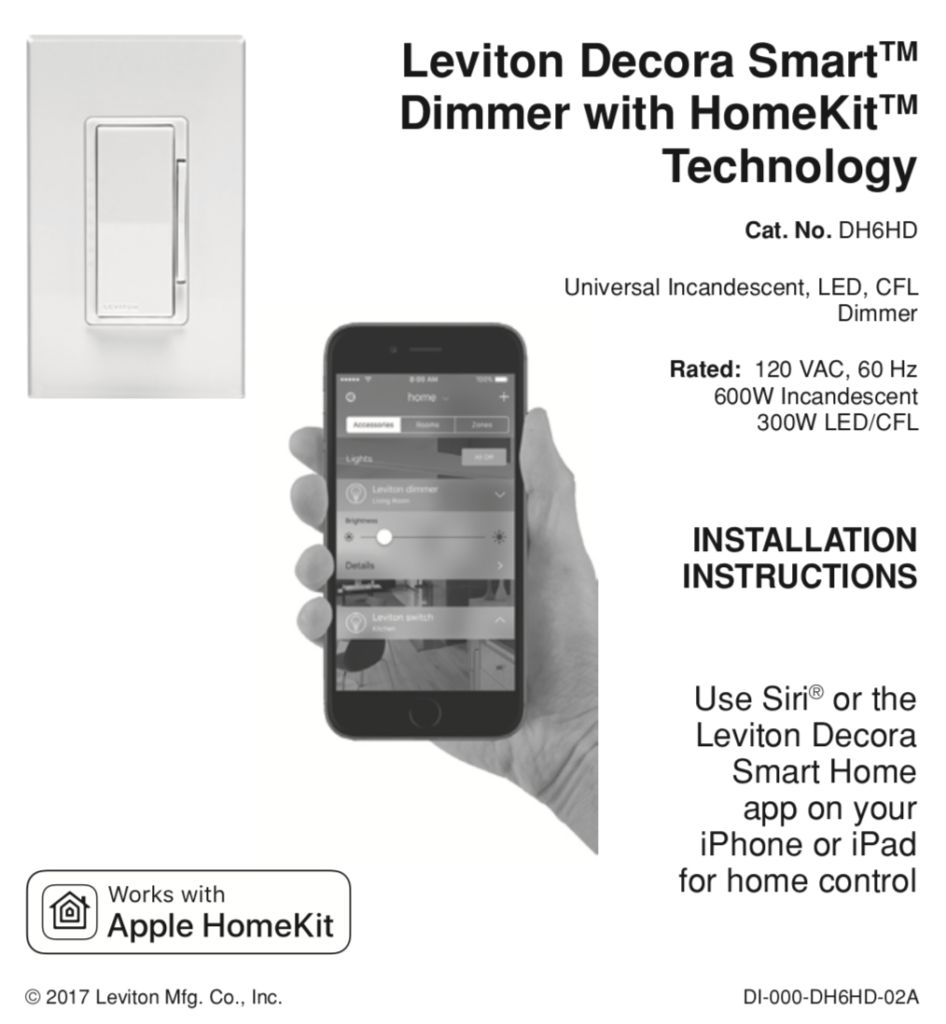
However, the honeymoon period did not last long. After about a week, HomeKit devices started to show the dreaded “No Response” labels. Specifically, I had connectivity problems with Leviton Smart Decora Dimmers. In the past, all I had to do was recycle the HomeKit device and it was all good. Another episode of HomeKit and Leviton dimmer switch nightmare was experienced and documented by my previous blog post.

In this particular instance, the Leviton dimmers were able to join the Wi-Fi network and I can validate that with the Unifi Controller software. However, our HomeKit App was not able to connect to the dimmer switches. It took me sometime to figure out that the dimmers were unreachable by other Wi-Fi clients, but was reachable by computers that were physically wired to our network.

I found out which access point the dimmer switches were connected to and ssh into the access point to see if I can ping those devices, and sure enough they were unreachable. Below is a screen capture of the ARP listing from the access point.

Normal ARP listing from the Wi-Fi Access Point

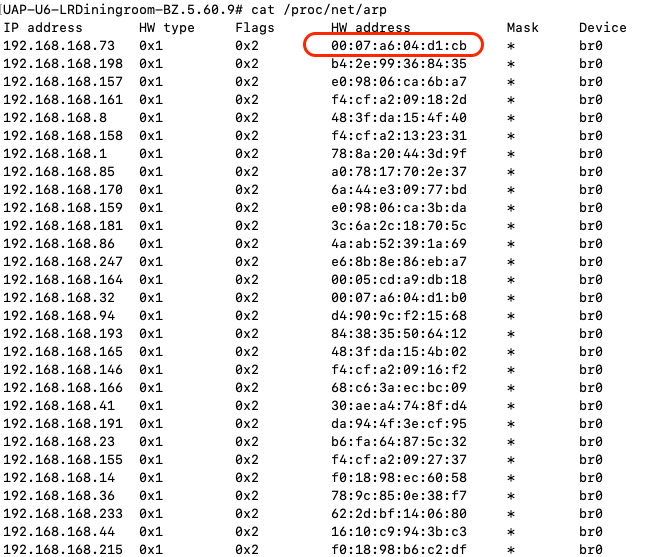
When the dimmers were unreachable, the HW address was set to 00:00:00:00:00:00. After rebooting the culprit access point, I was able to access the offline dimmer switches again from the HomeKit App.

In summary, when HomeKit devices are offline with the dreaded “No Response” labels, here are the following things to try:

  • Ensure that local DNS is working properly and caches are emptied so that the latest data are available;
  • Ensure the device itself has acquired a valid IP address that is from your network;
  • Ensure that the device is reachable from the HomeKit App, typically from your iPhone or iPad;
  • Back trace the physical upstream networking equipment that is connected to your HomeKit device such as switches and access points and see which requires rebooting;

Apple could improve the HomeKit experience by allowing users to perform a full backup of the HomeKit configuration and reset the Home and perform a restore. Unfortunately, the closest thing that I found was from the Home+ App, but they do not restore device connectivity just their configurations.

When HomeKit works, you are literally like god, able to command light and switches with your voice in your home. When it does not work, it is extremely difficult to debug, due to a lack of diagnostics and logging.

After this update, my current networking layout now looks like this:

2021 October Network Layout (Click to Enlarge)

Leviton Decora Smart Dimmer with HomeKit

I purchased these DH6HD HomeKit compatible dimmer switches from Leviton from February of 2018 (over 1 1/2 years now).

When they work, they are great. BUT! My HomeKit app frequently report these switches with “Not Responding”. The only remedy that I know of is to remove the accessory and then re-add it again.

The process of adding the accessory is extremely frustrating and time consuming. Adding the accessory to the WiFi network is a hit and miss affair. It really is a crapshoot.

Today after three tries adding the Leviton without success, I almost gave up. Finally I discovered the following process in this reddit article. Even the technique outlined by the article did not work until I restarted the avahi-daemon.service on my Linux server, figuring that it may interfere with the Bonjour discovery process when adding the accessory.

Using the WiFi setup of the iPhone to add the Leviton device to the WiFi network definitely works smoother than using the Home app. Here are the steps:

  1. Reset the light switch by pressing and holding the on position of the switch until its LED light switches rapidly from red and amber. This can take more than 10 seconds.
  2. Set the iPhone to the appropriate WiFi network.
  3. Goto the iPhone WiFi menu, and you will the Leviton switch available for adding to the WiFi network. Add this device to the network.
  4. If an error is encountered when adding to the network, then restart the avahi-daemon service (or other mDNS service that may be competing).
  5. Once the switch is added to the network, proceed to add the switch with the Home app.

Apparently there is a firmware update for these switches. However, the update from 1.4.13 to 1.4.32 fail with the Leviton iOS app.

If you are thinking of getting a light switch for your home automation project, I would steer away from these switches!

Possible Future of the Connected Watch

On Tuesday of this week, Apple announced the Apple Watch Series 3 with the ability to connect to the LTE data network, allowing the watch to stay connected to the Internet without an accompanying iPhone. This greatly enhances its functionality and removes its original handicap and its requirement to always be tethered to the phone. You can now get notifications and listen to the plethora of songs on Apple Music while on the go without your phone. The future is here.

Ever since the Apple Watch was released in the spring of 2015, it has been thought of as a companion device to the phone. However, I always thought it should be the other way around. The phone and tablet should be the companion devices to the watch!

The watch should be the only device that has the mobile networking radios and should operate in an always on manner, while sharing a personal hotspot via its WiFi radios. The phone and tablets can then function as displays with WiFi connectivity to your watch. This will also simplify your cellular data plans. I just see this as a more convenient setup, and hopefully a cheaper way to go with your mobile carrier.

As memory capacity increases with the watch, personal identity, application data, and other confidential information can be stored on the watch akin to the secure enclave on the iPhone today. This way display centric devices slaved to the watch can restore your last working state from the watch. Imagine a world where display slates are near commodity devices sans your personal information. You can be working with a shared slate in the office. All the while, your data is being centralized and stored securely on the watch. When you travel offsite at the airport or in the hotel, you pickup another shared slate, and you continue to work where you left off.

It is also more difficult to lose your watch than your phone. When you do misplace your phone and cannot find it, then just pickup another, because your personal data is stored on your watch.

Power consumption is probably going to be a major challenge for the watch in this scenario. But if the power challenge can be solved, then imagine having only WiFi display slates of any size of your choosing, and your watch has the only mobile data radio you will need. Instead of the phone being your most personalized information device, it will be your watch. I hope Apple has this vision in mind. Do you believe this to be a better future?

Raspberry Pi Zero W with Relay

Last weekend I spent my time configuring the Raspberry Pi 3 Model B to trigger a relay. Tonight, I finally took the time to solder the 2 x 20 pin headers to the Raspberry Pi Zero W board. I wired it all up again and took a photo with a quarter coin, so you can appreciate how small the circuit is.

I had to make a minor software adjustment, because the Node.js version that I installed on the Pi 3 did not work. Apparently I had to get the armv6l version instead of the arm7l.

After a quick re-install from the above link, I was back in business.

Now I’m going to test the stability of the WiFi on the Pi Zero, before I make the final security touches to the software and then to the garage door opener!

Raspberry Heaven

Two years ago I started to tinker with the Arduino platform and created a simplistic garage door opener by coupling a fairly inexpensive Leonardo board with a even cheaper ESP8266 WiFi board. It took quite a bit of work, figuring out how to configure the WiFi with the ESP8266, and struggling with its unreliability. I also wrote a little iOS test app so that I can control the garage door opener with my iPhone.

After numerous hours and a total bill of materials for less than $20, here is a short video on the fruits of my labour about a couple of years ago:

I have been tracking the Raspberry Pi platform for quite sometime, but always found them to be comparably expensive to the Arduino boards, especially all I needed was something to get on my WiFi network, and be able to respond to a remote request to effectively flip the proverbial switch. So when I found out that you can get a Raspberry Pi Zero W for $13.45 CAD at CanaKit.com, I was pretty excited to give it a try.

I purchased the Pi Zero W as well as the Pi 3 Model B. Why not?

Spent a good chunk of yesterday to:

  • Followed the instructions on raspberrypi.org to download and copy the image to a 16GB micro SD flash drive.
  • I needed to ensure that there is an empty file named "ssh", so that I can ssh to the board remotely from my Mac. I was too lazy to find the keyboard, mouse, and required cables. Thanks to Michael Smalley for providing this very helpful page.
  • Configure the WiFi settings with the good instructions provided by David Maitland.

After the above, the Pi board just needs power and nothing else, and I was able to establish an ssh session from my Mac to continue on with the configurations.

  • First I updated the environment.

    sudo apt-get update
    sudo apt-get dist-upgrade

  • Then installed the Java Developer’s Kit

    sudo apt-get install oracle-java8-jdk

  • Installed Node.js along with Express and wrote a super simple Express app. The instructions by Yannick Loriot were really helpful. Did not try to use apt-get to install node, because it ended up crashing the board with a kernel panic. That path led to many lost hours.

    wget https://nodejs.org/dist/latest/node-v7.7.2-linux-armv7l.tar.gz
    npm install express --save

    Update 2017-03-14: The armv7l apparently only worked for the Pi 3, but for the Pi Zero W, I had to get the arm6l version.
  • Installed Samba, so that I can use my editors on my Mac to edit code.

    sudo apt-get install samba

    Note that we had to use smbd to restart the service after configuration.

    sudo systemctl restart smbd.service

Once I have my development environment all setup and that all the networking stack is working properly. I can then start to play with the GPIO pins that came with the Pi. The idea is to provide a simple web service app powered by Node.js and Express to turn on or off or simply toggle a GPIO pin, acting as a switch, which I can hookup to a relay.

I first downloaded the wiringpi package.

sudo apt-get install wiringpi

I used the above package to get familiar with the GPIO mechanism and play around with it on the BASH command line.

Once I was comfortable with the concept, I wanted to hook it up with the Express app which I did with the onoff npm module. I spent this morning creating a simple Swift iOS app, and wired the Pi to the relay.

You can see it all working in the video below. When I press the button on my test app from my iPhone, you’ll see the red LED blinking denoting a pulse on the switch — think of this as you press the garage door opener. The yellow wire is the USB cable that is just feeding the board with power. Thrilling!

I am not finished yet. I still have to make the iOS app and web service more secure and switch from the Pi 3 to the Pi Zero, but not this weekend. However, my initial impression of the Raspberry Pi platform is much simpler for me, coming from a software background. My hardware skills are at best rusty from my university days. The micro controller environment of the Arduino platform is also very finicky and more difficult to debug. There is nothing like working with a real operating system with a mature development stack.

I also used my wattage meter to figure out how many watts the system was drawing, and it only peaked at less than 3W. That’s pretty good!