Over the past few months, I have been peppering the house with the Unifi G3 Flex security camera. They were very easy to install and since they use PoE, they minimize the wiring as well.
To monitor the cameras, I installed the Unifi Video server software on my Ubuntu Server that is up 7 x 24. All of this hardware components are behind my Unifi Security Gateway firewall.
For whatever reason, I had a thought whether Apple HomeKit can talk to these cameras? With a little Google searching, I came across this article. The instructions from the article was a bit outdated, but what peeked my interest was the use of the homebridge server. I already had homebridge service installed on my Ubuntu server because I use the same technique to have HomeKit talked to my home made garage door opener. After looking through the instructions, it looks like all I need to do is:
- Configure Unifi Video to enable RTSP streaming for each of the camera that it is managing;
- Download a homebridge camera plugin called homebridge-camera-ffmpeg;
- Configure homebridge to add the cameras;
- Add the cameras to the Home App;
The first step was extremely simple. First we had to enable RTSP streaming for all cameras managed by Unifi Video.

We then had to select each camera and enable the resolution that we want streamed.
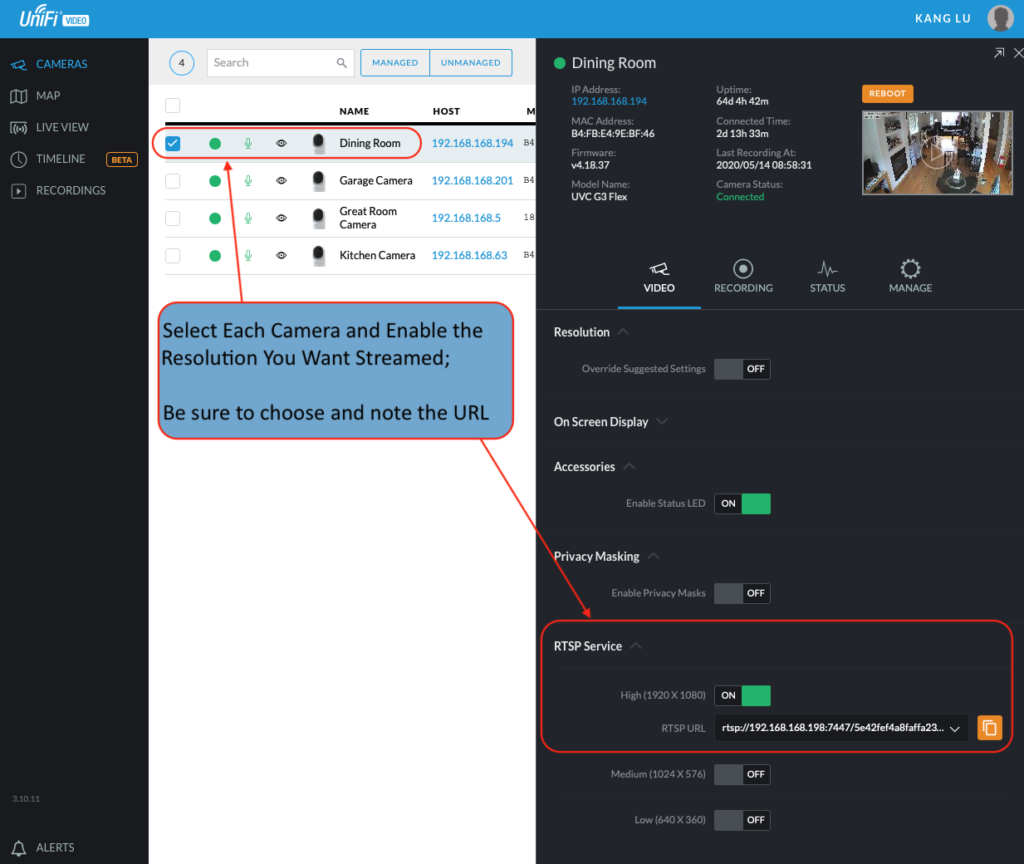
I tested the RTSP URL on the VLC App just to make sure the streaming is working properly.
Installed the plugin with the following command line:
npm install -g --unsafe-perm homebridge-camera-ffmpegAdd the platform section to the homebridge config.json file, which for my server was located in /var/homebridge.
"platforms": [
{
    "platform": "Camera-ffmpeg",
    "cameras": [
    {
        "name": "Dining Room",
        "videoConfig":
        {
            "source": "-rtsp_transport http -re -i rtsp://192.168.168.198:7447/5e42fef4a8faffa2326b5d38_0",
            "maxStreams": 4,
            "maxWidth": 1280,
            "maxHeight": 720,
            "maxFPS": 15,
            "maxBitrate": 600,
            "mapvideo": "0:1",
            "mapaudio": "0:0",
            "vcodec": "h264",
            "audio": true,
            "packetSize": 188,
            "hflip": false,
            "additionalCommandline": "-x264-params intra-refresh=1:bframes=0",
            "debug": false
        }
    },
    {
        "name": "Garage",
        "videoConfig":
        {
            "source": "-rtsp_transport http -re -i rtsp://192.168.168.198:7447/5e417ffba8faffa2326b5c80_0",
            "maxStreams": 4,
            "maxWidth": 1280,
            "maxHeight": 720,
            "maxFPS": 15,
            "maxBitrate": 600,
            "mapvideo": "0:1",
            "mapaudio": "0:0",
            "vcodec": "h264",
            "audio": true,
            "packetSize": 188,
            "hflip": false,
            "additionalCommandline": "-x264-params intra-refresh=1:bframes=0",
            "debug": false
        }
    },
    {
        "name": "Great Room",
        "videoConfig":
        {
            "source": "-rtsp_transport http -re -i rtsp://192.168.168.198:7447/5e0bacf4a8fa51584a2a94cb_0",
            "maxStreams": 4,
            "maxWidth": 1280,
            "maxHeight": 720,
            "maxFPS": 15,
            "maxBitrate": 600,
            "mapvideo": "0:1",
            "mapaudio": "0:0",
            "vcodec": "h264",
            "audio": true,
            "packetSize": 188,
            "hflip": false,
            "additionalCommandline": "-x264-params intra-refresh=1:bframes=0",
            "debug": false
        }
    },
    {
        "name": "Kitchen",
        "videoConfig":
        {
            "source": "-rtsp_transport http -re -i rtsp://192.168.168.198:7447/5e430638a8faffa2326b5d3a_0",
            "maxStreams": 4,
            "maxWidth": 1280,
            "maxHeight": 720,
            "maxFPS": 15,
            "maxBitrate": 600,
            "mapvideo": "0:1",
            "mapaudio": "0:0",
            "vcodec": "h264",
            "audio": true,
            "packetSize": 188,
            "hflip": false,
            "additionalCommandline": "-x264-params intra-refresh=1:bframes=0",
            "debug": false
        }
    }]
}]
I had four cameras installed so you will see four cameras configured within the Camera-ffmpeg platform. Note that the entire platforms section should be sibling to the accessories and bridge sections.
I restarted the homebridge service with systemctl, and you should see messages similar to:
May 14 15:00:05 avs homebridge[2973]: [2020-5-14 15:00:05] Please add [Dining Room] manually in Home app. Setup Code: 031-45-153
May 14 15:00:05 avs homebridge[2973]: [2020-5-14 15:00:05] Please add [Great Room] manually in Home app. Setup Code: 031-45-153
May 14 15:00:05 avs homebridge[2973]: [2020-5-14 15:00:05] Please add [Kitchen] manually in Home app. Setup Code: 031-45-153
May 14 15:00:05 avs homebridge[2973]: [2020-5-14 15:00:05] Please add [Garage] manually in Home app. Setup Code: 031-45-153
You simply open the Home App and add the above camera accessories using the manual process instead of the scan code method.
If everything works, you should see something like this on the Home App. Below is a screen shot taken from the macOS version of the Home App.
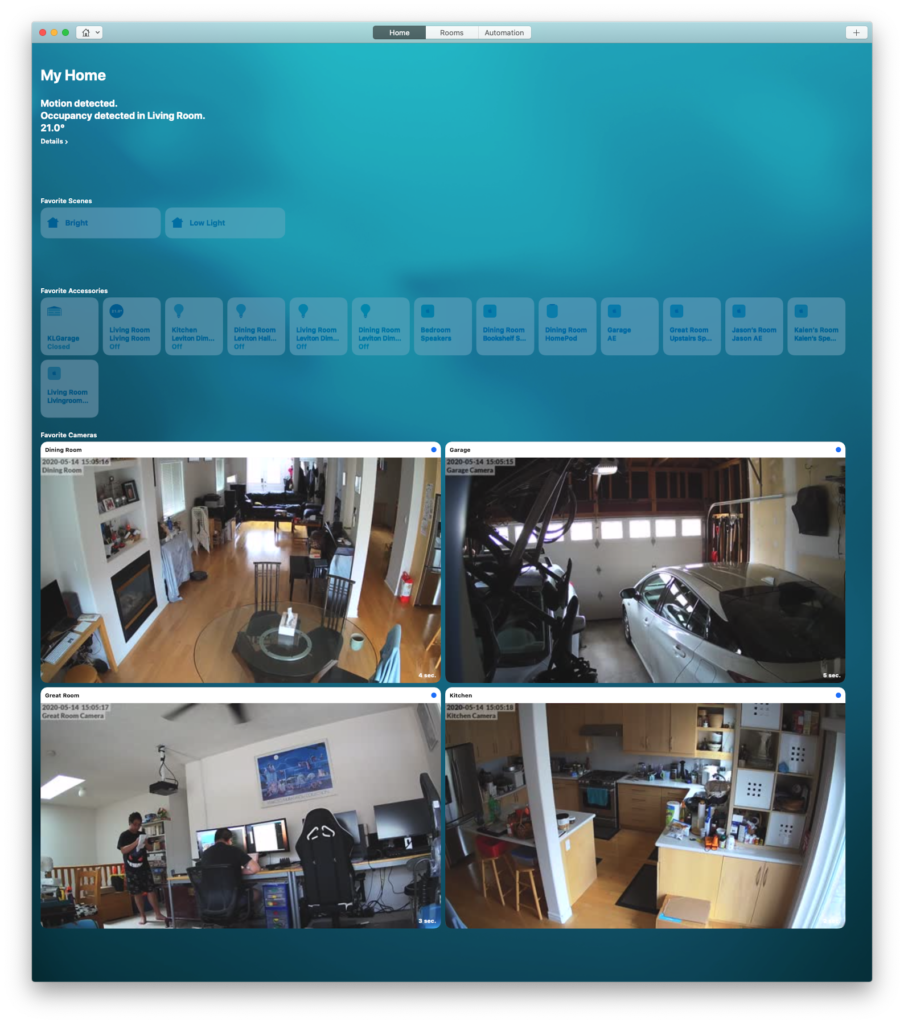
So it is pretty cool to have something working in your home for several months, and because of a thought, I now have a new capability in the house via Apple’s HomeKit Home App.
Thank you to the homebridge community and the UniFi Protect with HomeKit – Setup Guide.