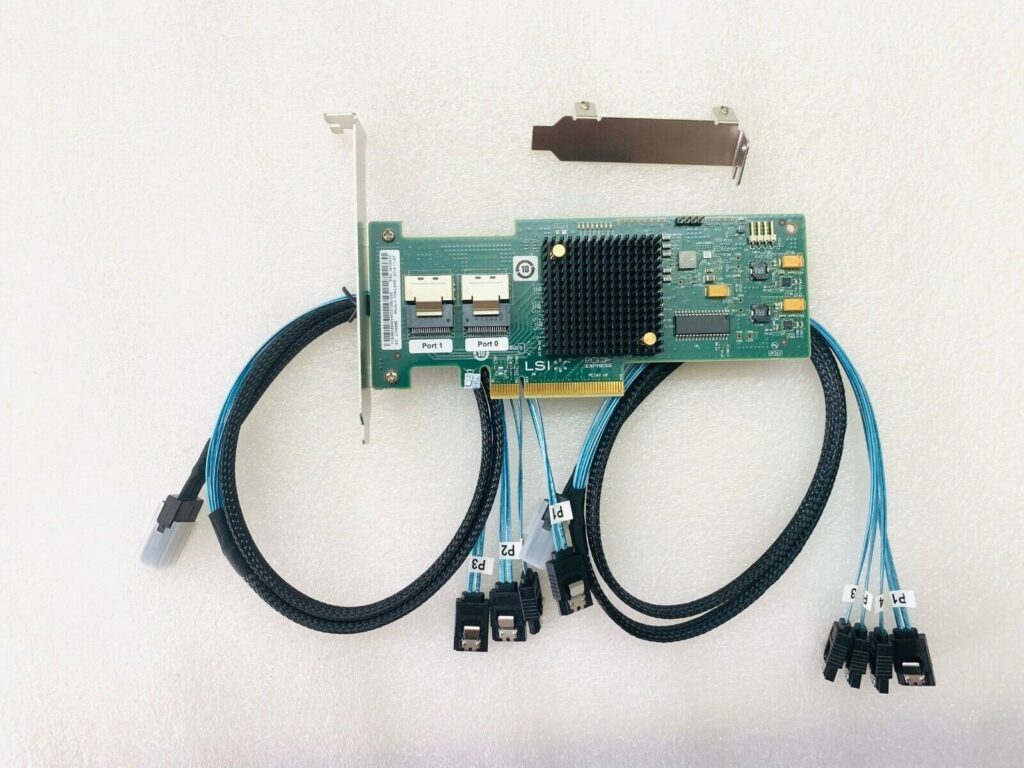
About three weeks ago, I was casually browsing eBay and found this little gem, a Host Bus Adapter that can do PCIe 2.0 x8 (~4 to 8GB/s). This is way better than the one that I purchased earlier (GLOTRENDS SA3116J PCIe SATA Adapter Card) which can operate on a single lane of PCIe 3.0 yielding only 1GB/s. I could not pass it up at a price of only $ 40 CAD, so I purchased two of these to replace the old adapter card I had.
LSI 6Gbps SAS HBA 9200-8i IT Mode ZFS FreeNAS unRAID + 2*SFF-8087 SATA
This new card LSI 6Gbps SAS HBA 9200-8i only supports 8 SATA ports per card, so I had to get two of them to support all of the hard drives that I have. These SAS HBA cards must have the IT (initiator target) mode firmware because the default firmware (IR mode) supports a version of hardware RAID, which I did not want. With the IT mode, the hard drives will be logically separated on the card and only share the physical bandwidth of the PCIe bus. This is a must for ZFS.
With these new cards, my write throughput to my NAS hard drives now averages around 500MB/s. Previously, I was only getting about half of this.
I wish I would have found these sooner. Now I have two spare PCIe SATA expansion cards, one supporting 8 ports, and the other supporting 16 ports. I will place them on another server. Perhaps in a future Proxmox cluster project.
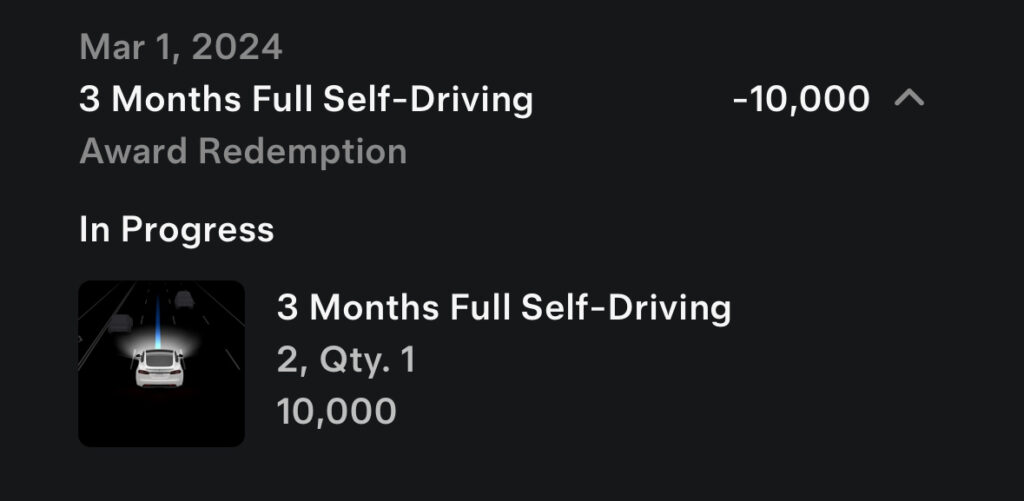
Thanks to my cousins who also purchased Tesla using my Tesla referral code, I have some referral credits that I can use to select a 3 months trial of Tesla’s Full Self Driving (FSD) capability. On March 1st, 2024, I turned this feature on.
It was pretty easy to set up. After agreeing with all the legal stuff and enable the feature, I just set the destination, set it to drive mode, wait for the autopilot icon to show, and double tap the right stalk and away we go!
There are three settings to FSD: chill, average, aggressive/assertive. I just left it on the default, average mode.
Pulling out of the driveway, the car was a bit jerky, but once it got on the road, it made all the right decisions. I override the mode on our neighbourhood feeder road from Leslie Street just to make sure that I can override the mode, and then quickly re-engage the FSD.
On this occasion, all traveling was done on regular roads, no highways, so it was more challenging for the car. It made all the turns correctly, but I did have to override it once when it did not recognize the restricted Via Bus Lane on Yonge Street. It even pulled into the parking area at Mr. Congee, but did not fully complete the trip by parking the car. I had to park it manually.
On the way back, it hesitated too much on a left-hand turn. I had to press the accelerator to help it along. Doing this did not override the FSD mode.
I will be driving to Montreal in about 4 weeks, so I will be looking forward to testing FSD on the highway.
My initial assessment is that I probably would not have paid any more money to gain this feature. Once again, thanks to my cousins who allowed me to experience this through the use of my Tesla redemption credits.
The advent of the Large Language Model (LLM) is in full swing within the tech community since the debut of ChatGPT by openAI. Platforms such as Google Colab, and similar variants from Amazon and Facebook allows software developer to experiment with LLM’s. The hosted model of the data center based GPU’s makes training and refinement of LLM’s tolerable.
What about using LLM on a local computer away from the cloud?
Projects such as llama.cpp by Georgi Gerganov makes it possible to run the Facebook open sourced Llama 2 model on a single MacBook. The existence of llama.cpp gives hope on creating a desktop that is powerful enough to some local development with LLM’s away from the cloud. This post documents an experimental procedure in building a desktop machine using parts readily available from the Internet to see if we can do some AI development with LLM’s.
Below is a list of sourced parts from EBay, Amazon and CanadaComputers, a local computer store. All prices are in Canadian dollars and includes relevant taxes.
GDSTIME 7530 75mm x 30mm 7cm 3in 12V DC Brushless Small Mini Blower Cooling Fan for Projector, Sleeve Bearing 2PIN (sourced from Amazon)
$16.94
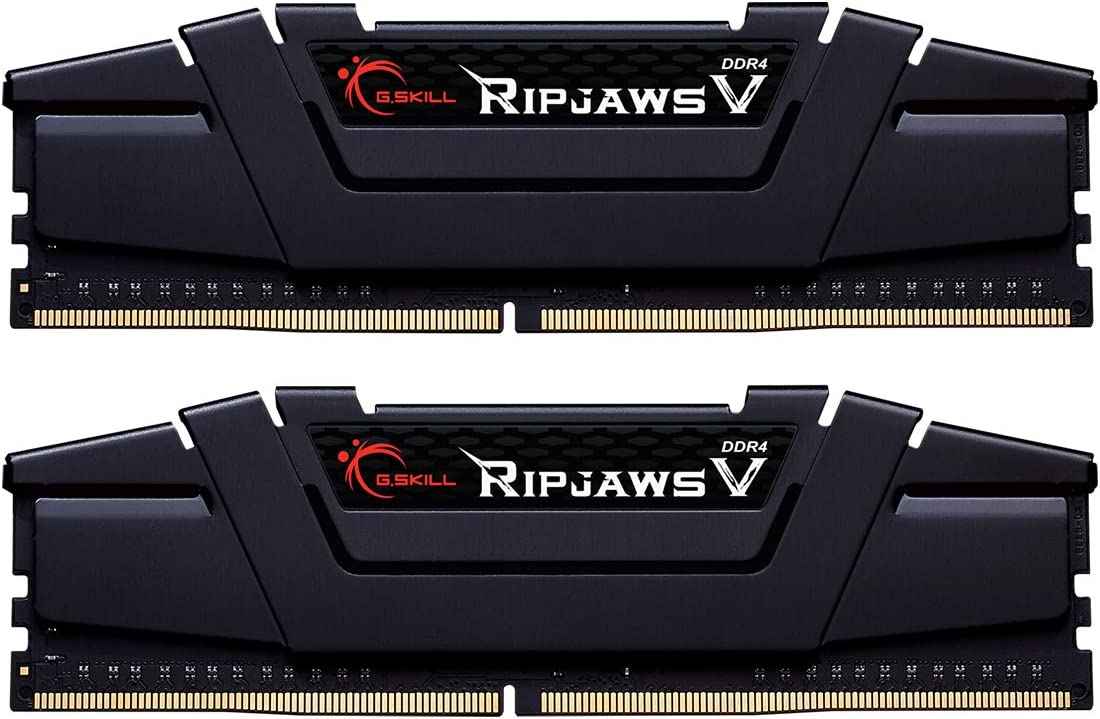
CORSAIR Vengeance LPX 64GB (4 x 32GB) DDR4 3200 (PC4-25600) C16 1.35V Desktop Memory – Black (sourced from Amazon)
$350.28
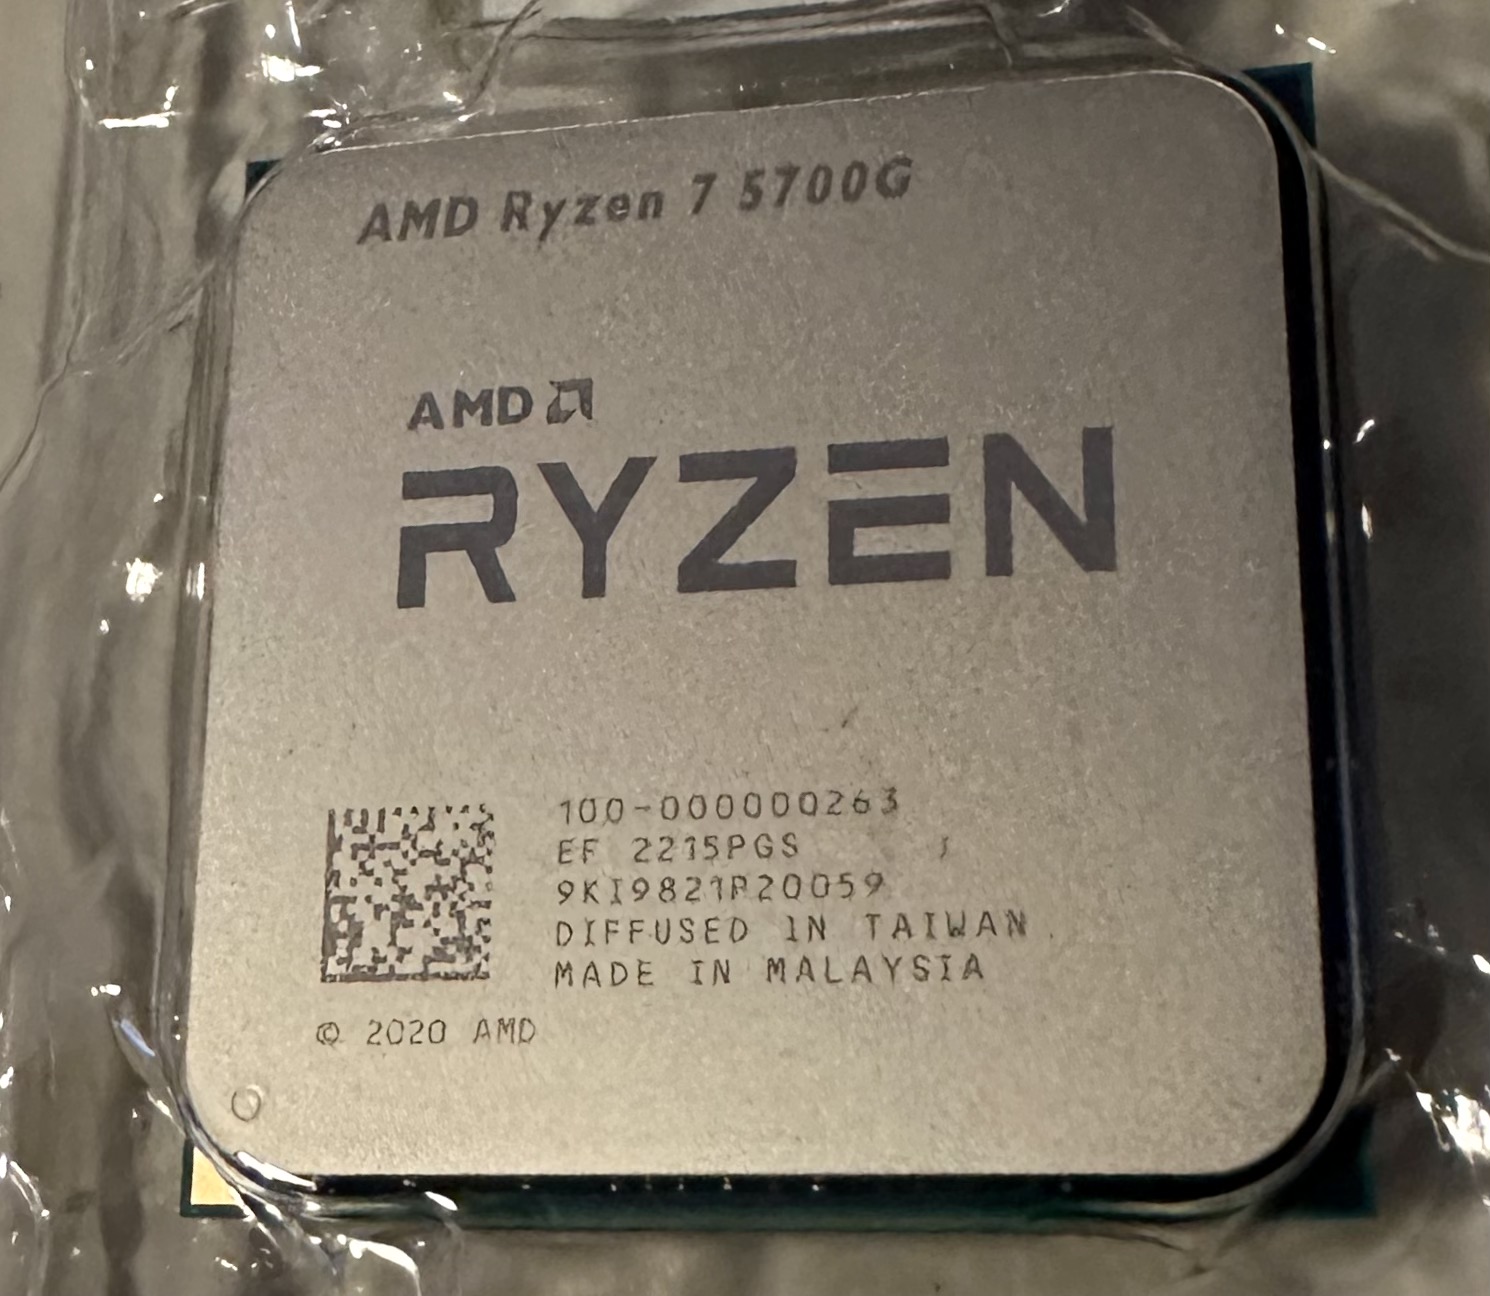
AMD Ryzen 7 5700G 8-Core, 16-Thread Unlocked Desktop Processor with Radeon Graphics (sourced from Amazon)
$281.35
Noctua NH-D15 chromax.Black, Dual-Tower CPU Cooler (140mm, Black) (sourced from Amazon)
$158.14
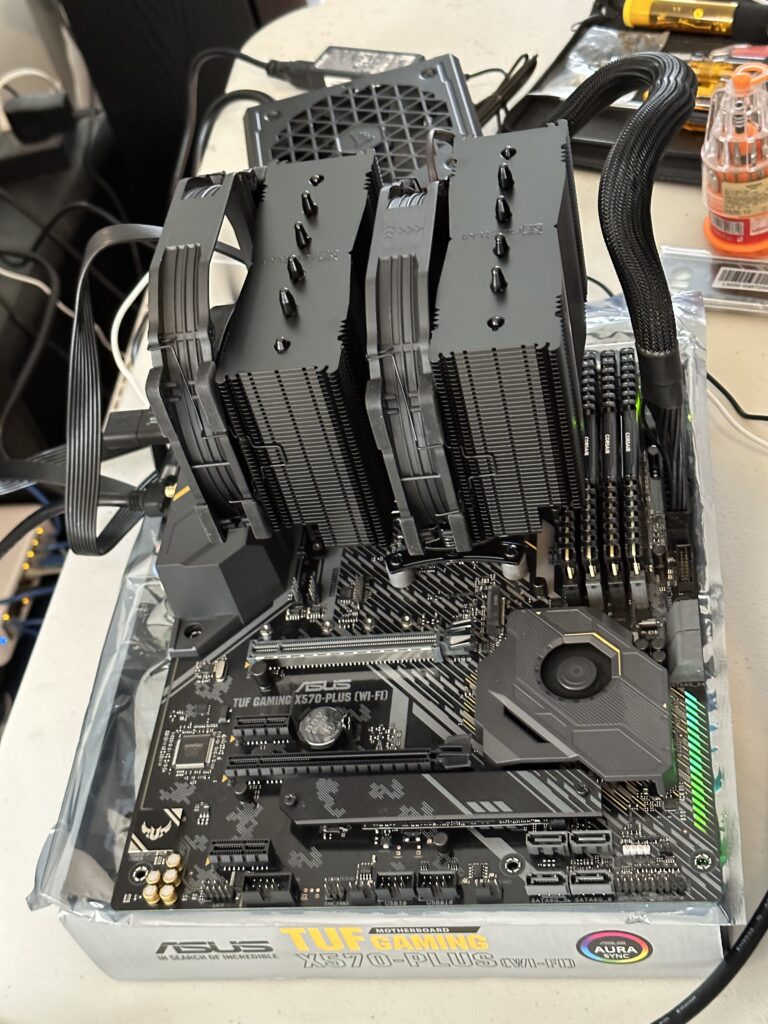
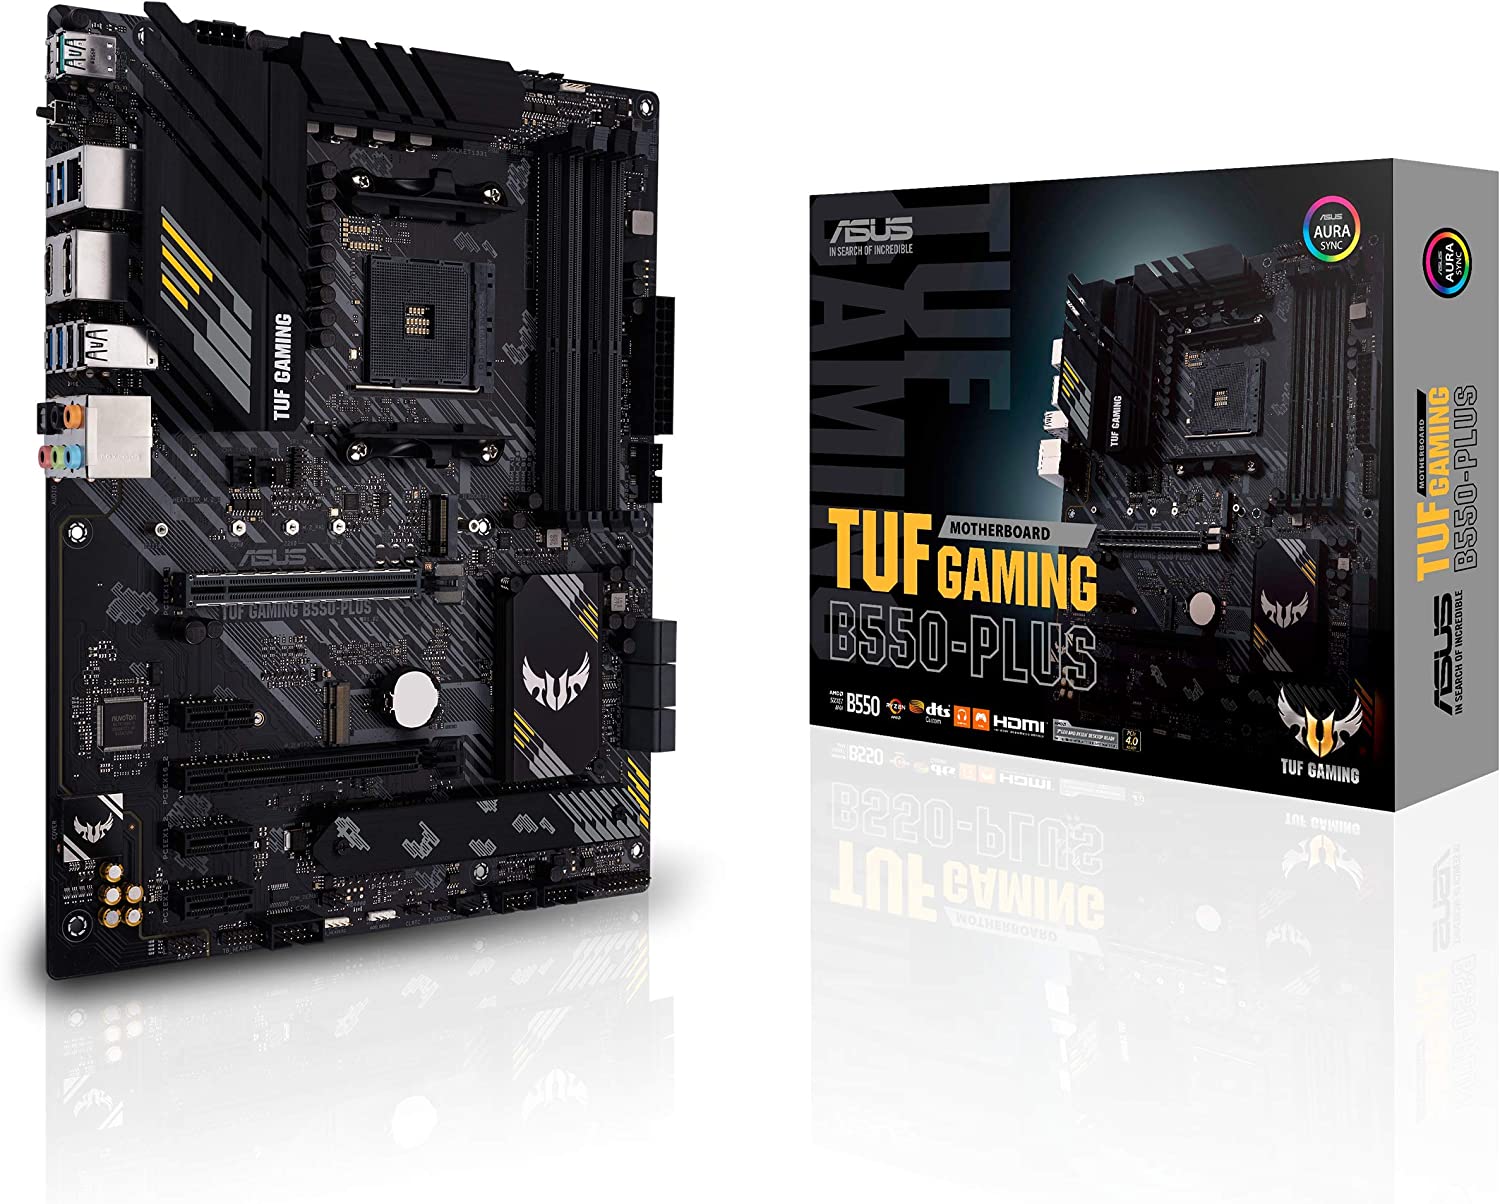
Asus AM4 TUF Gaming X570-Plus (Wi-Fi) ATX motherboard with PCIe 4.0, dual M.2, 12+2 with Dr. MOS power stage, HDMI, DP, SATA 6Gb/s, USB 3.2 Gen 2 and Aura Sync RGB lighting (sourced from Amazon)
$305.09
Samsung 970 EVO Plus 2TB NVMe M.2 Internal SSD (MZ-V7S2T0B/AM) (sourced from Amazon)
Miscellaneous 120mm case fans and cables purchased from CanadaComputers
$63.17
The total cost of the above materials is $2,062.87 CAD.
The Nvidia Tesla P40 (Pascal Architecture) specializes for Inferencing limited to INT8 based operations and does not support any FP related operations, so it may not be optimal for machine learning. However recent claims have been made that INT8 / Q8_0 quantization can yield some promising results. Let us see what our experimentation will yield once the machine is built.
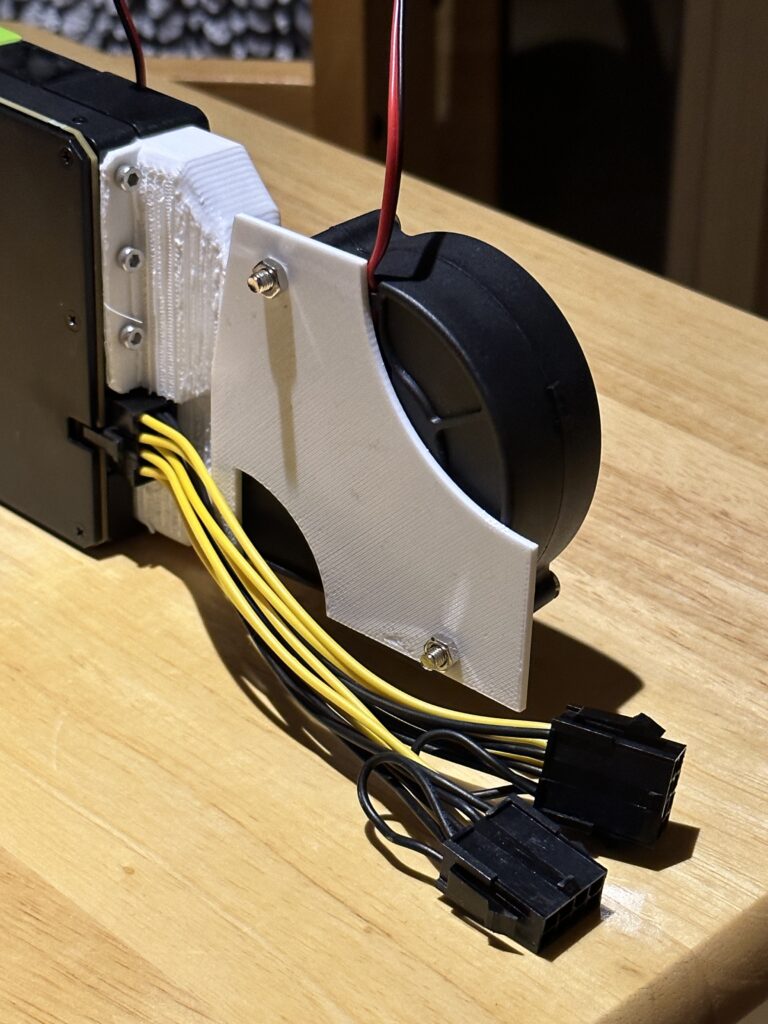
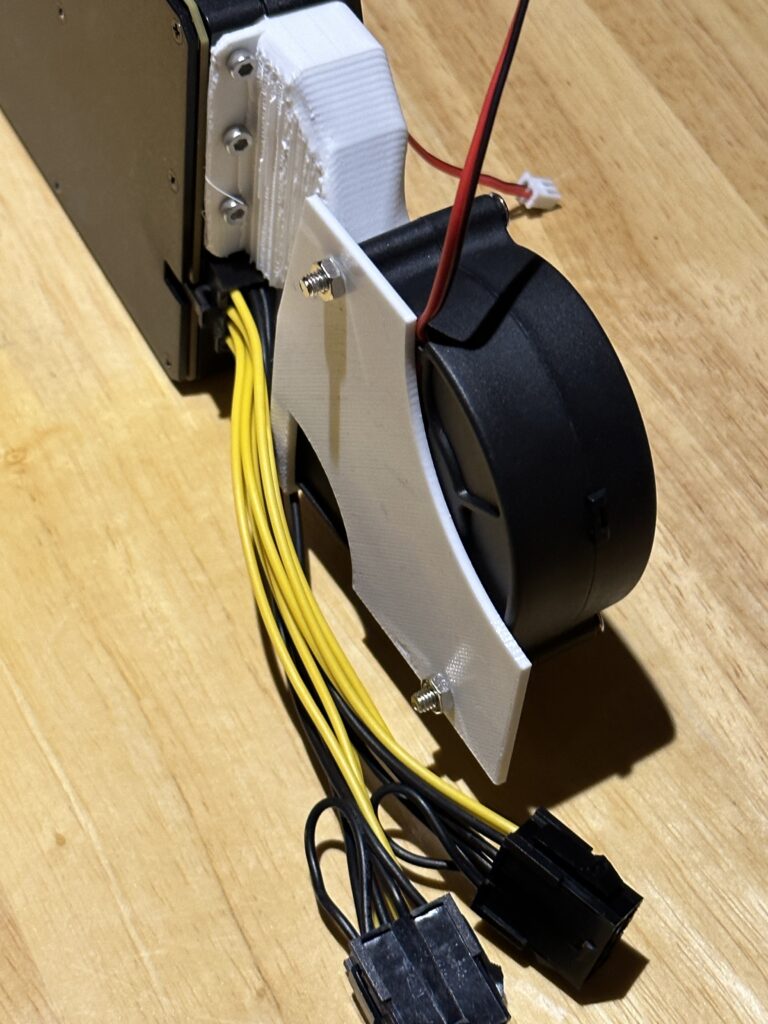
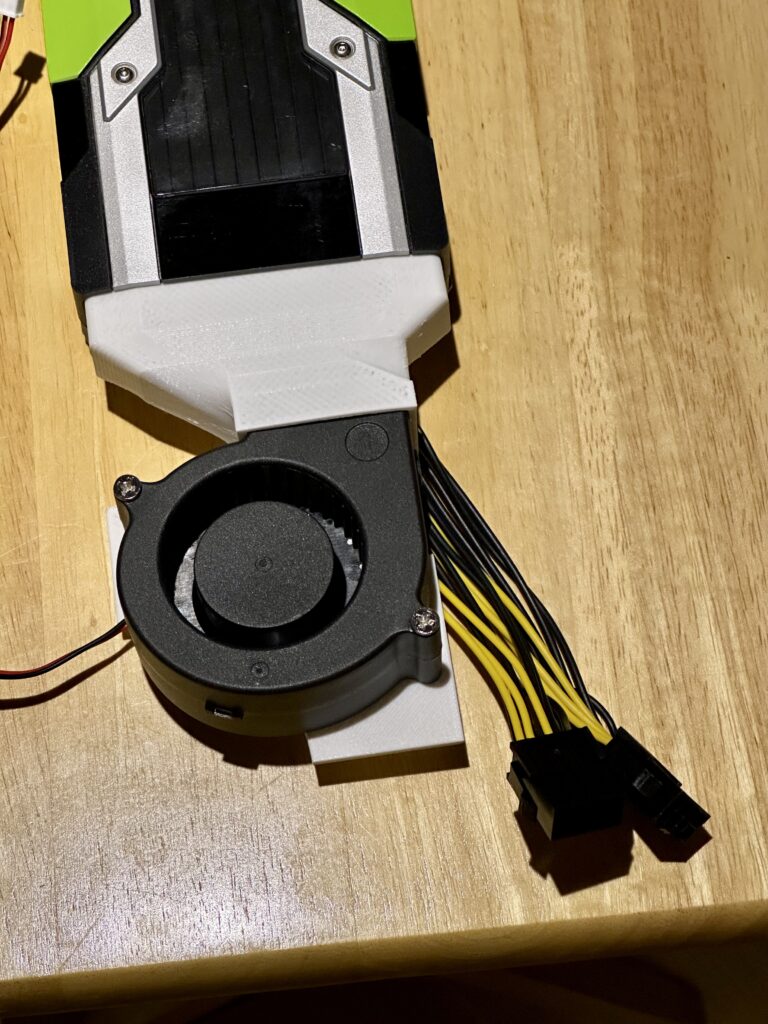
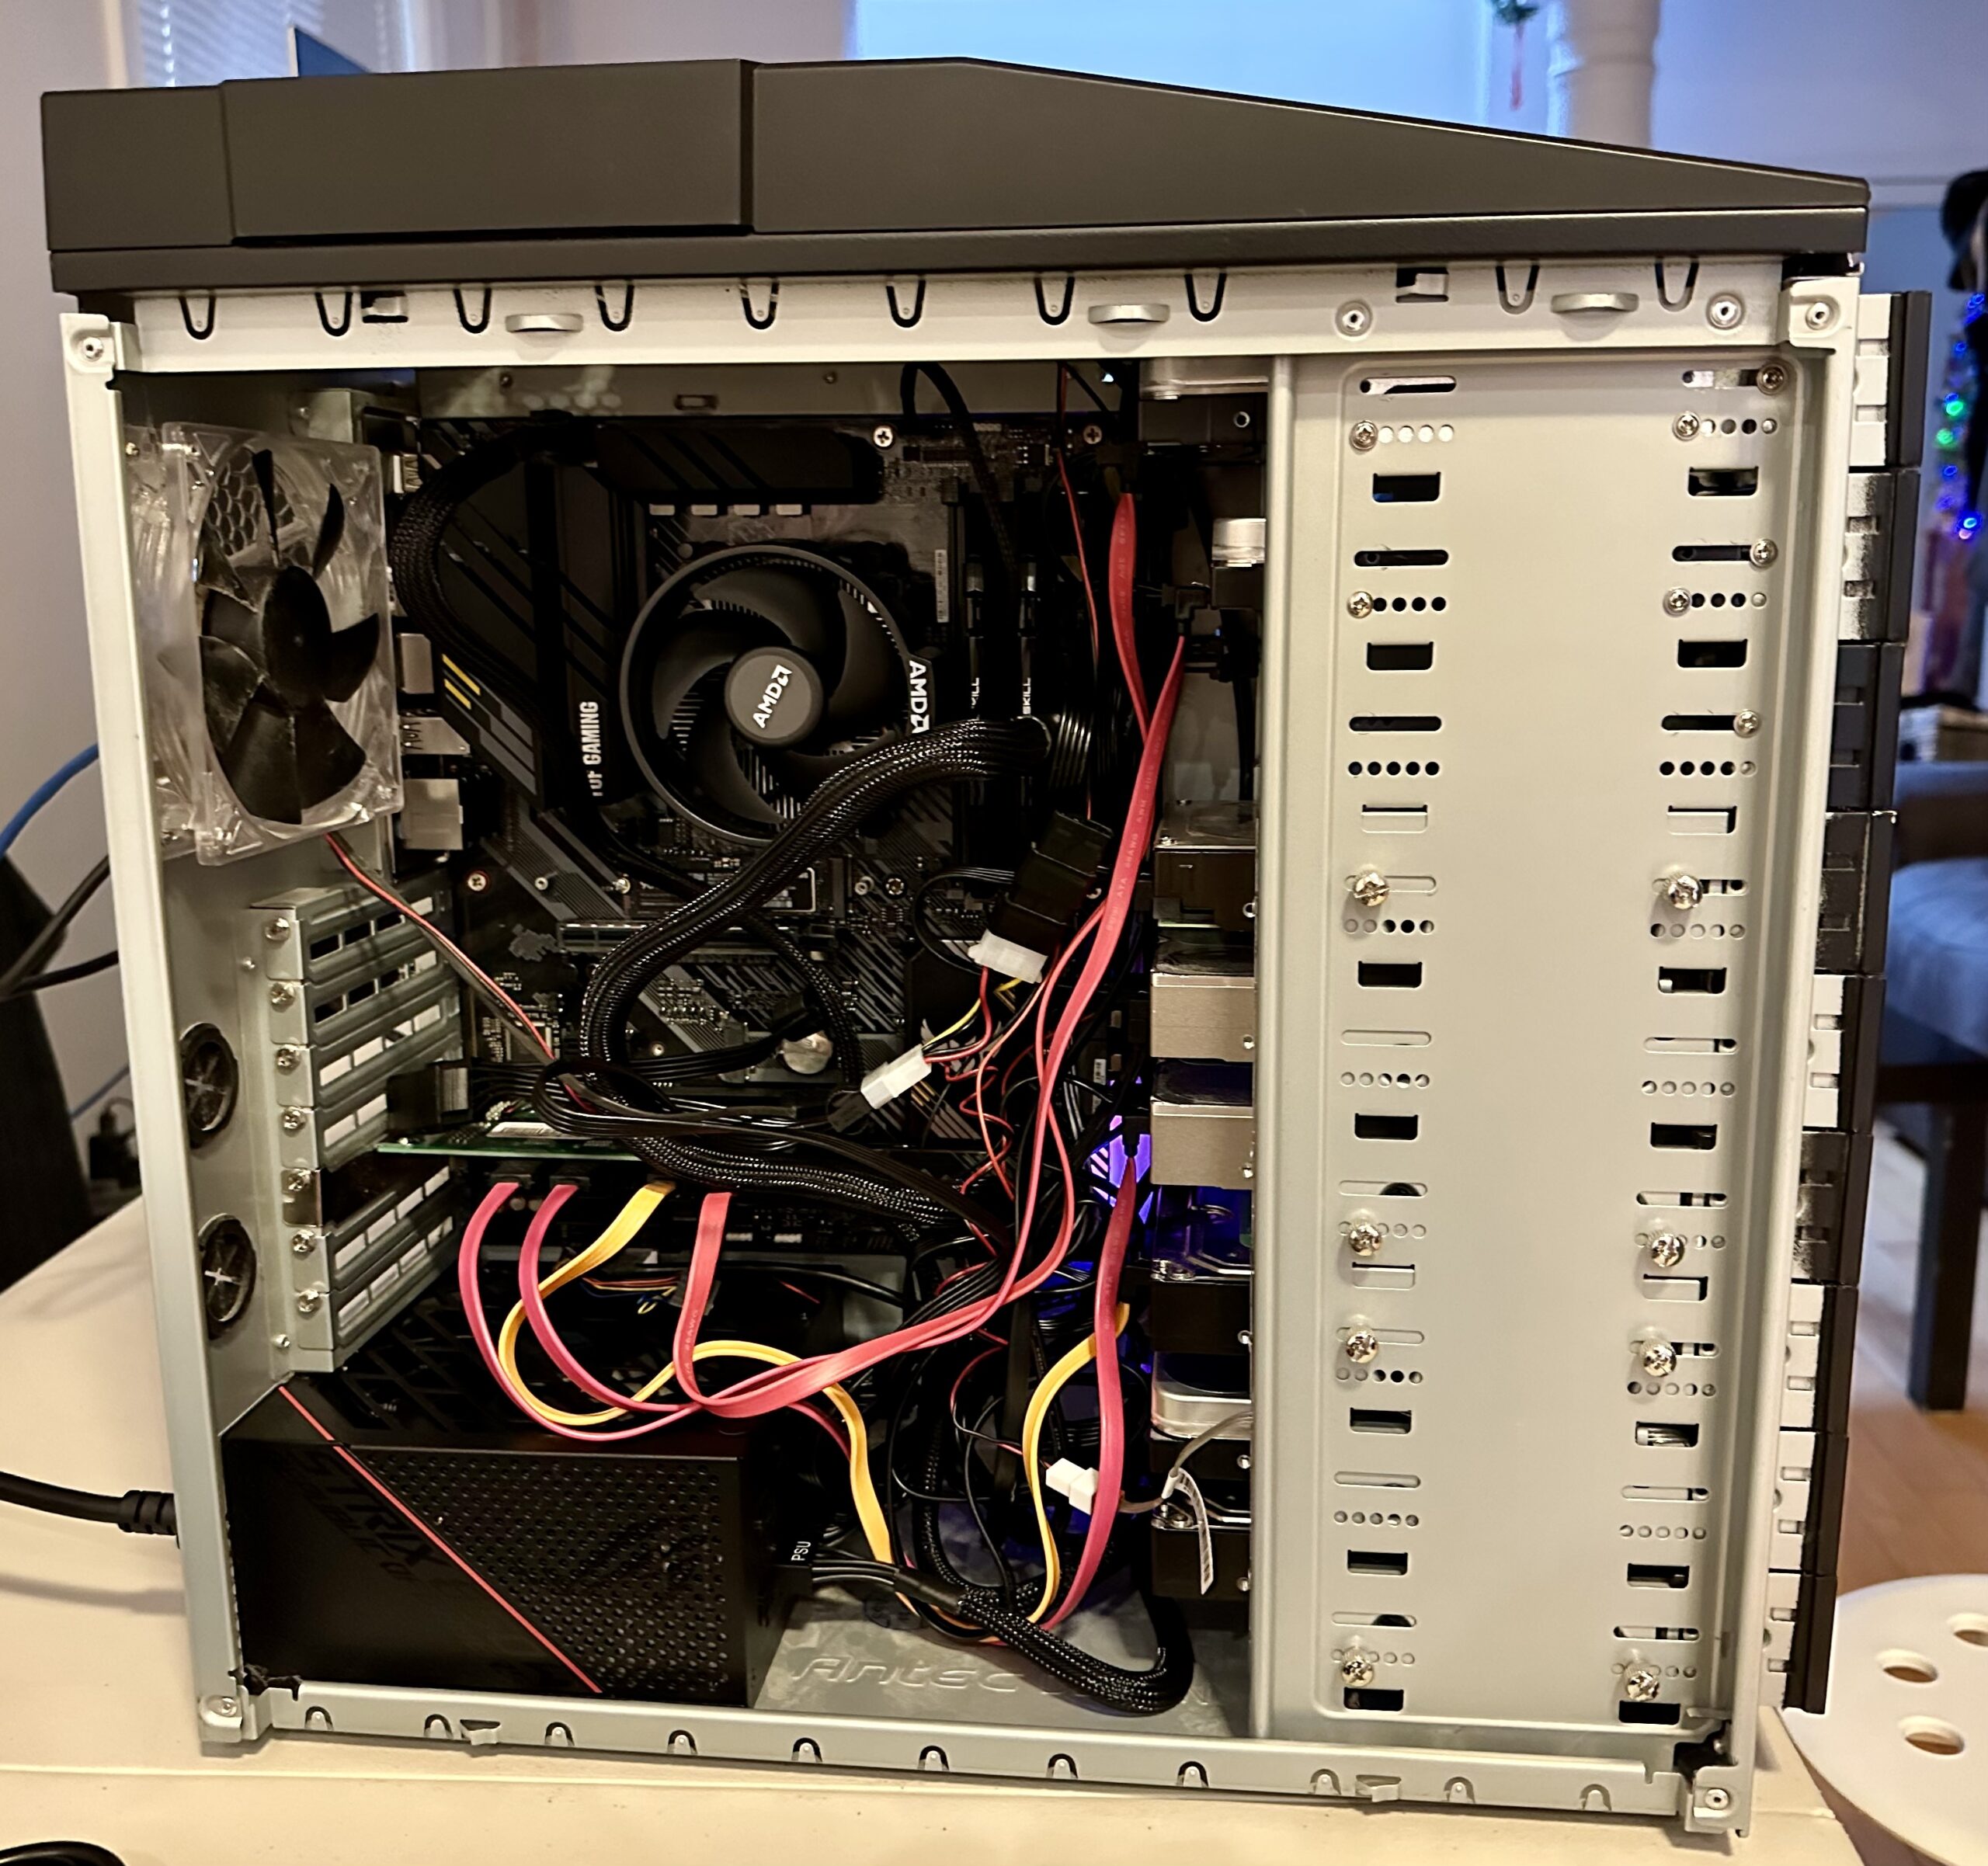
A custom design 3D fan shroud has to be designed and 3D printed because the P40 does not natively come with active cooling. The P40 is originally designed to operate in a data center so cooling is provided by the server chassis. The custom shroud design is posted on Thingiverse and some photos of the finished shroud is shown below.
Note that M3 screws were used to secure the shroud to the P40 GPU card. The GDSTIME fan came with the screws.
I also made a mistake by initially getting a 1000W ATX power supply that ended not fitting the case, because the case is built for SFX and SFX-L power supplies. Lesson learned!
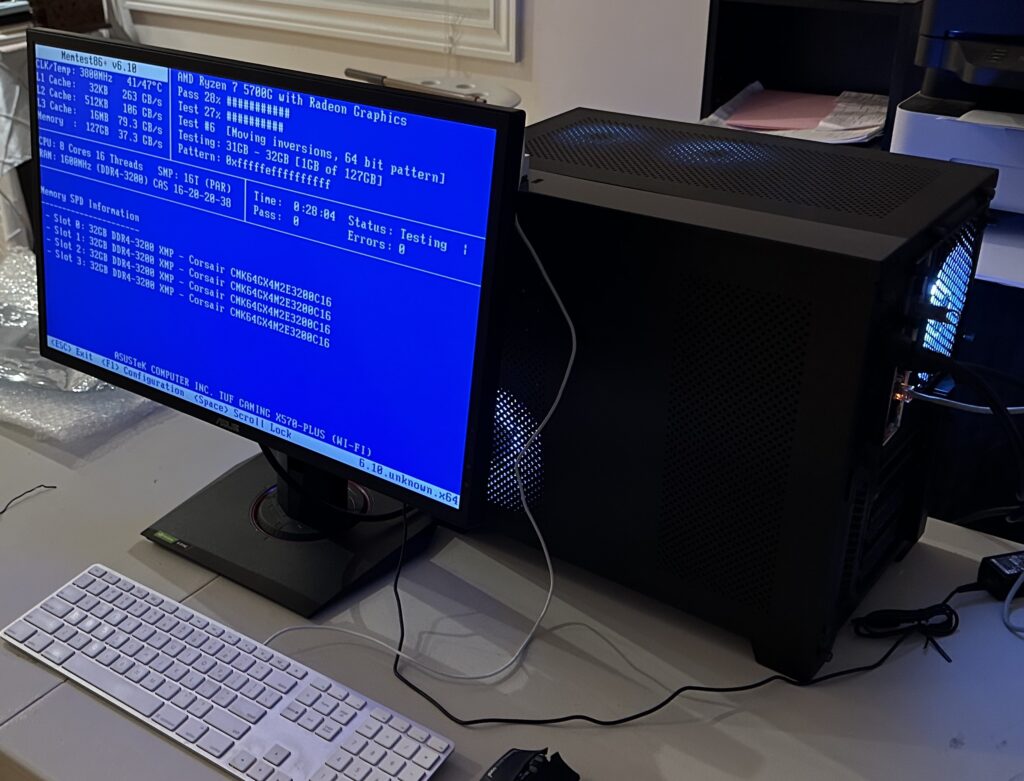
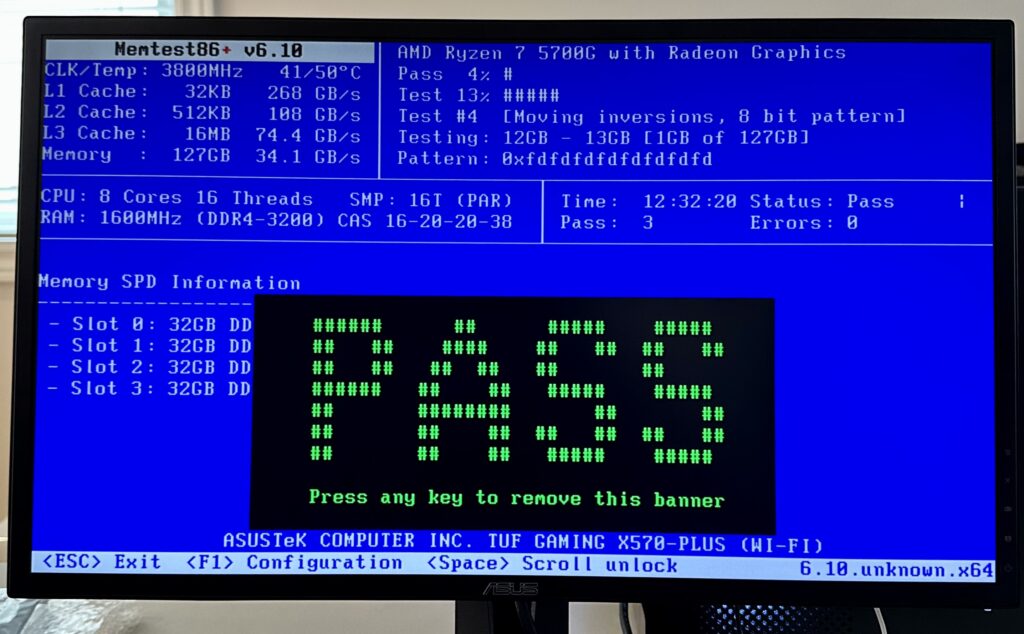
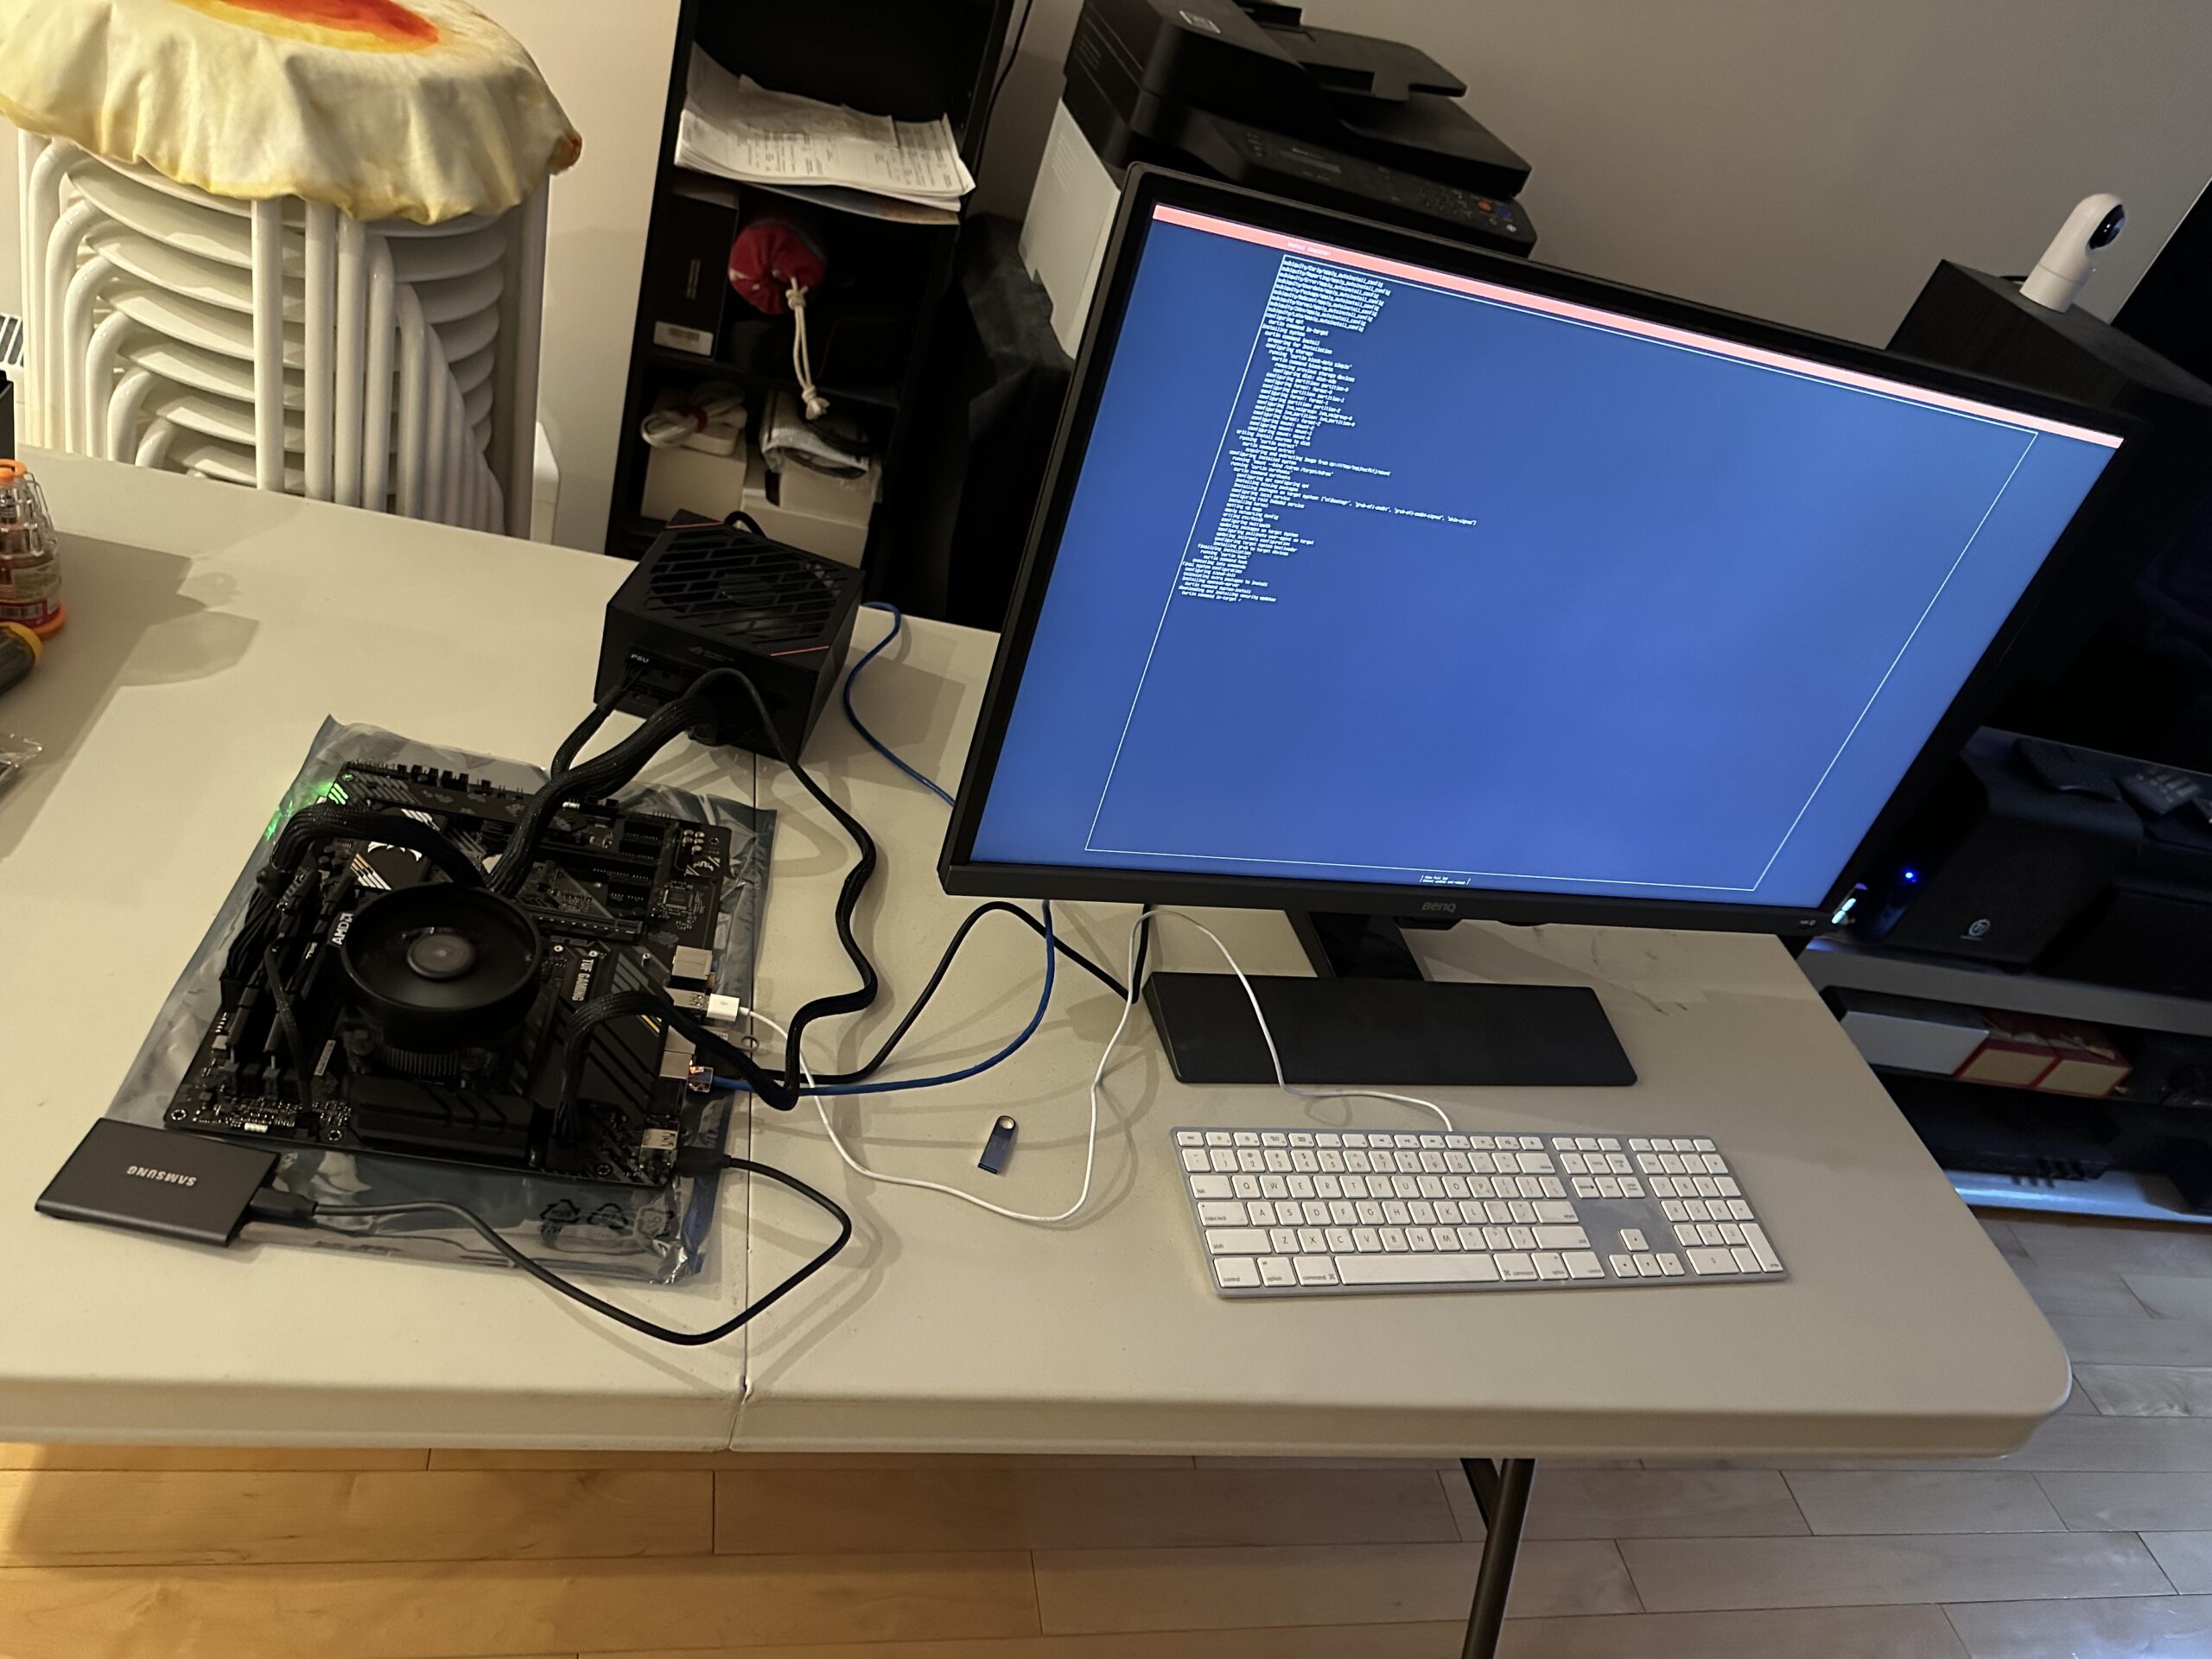
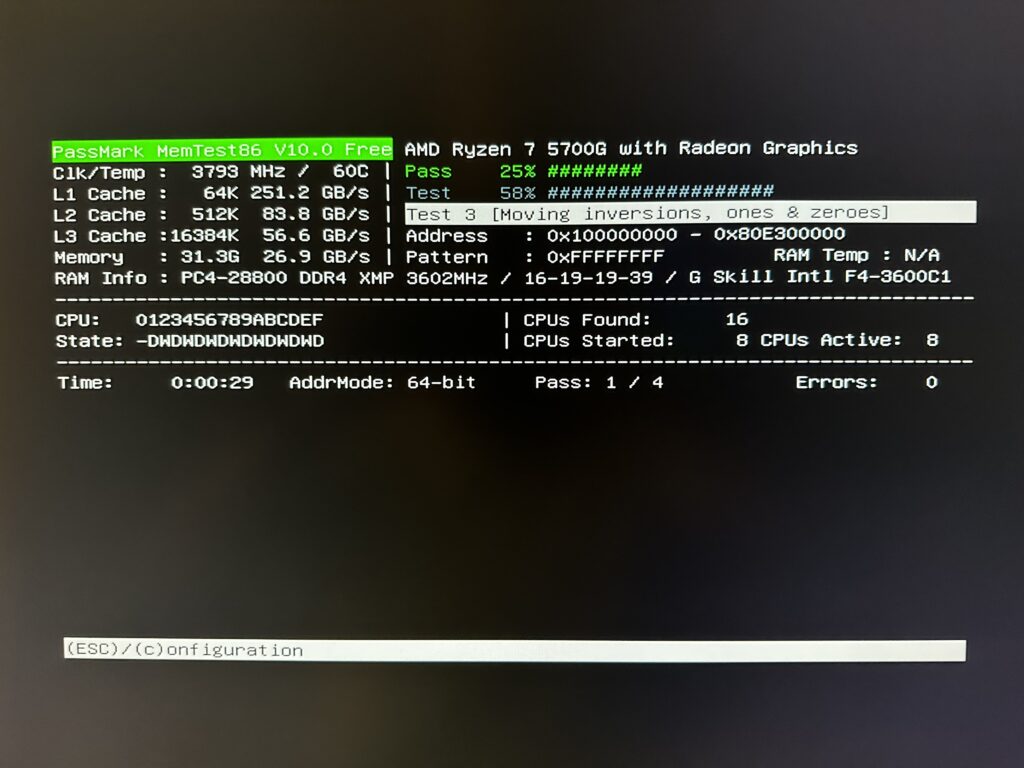
Once the machine is built I performed a 12 hours MemTest86+. It turned out that running the memory at the XMP profile was a bit unstable. I had to clock the memory back from its 3200MHz rating to 3000MHz.
After more than 12 hours with 3 passes.
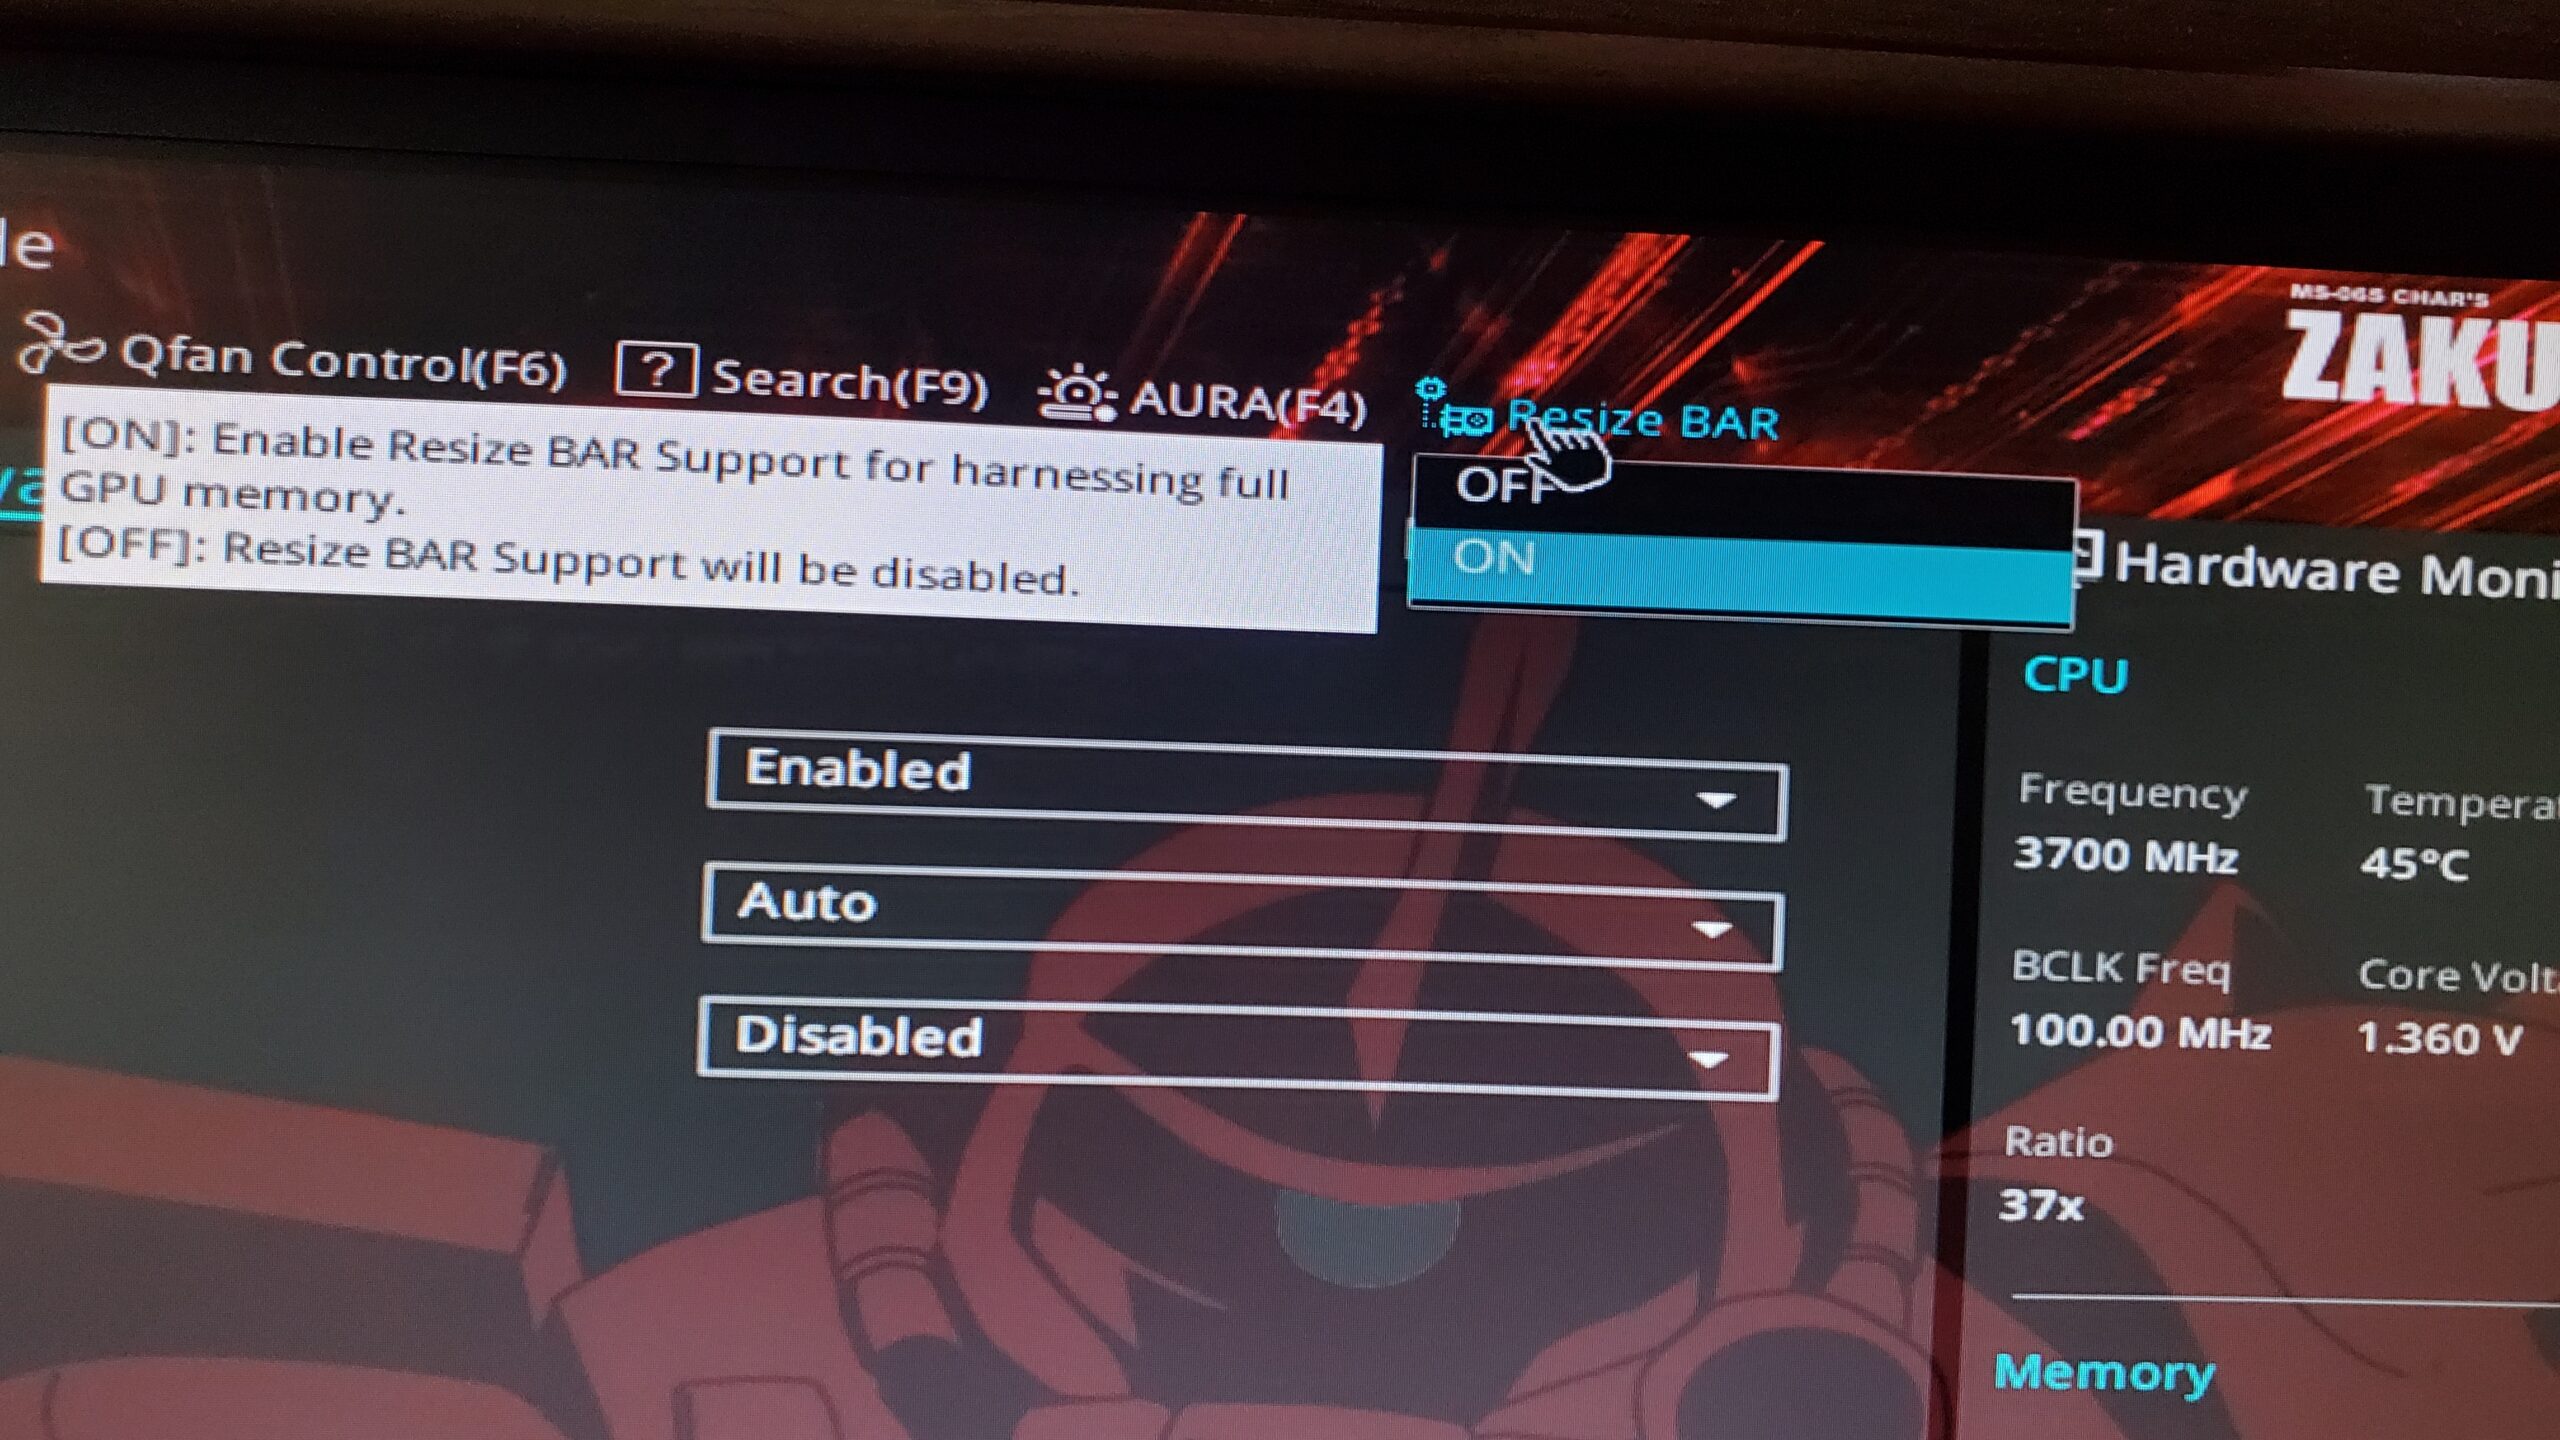
The BIOS settings had to be configured so that Resize BAR is ON. This is required for the P40 to function properly.
Turn on Resize BAR
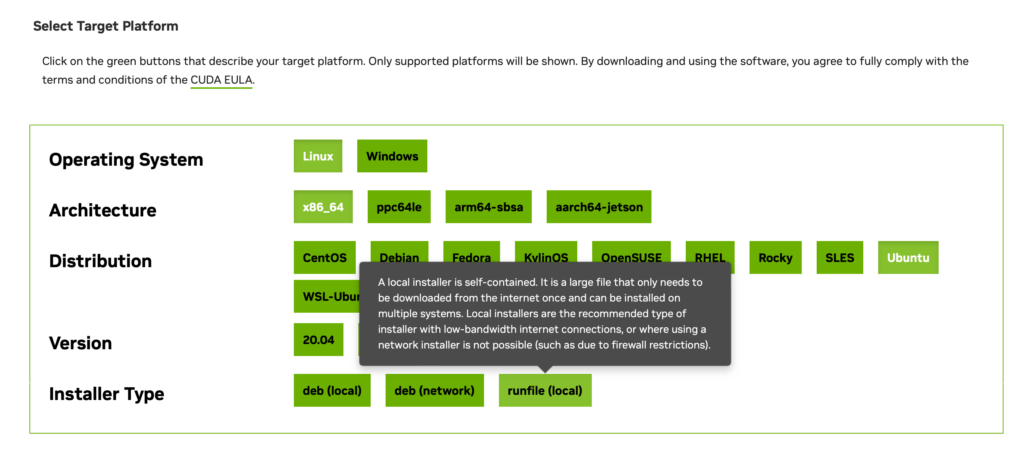
The next step is to install Ubuntu 22.04.3 LTS with Nvidia GPU and CUDA drivers. The latter was quite challenging. The traditional way of installing using the package manager did not work. The best way is to goto this site, and pick the run file like below:
Beside to use the runfile
The run file had to be run in recovery mode using the console because the installation will fail if an X11 window manager is running. Also all previous Nvidia drivers had to be removed and purged. The Ubuntu default installation process may have installed them.
A detail that was left out of the instructions is to set the appropriate shell paths once the installation is completed. The following changes were made with /etc/profile.d so that all users can benefit. If the login shell is using zsh, then /etc/zsh/zshenv has to be changed. Without this change, commands such as nvcc and other CUDA toolkit commands will not be found. The same is true for CUDA related share libraries.
$cat /etc/profile.d/cuda-path.sh

export CUDA_HOME="/usr/local/cuda"

if [[ ! ${PATH} =~ .*cuda/bin.* ]]
then
    export PATH="${PATH}:/usr/local/cuda/bin"
fi

if [[ ! ${LD_LIBRARY_PATH} =~ .*cuda/lib64.* ]]
then
    export LD_LIBRARY_PATH="${LD_LIBRARY_PATH}:/usr/local/cuda/lib64"
fi

if [[ ! ${LD_LIBRARY_PATH} =~ .*/usr/local/lib.* ]]
then
    export LD_LIBRARY_PATH="${LD_LIBRARY_PATH}:/usr/local/lib"
fi
In this hardware configuration the AMD CPU has integrated graphics, and the P40 does not have any HDMI or DisplayPort connections. We need to change the X11 configuration so that it will only use the AMD CPU while dedicating the P40 GPU for CUDA based computation. The following configurations have to be made in /etc/X11/xorg.conf:
The BusId can be obtained using the lspci command and be sure to change any hexadecimal notations to decimal in the configuration file. Without this xorg.conf configuration, the Ubuntu desktop will not start properly.
When everything is done properly, the command nvidia-smi should show the following:
Fri Aug 25 17:33:31 2023
+---------------------------------------------------------------------------------------+
| NVIDIA-SMI 535.86.10              Driver Version: 535.86.10    CUDA Version: 12.2     |
|-----------------------------------------+----------------------+----------------------+
| GPU  Name                 Persistence-M | Bus-Id        Disp.A | Volatile Uncorr. ECC |
| Fan  Temp   Perf          Pwr:Usage/Cap |         Memory-Usage | GPU-Util  Compute M. |
|                                         |                      |               MIG M. |
|=========================================+======================+======================|
|   0  Tesla P40                      Off | 00000000:01:00.0 Off |                  Off |
| N/A   22C    P8               9W / 250W |      0MiB / 24576MiB |      0%      Default |
|                                         |                      |                  N/A |
+-----------------------------------------+----------------------+----------------------+

+---------------------------------------------------------------------------------------+
| Processes:                                                                            |
|  GPU   GI   CI        PID   Type   Process name                            GPU Memory |
|        ID   ID                                                             Usage      |
|=======================================================================================|
|  No running processes found                                                           |
+---------------------------------------------------------------------------------------+
The machine is now ready for user account configurations.
A quick video encoding using ffmpeg with hardware acceleration and CUDA was performed to test the GPU usage. It was a bit of a challenge to compile ffmpeg with CUDA support. This is when I found out that I was missing the PATH configurations made above.
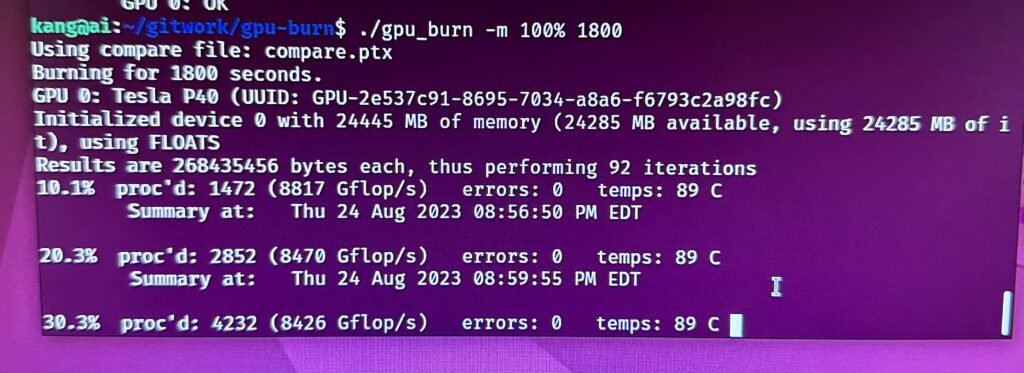
For good measure, gpu-burn was run for an hour to ensure that the GPU is functioning correctly.
Next step is to download and setup the tool chain for LLM development. We will save that for another posting.
Update: The runfile (local) method did not preserve through a system update using apt. I had to re-perform the installation with deb (local) methodology. I guess after not using the GPU for the desktop, we no longer have to run the operating system in recovery mode to install using the deb (local) method.
My wife and I were watching Lighter & Princess (点燃我,温暖你). In episode 5, a smart programmer completed a heart animation as part of a programming test in a university course. Everyone of his classmates had a mediocre and simplistic implementation.
My wife challenged me to do the same. I could have done this with SVG and Javascript, but I took the opportunity to learn more Python and Qt. The latter I have not used at all and was always curious how well it worked with Python. I decided to use the PyQt package instead of the PySide package.
I hacked this together today resulting in this rendition:
Click above to see it in action
The PyQt implementation worked really well across Windows, Mac, and Ubuntu Linux. I suppose the Javascript and SVG would have done the same, but I learned something new in this case.
The source code and the installation instructions are at:
In the first part of this post, I talked about making sure all the new hardware that I recently purchased works. Yesterday, upgrading from Ubuntu 20.04 LTS to 22.04 LTS was super simple. Unfortunately, that was the end of the easy part.
I thought I could just image by old boot drive and make a carbon copy of it on my new boot drive. My old boot drive is a simple SATA 512GB SSD, and my new boot drive is an NVMe M.2 1TB SSD plugged directly to the motherboard. The copying was pretty simple, but because the drives differ in size, I had to relayout the partition table with the new drive once the copy is completed. I did this with the parted command.
Unfortunately the new boot drive did not want to boot. At this point I had to do some research. The most helpful articles were:
Both of the above articles were an excellent refresher on how GRUB works. I have used GRUB since the beginning, but one gets super rusty when these types of tasks are only performed once every three or six years!
Instead of detailing what went wrong, I will just explain what I should have done. This way if I need it again in the future, it is here for my reference.
Step 1: Perform a backup of the old boot drive from a Live USB in shell mode. This is done on my server on a nightly basis. This method is clearly described on the Ubuntu Community Help Wiki.
Following this method I will end up with a compressed tar archive for my entire root directory, skipping some runtime and other unwanted directories.
Step 2: After installing a fresh install of the new Ubuntu LTS Server operating system on the new server and boot drive, I proceeded to backup the new boot with the same technique used in Step 1. I stored the backup of the new install on another external SSD drive that I have lying around. Also it is important that new boot drive partition layout of the new install contains a swap partition.
Step 3: I then restore the most recent backup (done in Step 1) of the old boot drive to the new boot drive. I then replaced the /boot/grub directory with the new contents from the new install which was backed up in Step 2. The new GRUB is already installed when we performed a brand new installation on the drive. We just want to make sure the boot partition matches the /boot/grub contents.
Step 4: We also need to fix up the /etc/fstab file because it contains references to drive devices from the old hardware. Paid special attention the main data partition and the swap partition. It should look something like this:
# /etc/fstab: static file system information.
#
# Use 'blkid' to print the universally unique identifier for a
# device; this may be used with UUID= as a more robust way to name devices
# that works even if disks are added and removed. See fstab(5).
#
# <file system> <mount point>   <type>  <options>       <dump>  <pass>
# / was on /dev/nvme1n1p2 during curtin installation
UUID=fc939be4-5292-4252-8120-7ef59b177e5b / ext4 defaults 0 1

# /boot/efi was on /dev/nvme0n1p1 during curtin installation
UUID=5187-A8C6 /boot/efi vfat defaults 0 1

# Swap partition
UUID=512d611e-6944-4a57-9748-ea68e9ec3fad	none	swap	sw	0	0

# /dev/mapper/airvideovg2-airvideo /mnt/airvideo ext4 rw,noatime 0 0
UUID=9e78425c-c1f3-4285-9fa1-96cac9114c55 /mnt/airvideo ext4 rw,noatime 0 0
Noticed that I also added the LVM logical volume for /mnt/airvideo, which is my RAID-1 array. The UUID can be obtained by the blkid command. Below is a sample output:
Step 4B (Potentially): If the system boots in the “grub>” prompt, then we will have persuade grub to manually boot by providing the following at the prompt:
grub> set root=(hd9,gpt2)
grub> linux /boot/vmlinuz root=/dev/nvme1n1p2
grub> initrd /boot/initrd.img
grub> boot
To find the root value on the first line, you have use the ls command which is explained in this article. The root parameter on the linux line references the partition which the root directory is mounted. In my case, it was /dev/nvme1n1p2.
After I rebooted, I reinstalled GRUB with the following as super user:
grub-install /dev/nvme1n1
It may also be required to update our initramfs using:
update-initramfs -c -k all
Step 5: At this point the system should reboot and all of the old server’s content should now be on the old hardware. Unfortunately we will need to fix the network interface.
First obtain the MAC address of the network interface using:
% sudo lshw -C network | grep serial
    serial: 04:42:1a:05:d3:c4
And then we will have to edit the /etc/netplan/00-installer-config.yaml file.
% cat /etc/netplan/00-installer-config.yaml
# This is the network config written by 'subiquity'
network:
  ethernets:
    enp6s0:
      dhcp4: true
      match:
        macaddress: 04:42:1a:05:d3:c4
      set-name: enp6s0
  version: 2
Ensuring the MAC address matches from lshw and that the name is the same as the old system. The name in this example is enp6s0. We then need to execute the following commands to generate the interface.
netplan generate
netplan apply
We need to ensure the name matches because many services on the server have configurations that references the interface name, such as:
Configurations in /var/network/interfaces
Samba (SMB) (/etc/samba/smb.conf)
Pihole (/etc/pihole/setupVars.conf)
Homebridge (/var/lib/homebridge/config.json)
Step 6: Fix the router provisioning DHCP IP addresses so that the new server has the same fixed IP address as the old server. This is important because there may be firewall rules referencing this IP address directly. The hostname should have been automatically restored when we restored the partition in Step 3.
Step 7: Our final step is to test the various services and ensure they are working properly. These include:
On May 15th, 2019 (more than three years ago), I performed a performance boost to my media server by upgrading its CPU, Motherboard, and Memory. You can read that experience in this post.
Today, I am going to be doing the same. It looks like we are on a cadence of every 3 years or so to do a spec bump. This time around we are also changing the same items, but will include the power supply as well in the swap. I also decided to swap the boot drive hardware from an old SSD drive to an NVME drive. All of this resulted in the following hardware acquisitions, all from Amazon, which I find them to have lower pricing (when factoring free shipping through Prime), than Newegg even during Black Friday and Cyber Monday offers.
The plan is to spend the time today to roughly test out all the new hardware.
Test Setup
I quickly did a skeleton setup to make sure Ubuntu 22.04.01 Server Edition works with all hardware involved, especially the networking.
Memory Test
Once I know Ubuntu server is working good, I am now testing the server’s new 32GB DDR4 memory. This is running as I write this post and will let it run overnight.
The plan for tomorrow is to upgrade the current media server from Ubuntu 20.04.5 LTS to Ubuntu 22.04.1 LTS. Once this is done, I can then backup everything, and move the new hardware into the old casing and hope everything works.