Simple Home Networking

I thought it would be a good idea for me to give a a small tutorial on basic home networking issues, which many may find useful when diagnosing connectivity issues.

A modern, typical home network may look something like this:

Typical Network (click to enlarge)

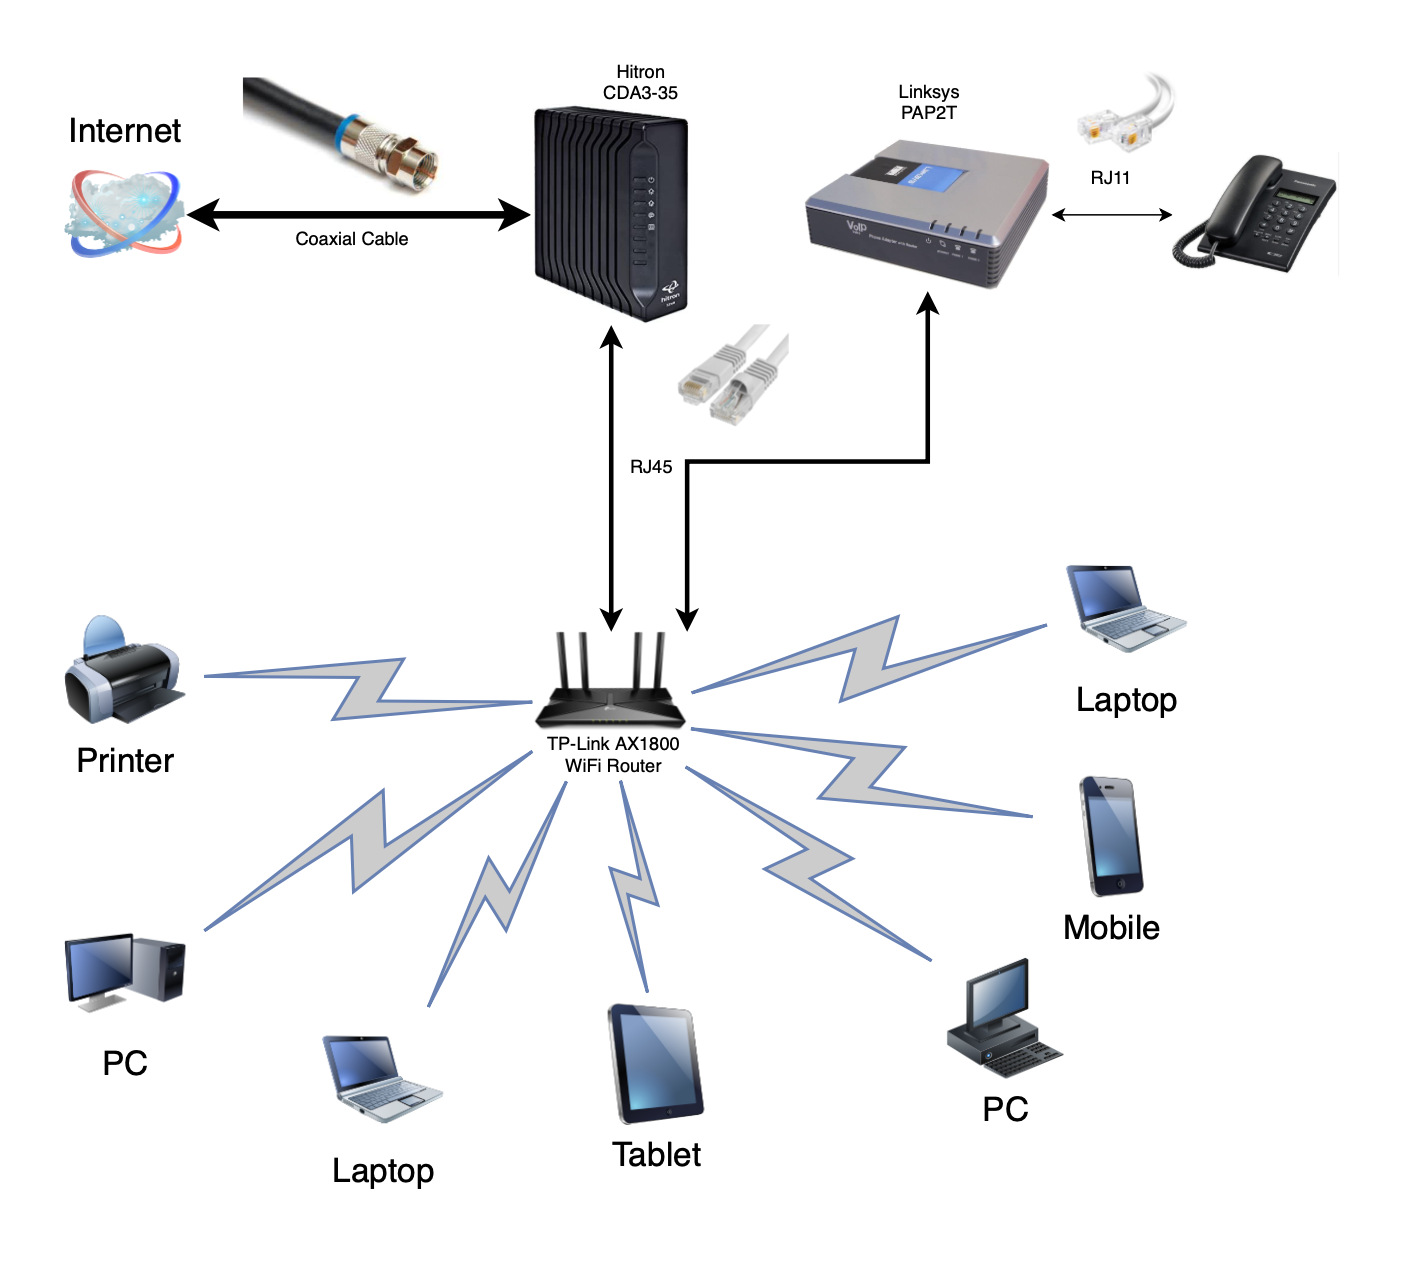
Most people in our neighbourhood will have a cable based Internet access.1 Internet comes through via the coaxial cable, like the traditional cable that you used for your cable TV. This cable is connected to a cable modem, which in our case is the Hitron CDA3-35. The cable modem then makes the Internet accessible via classic networking cables with RJ45 plugs. Think of the cable modem as your main door to the Internet and nothing else. Since this box is typically provided by your cable company, you should probably not trust it, so it is a main door without a lock.

Some cable modems also do Wi-Fi, like the new Rogers Ignite Hubs. For best performance and better security,2 I would recommend configuring the cable modem in bridge mode and not in gateway or router mode. This means that it should not be the box provisioning and managing your network, and it will have its Wi-Fi functionality turned off. This also avoids double NAT-ing, something to be avoided in your home, in my opinion.3

You should invest in your own Wi-Fi access by purchasing something like the TP-Link AX1800 WiFi Router.4 This box provisions your residential network and your local Wi-Fi. You can purchase more advance / expensive Wi-Fi solutions here depending on the size and complexity of your residential layout.

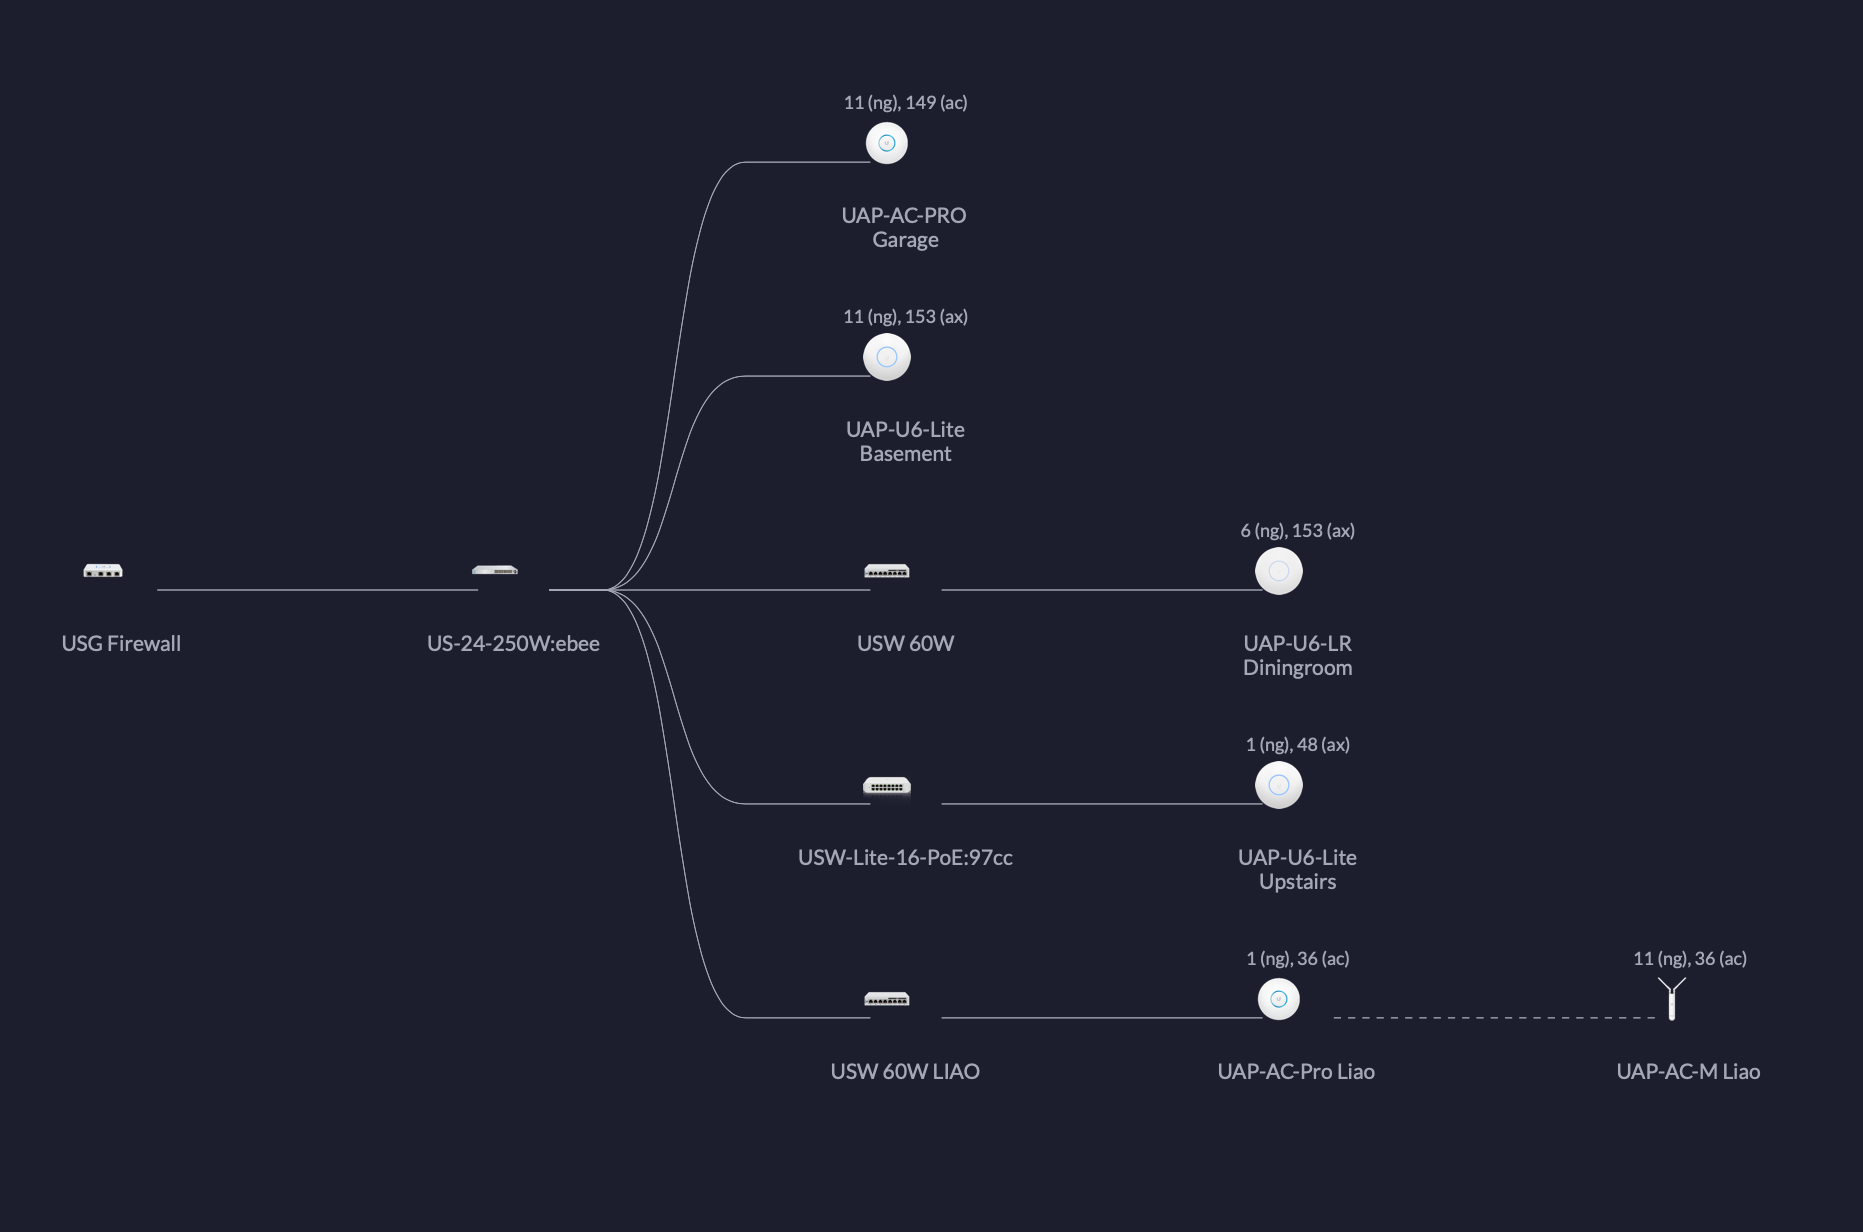
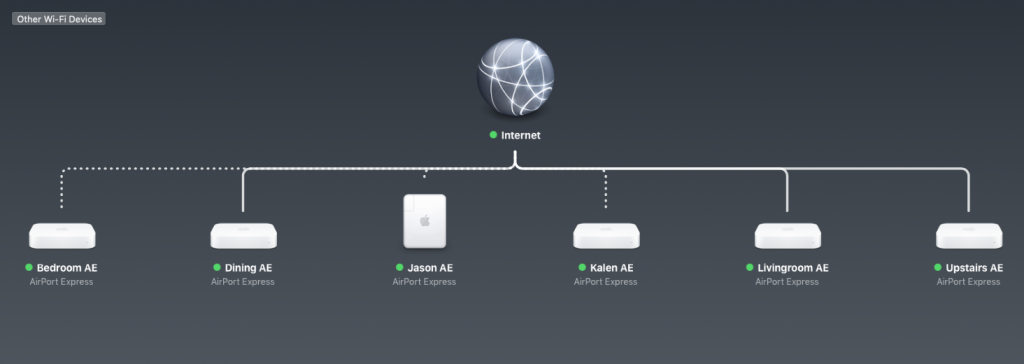
If you have more than one Wi-Fi access point, I would recommend that they all have the same SSID but on different Wi-Fi channels. This will make it convenient and optimal for your Wi-Fi devices. Also keep in mind that some old / cheap IoT devices only like the 2.4GHz band. If you are in that situation, then you should create a specific 2.4GHz network with a different SSID.

If you want to try out VOIP (Voice-Over IP), you may also connect a VOIP Adapter. In our example, we have the Linksys PAP2T box. I am not going to go into details of how to acquire VOIP, or set it up, but this box effectively converts Internet traffic into voice traffic. Traditional landline phones can be linked up to the VOIP adapter using normal phone cables.

Okay, now that we have the different parts of the network defined, let us present a basic diagnostic workflow.

Basic Diagnostic Workflow

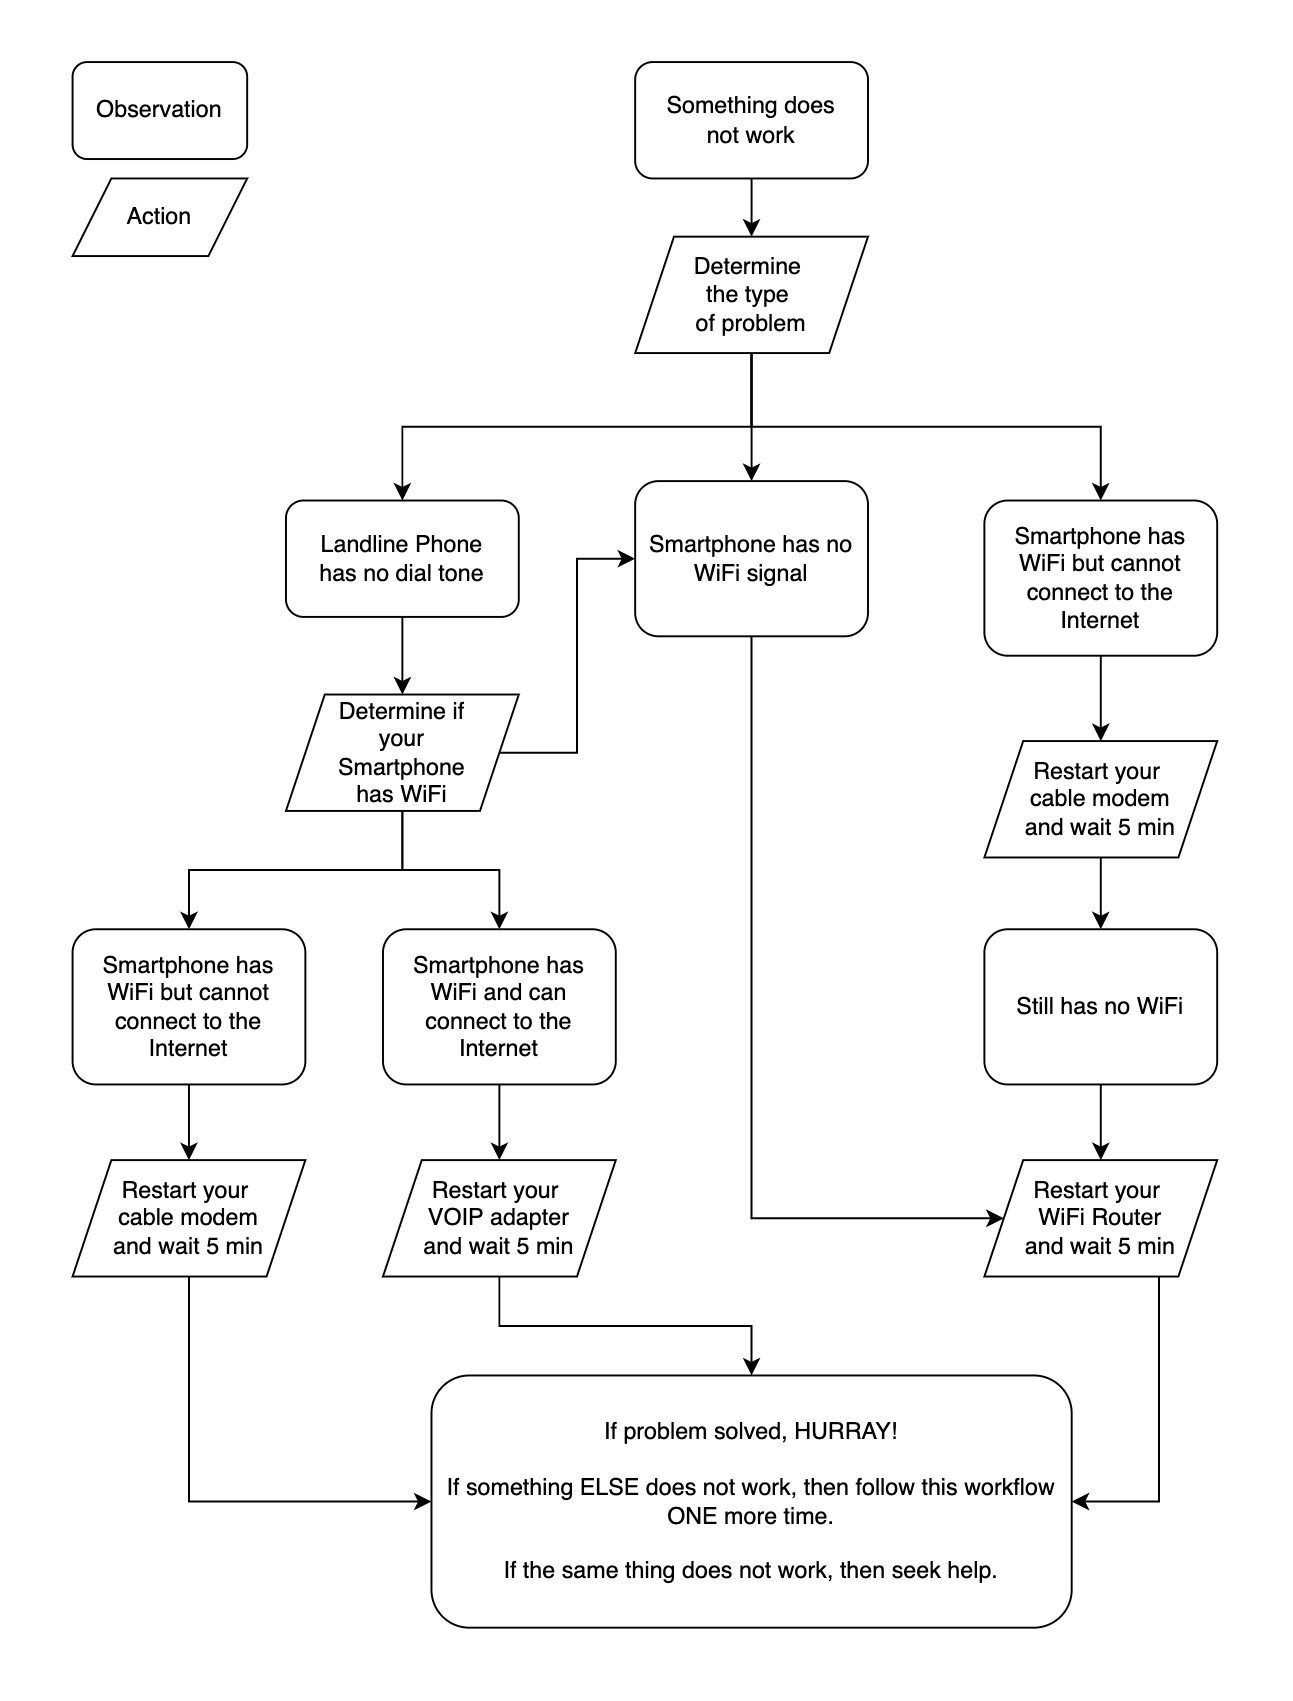
I hope the above introduction to the different parts of your home network and a workflow that you can follow will assist you in resolving some common connectivity issues in your home.

Wi-Fi 6 Upgrade with HomeKit Headaches

I recently upgraded all my WiFi access points to the Unifi UAP-U6-LR and UAP-U6-Lite. This will elevate my home to Wi-Fi 6 capable.

This was extremely exciting as my 802.11ax capable devices can now get between 100Mbps to 400Mbps depending on where we are in the house. It seems even the 802.11ac devices got about a 30% speed bump.

As a result of this upgrade, two UAP-AC-M mesh and one UAP-AC-Pro access points were retired from my house. I don’t recommend buying these devices any more since the Wi-Fi 6 devices from Ubiquiti are way more capable with higher performance and increase range than their 802.11ac access points.

However, the honeymoon period did not last long. After about a week, HomeKit devices started to show the dreaded “No Response” labels. Specifically, I had connectivity problems with Leviton Smart Decora Dimmers. In the past, all I had to do was recycle the HomeKit device and it was all good. Another episode of HomeKit and Leviton dimmer switch nightmare was experienced and documented by my previous blog post.

In this particular instance, the Leviton dimmers were able to join the Wi-Fi network and I can validate that with the Unifi Controller software. However, our HomeKit App was not able to connect to the dimmer switches. It took me sometime to figure out that the dimmers were unreachable by other Wi-Fi clients, but was reachable by computers that were physically wired to our network.

I found out which access point the dimmer switches were connected to and ssh into the access point to see if I can ping those devices, and sure enough they were unreachable. Below is a screen capture of the ARP listing from the access point.

Normal ARP listing from the Wi-Fi Access Point

When the dimmers were unreachable, the HW address was set to 00:00:00:00:00:00. After rebooting the culprit access point, I was able to access the offline dimmer switches again from the HomeKit App.

In summary, when HomeKit devices are offline with the dreaded “No Response” labels, here are the following things to try:

  • Ensure that local DNS is working properly and caches are emptied so that the latest data are available;
  • Ensure the device itself has acquired a valid IP address that is from your network;
  • Ensure that the device is reachable from the HomeKit App, typically from your iPhone or iPad;
  • Back trace the physical upstream networking equipment that is connected to your HomeKit device such as switches and access points and see which requires rebooting;

Apple could improve the HomeKit experience by allowing users to perform a full backup of the HomeKit configuration and reset the Home and perform a restore. Unfortunately, the closest thing that I found was from the Home+ App, but they do not restore device connectivity just their configurations.

When HomeKit works, you are literally like god, able to command light and switches with your voice in your home. When it does not work, it is extremely difficult to debug, due to a lack of diagnostics and logging.

After this update, my current networking layout now looks like this:

2021 October Network Layout (Click to Enlarge)

The Hidden Gem to AirPlay 2

A couple of weeks ago I came across a 9to5Mac article indicating that Apple has updated all Airport Express 2nd Gen (A1392) firmware to 7.8. This means that if you have one of these little gems you can pretty well enable any active speakers or receivers that can take RCA, 3.5 mm, and optical toslink inputs (with appropriate cables).

I immediately scour my local Kijiji site and Facebook marketplace for these devices. I ended up buying five of these little devices. One for $25 CAD and the others for $50 CAD. All are in working order and I added all five of them to my network, enabling all of my speakers in the house. Now every speakers on all three floors in my house are AirPlay 2 enabled.

My Airport Utility Status Display

To test the new setup, I ended playing Christmas Carols on all three floors. The songs are all in sync. As I walk around the house, it is pretty surreal to have the same song omnipresent around your head.

The boys are happy because their bedroom speakers are now enabled via AirPlay. This means they can be more lazy by switching songs while laying in bed. Before, they had to plug their iPhones into their receivers.

If these devices are still around, you cannot beat the $50 value to enable any speakers of your choice to be AirPlay 2 compatible. Start looking around!