If you follow my posts in the Solar category, I mentioned Frequency Shift Power Control. What is this? I will try to answer it in this post and explain why this is important in the context of full house backup and grid connectivity is lost during a power outage.
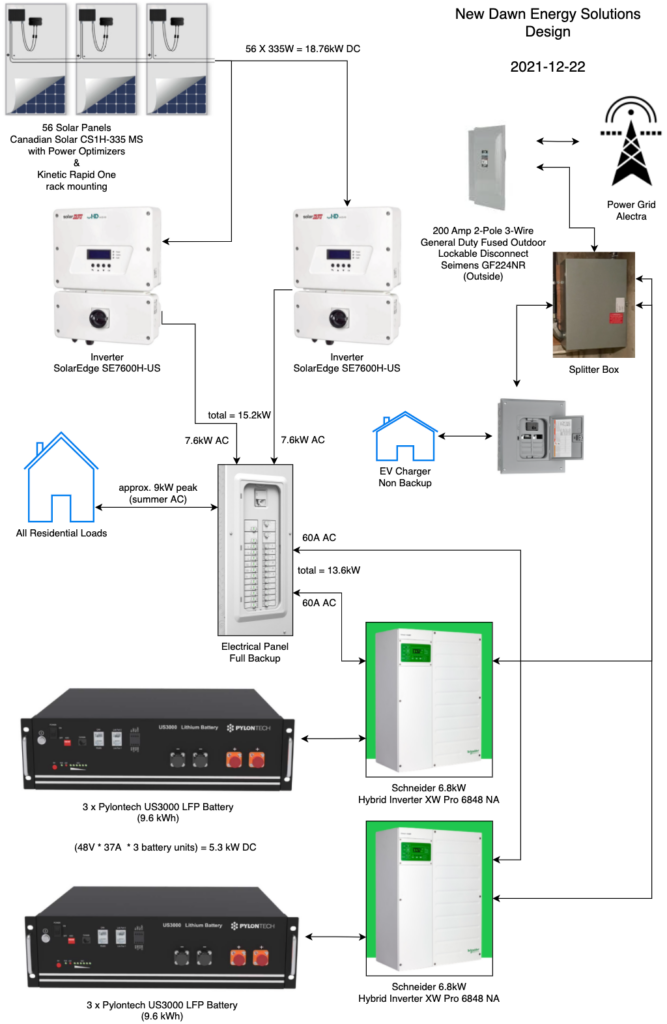
There are two types of inverters in my house. The Schneider inverters are the hybrid inverters that charge and discharge the battery and manage the battery power in conjunction with grid power. During normal operations when the grid is connected, the Schneider inverter can consume or send electricity to the grid.
The other type of inverter is the SolarEdge inverter, which is a solar inverter. Its job is to convert DC power from the solar panels into AC power which your house needs.
Having both hybrid and solar inverters connected on a common AC bus is known as AC coupling.
First, let me explain how it works when the grid is happy and we have connection. The solar power from the solar inverters will do the following in priority:
- Power the house; and send excess to
- Charge the batteries; and send excess to
- Send back to the grid
If there is not enough power from solar, then power is supplemented by the batteries or the grid depending how you configure the Schneider inverters. I will not get into how Schneider inverters are configured here.
Now when the grid is out (power outage) and the batteries are fully charged, the solar power has no where to go. To regulate solar power production, the hybrid inverters will communicate to the solar inverters via Frequency Shift Power Control. The hybrid inverters will intentionally shift the output power frequency from its normal 60Hz to something like 61Hz. This is done slowly. The solar inverters detects this anomaly and either throttles its power output or stop producing power completely. Once power regulation is completed, the hybrid inverters will shift back to 60Hz.
The solar inverters will come back online after an arbitrary down time. For SolarEdge, I have observed this to be around 5 to 10 minutes. The idea of having this down time is so that batteries can be discharged while powering the house and create more head room for new solar energy. Unfortunately the SolarEdge down time is not long enough, at least not for my house and my battery storage system. Once solar power is restored, you can end up in a cycle if the batteries are still topped up. The hybrid inverters will again shift its frequency to force the solar inverters to reduce or stop producing power. The cycle repeats until the grid comes back on.
Instead of a repeating the cycle every 5 to 10 minutes, it is better to manually turn off the solar inverters and wait for the batteries to draw down until you have enough head room for the batteries to absorb the solar energy again. For example, you may want to draw down the batteries from 100% to 80%, and then turn back on the solar inverters. In this scenario, excessive solar power can then be used to charge the batteries.
Another matter to pay attention to is UPS (Uninterruptible Power Supply) units. Certain models are very finicky to frequency shift and will actually shutdown instead of continuing to supply power. This is very frustrating as it cuts power to the very items that you are trying to protect from outages.
I had UPS units spread through out the house prior to our solar installation. Now I am simply going to replace these with surge protection power bars.