
Near the end of last year, we built an AI Server with two RTX3090 GPU card resulting in 48GB of VRAM. Back then we were running Qwen3 14B model locally on the machine.
Agentic coding 8 months ago was very instructional driven. We would have to concentrate on small tasks and explain the steps in the detail to the AI. There were also many mistakes. For every 5 tasks, there may be bugs based on duplication, syntax errors, misunderstanding, or simply incompetence on behalf of the AI.
How far have we come? Today using the same hardware, we are now running Qwen3.8 27B model. Things are moving very fast. I think since the initial creation of the machine, we have updated the LLM model more than three times, and the vLLM inference serving engine more than four times.
With this current model, we can truly give complex tasks. One major example is that we were unhappy with Perplexica. Its recent release does not perform very well with integrating web search results. We ended up asking the AI to create a new chat application from scratch using an architecture and technology platforms of its choosing. We collaborate with the user interface layout and design.
The final result is stunning. Below is a screenshot of our custom chat application.
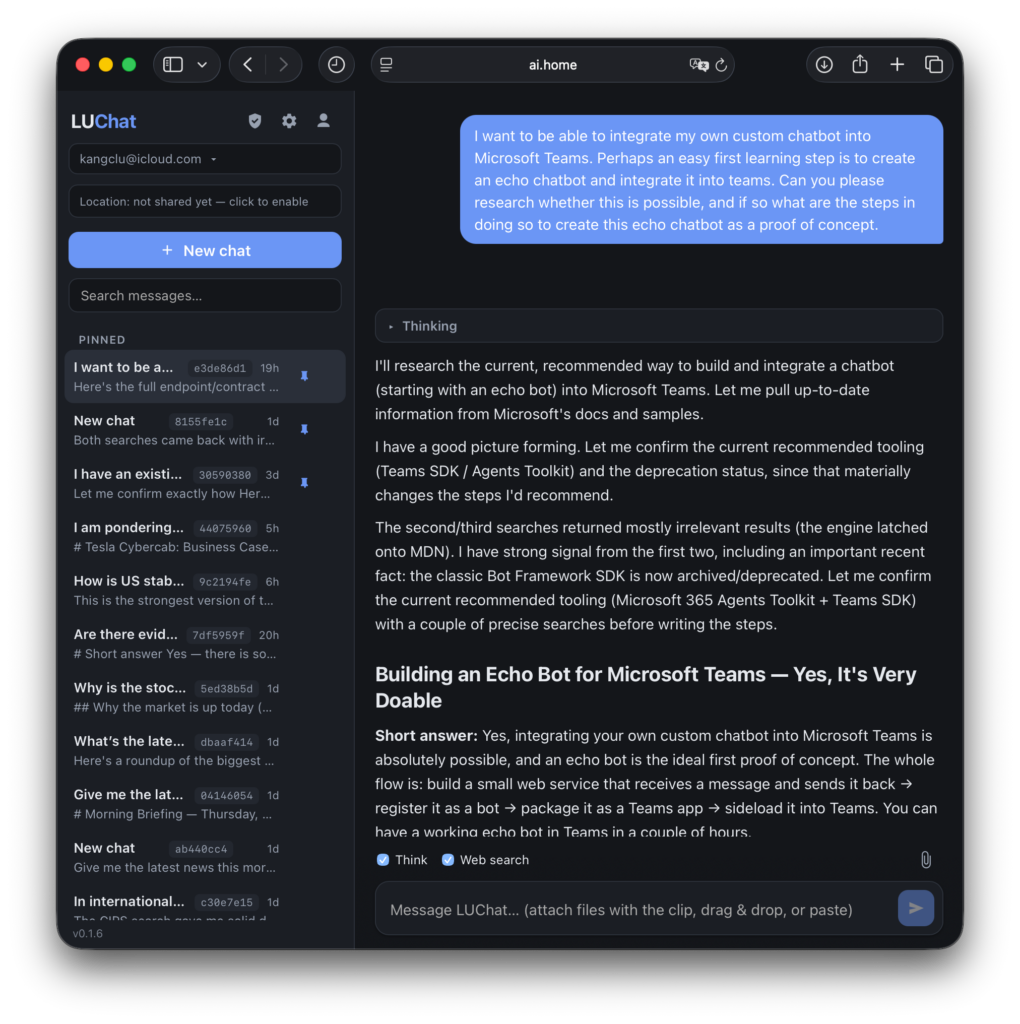
We used very similar steps to install vLLM (v0.28.0 as of this writing):
python3 -m venv .venv
source .venv/bin/activate

pip install torch-c-dlpack-ext
pip install torch torchvision --index-url https://download.pytorch.org/whl/cu130
pip install vllm
We also modified the systemd unit file so that vLLM starts with Qwen3.8 27B model when it boots. The contents of the /etc/systemd/system/vllm.service file is below:
[Unit]
Description=vLLM OpenAI Compatible Server
After=network.target

[Service]
# User and Group to run the service as (e.g., 'youruser', 'yourgroup')
User=kang
Group=kang

# Set the working directory
WorkingDirectory=/home/kang/py_vllm

Environment=CUDA_VISIBLE_DEVICES=0,1

# Need for vLLM 0.27.1
Environment=FLASHINFER_DISABLE_VERSION_CHECK=1

# New recommendation from lued/Qwen3.8-27B-INT8-W8A16-MTP
Environment NCCL_P2P_DISABLE=1
Environment NCCL_CUMEM_ENABLE=0
Environment VLLM_WORKER_MULTIPROC_METHOD=spawn
Environment OMP_NUM_THREADS=1
Environment VLLM_USE_FLASHINFER_SAMPLER=1
Environment PYTORCH_CUDA_ALLOC_CONF=expandable_segments:True,max_split_size_mb:512

# The command to start the vLLM server
# Qwen3.8 27B
ExecStart=/home/kang/py_vllm/.venv/bin/python -m vllm.entrypoints.openai.api_server --model lued/Qwen3.8-27B-INT8-W8A16-MTP \
  --served-model-name Qwen3.8-27B \
  --tensor-parallel-size 2 \
  --pipeline-parallel-size 1 \
  --dtype float16 \
  --performance-mode balanced \
  --max-model-len 262144 \
  --gpu-memory-utilization 0.93 \
  --max-num-seqs 4 \
  --max-num-batched-tokens 4096 \
  --kv-cache-dtype fp8_e4m3 \
  --enable-prefix-caching \
  --enable-chunked-prefill \
  --mamba-cache-mode align \
  --prefix-match-unit 16 \
  --enable-prompt-tokens-details \
  --reasoning-parser qwen3 \
  --tool-call-parser qwen3_xml \
  --enable-auto-tool-choice \
  --disable-custom-all-reduce \
  --trust-remote-code \
  --default-chat-template-kwargs '{"enable_thinking":true,"preserve_thinking":true}' \
  --override-generation-config '{"temperature":1.0,"top_p":0.95,"top_k":20,"min_p":0.0,"repetition_penalty":1.0,"presence_penalty":0.8}' \
  --speculative-config '{"method":"mtp","num_speculative_tokens":3}' --host 0.0.0.0 --port 8000 --api-key XXXXXXXX

# Restart the service if it fails
Restart=always

[Install]
WantedBy=multi-user.target
We used the opencode.ai harness to build the chat-bot. To configure the harness, below is the ~/.config/opencode/opencode.jsonc:
{
  "$schema": "https://opencode.ai/config.json",
  "permission": {
    "lsp": "allow",
  },
  "provider": {
    "vLLM": {
      "npm": "@ai-sdk/openai-compatible",
      "name": "vLLM (local)",
      "options": {
        "baseURL": "http://0.0.0.0:8000/v1",
        "timeout": false,
        "chunkTimeout": 2400000,
      },
      "models": {
        "Qwen3.8-27B": {
          "name": "Qwen3.8-27B",
          "options": {
            "max_tokens": 262144,
            "max_completion_tokens": 132072,
            "temperature": 1.0,
            "top_p": 0.95,
            "top_k": 20,
            "min_p": 0,
            "presence_penalty": 0.0,
            "repetition_penalty": 1.0,
          },
        },
      },
    },
  },
}
Who would have thought that the first RUST and REACT application that I ended up writing (producing) is one with AI.