It looks like Transport Canada has updated their eligible vehicles for their Incentives for Zero-Emission Vehicles Program.
From Transport Canada
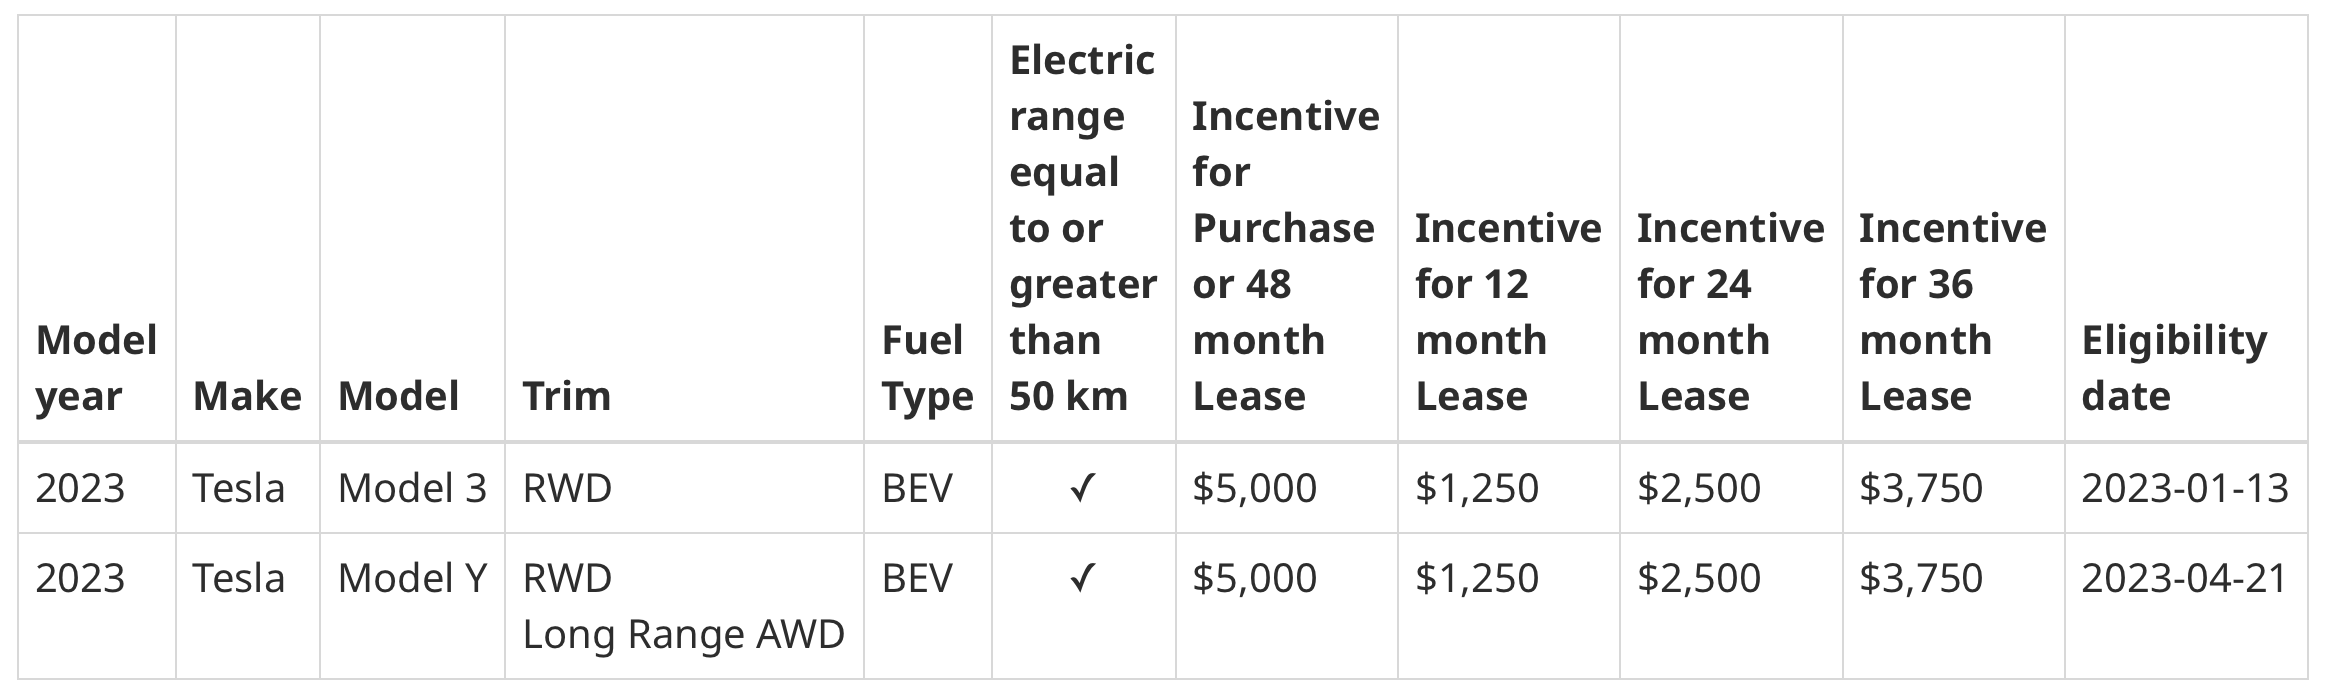
From above, it is clear that the Model Y Long Range AWD is now eligible! This is great news. I will be able to save $5000 from the purchase price.
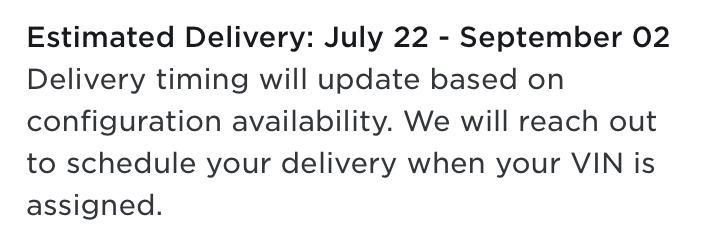
When I checked my Tesla account, I can see that my order has been updated.
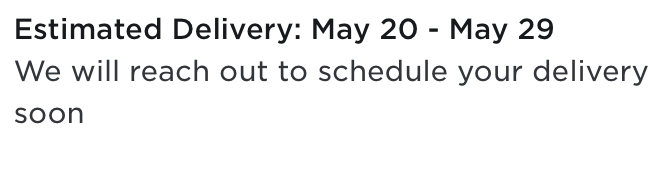
That is of course excellent news. However there is a downside. The delivery date is now pushed out to be between late July and early September, so fingers crossed that we’ll be getting it sooner rather than later.
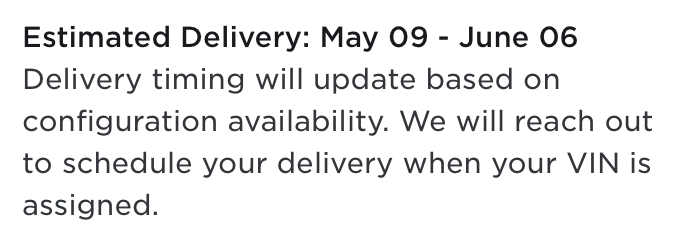
Above estimate as of April 25th, 2023
Update May 1, 2023:
Above estimate as of May 1st, 2023
Update May 6, 2023:
Received an email update indicating “Final Payment is now ready”. Went to the Tesla site and into my account and received the bank wire info. We will call the bank on Monday to arrange the transfer.
Above is displayed as of May 6th, 2023
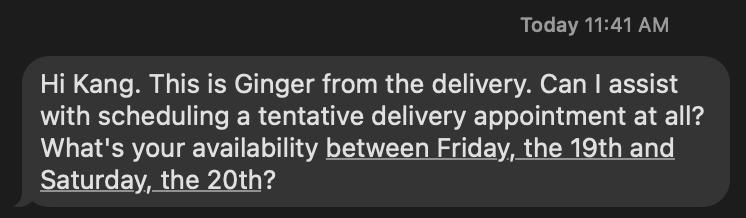
Update May 14, 2023:
I received a text message this morning:
I chose the 20th, and we are temporarily booked for 11:30am for delivery. I have not received a VIN number as of yet. Hope to get this soon, as I will need it for augmenting our auto insurance.
This is our journey to buy a full Battery Electric Vehicle (BEV).
When Tesla announced their Model 3 back in 2016, I was one of the first to place a $1,000 reservation for one. The promise was for an electric vehicle costing $35,000 USD. In the spring of 2018 when the first delivery to Canada happened, the price was $64,100 CAD for the Long Range Model 3. This is not the AWD version, and with the taxes it will exceed $70K. The on the road – all in – price from one of our neighbours exceeded $80K when his vehicle got delivered. Okay, at the time there was a $15K incentive from the government.
The final sticker shock was a bit of a surprise, and we were still probably not ready for a full electric vehicle at the time. We checked out the Nissan Leaf, the Hyundai Kona, and the Kia Niro. These were all in high demand with waiting lists exceeding a year. We waited for the Subaru Impreza Hybrid, which never made it to Ontario, and the availability in Quebec was spotty at best.
In a moment of pure coincidence, we got hold of a Toyota Prius Prime on October, 2019. This is our first Plugin Hybrid Electric Vehicle (PHEV). We decided on a PHEV to get our feet wet with EV tech but also mitigated our fear of range anxiety. We felt less stress with a hybrid, and the small plugin battery which offers a limited range of the 35 to 45km. This short range will make do for 90% of our trips, which are mainly grocery runs, errands, and trips to local restaurants. We thought this PHEV will be perfect for us.
The experience driving in EV mode with the Toyota has made gas station visits an extreme rarity. We are talking like two partial fill ups during 2020, and probably less than 10 fill ups to date (all partials), and we are on its fourth year driving the Toyota.
We love the PHEV experience so much that on July 27, 2021, we placed a reservation on a RAV4 Prime at Richmond Hill Toyota and were warned that the wait will be very long.
Hedging our bets, we later placed another reservation on a KIA EV6 at KIA Stouffville on September 2, 2022. We thought the EV6 would be in a similar price range of the RAV4 Prime. You can read more about our reservation experience here.
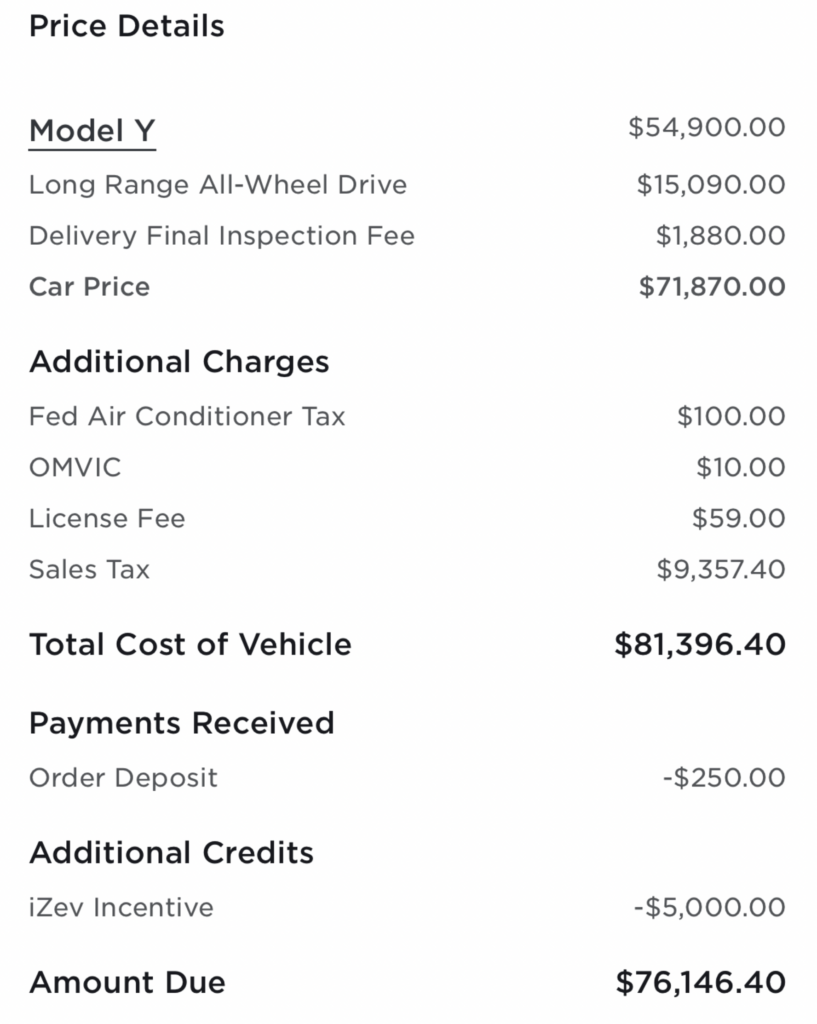
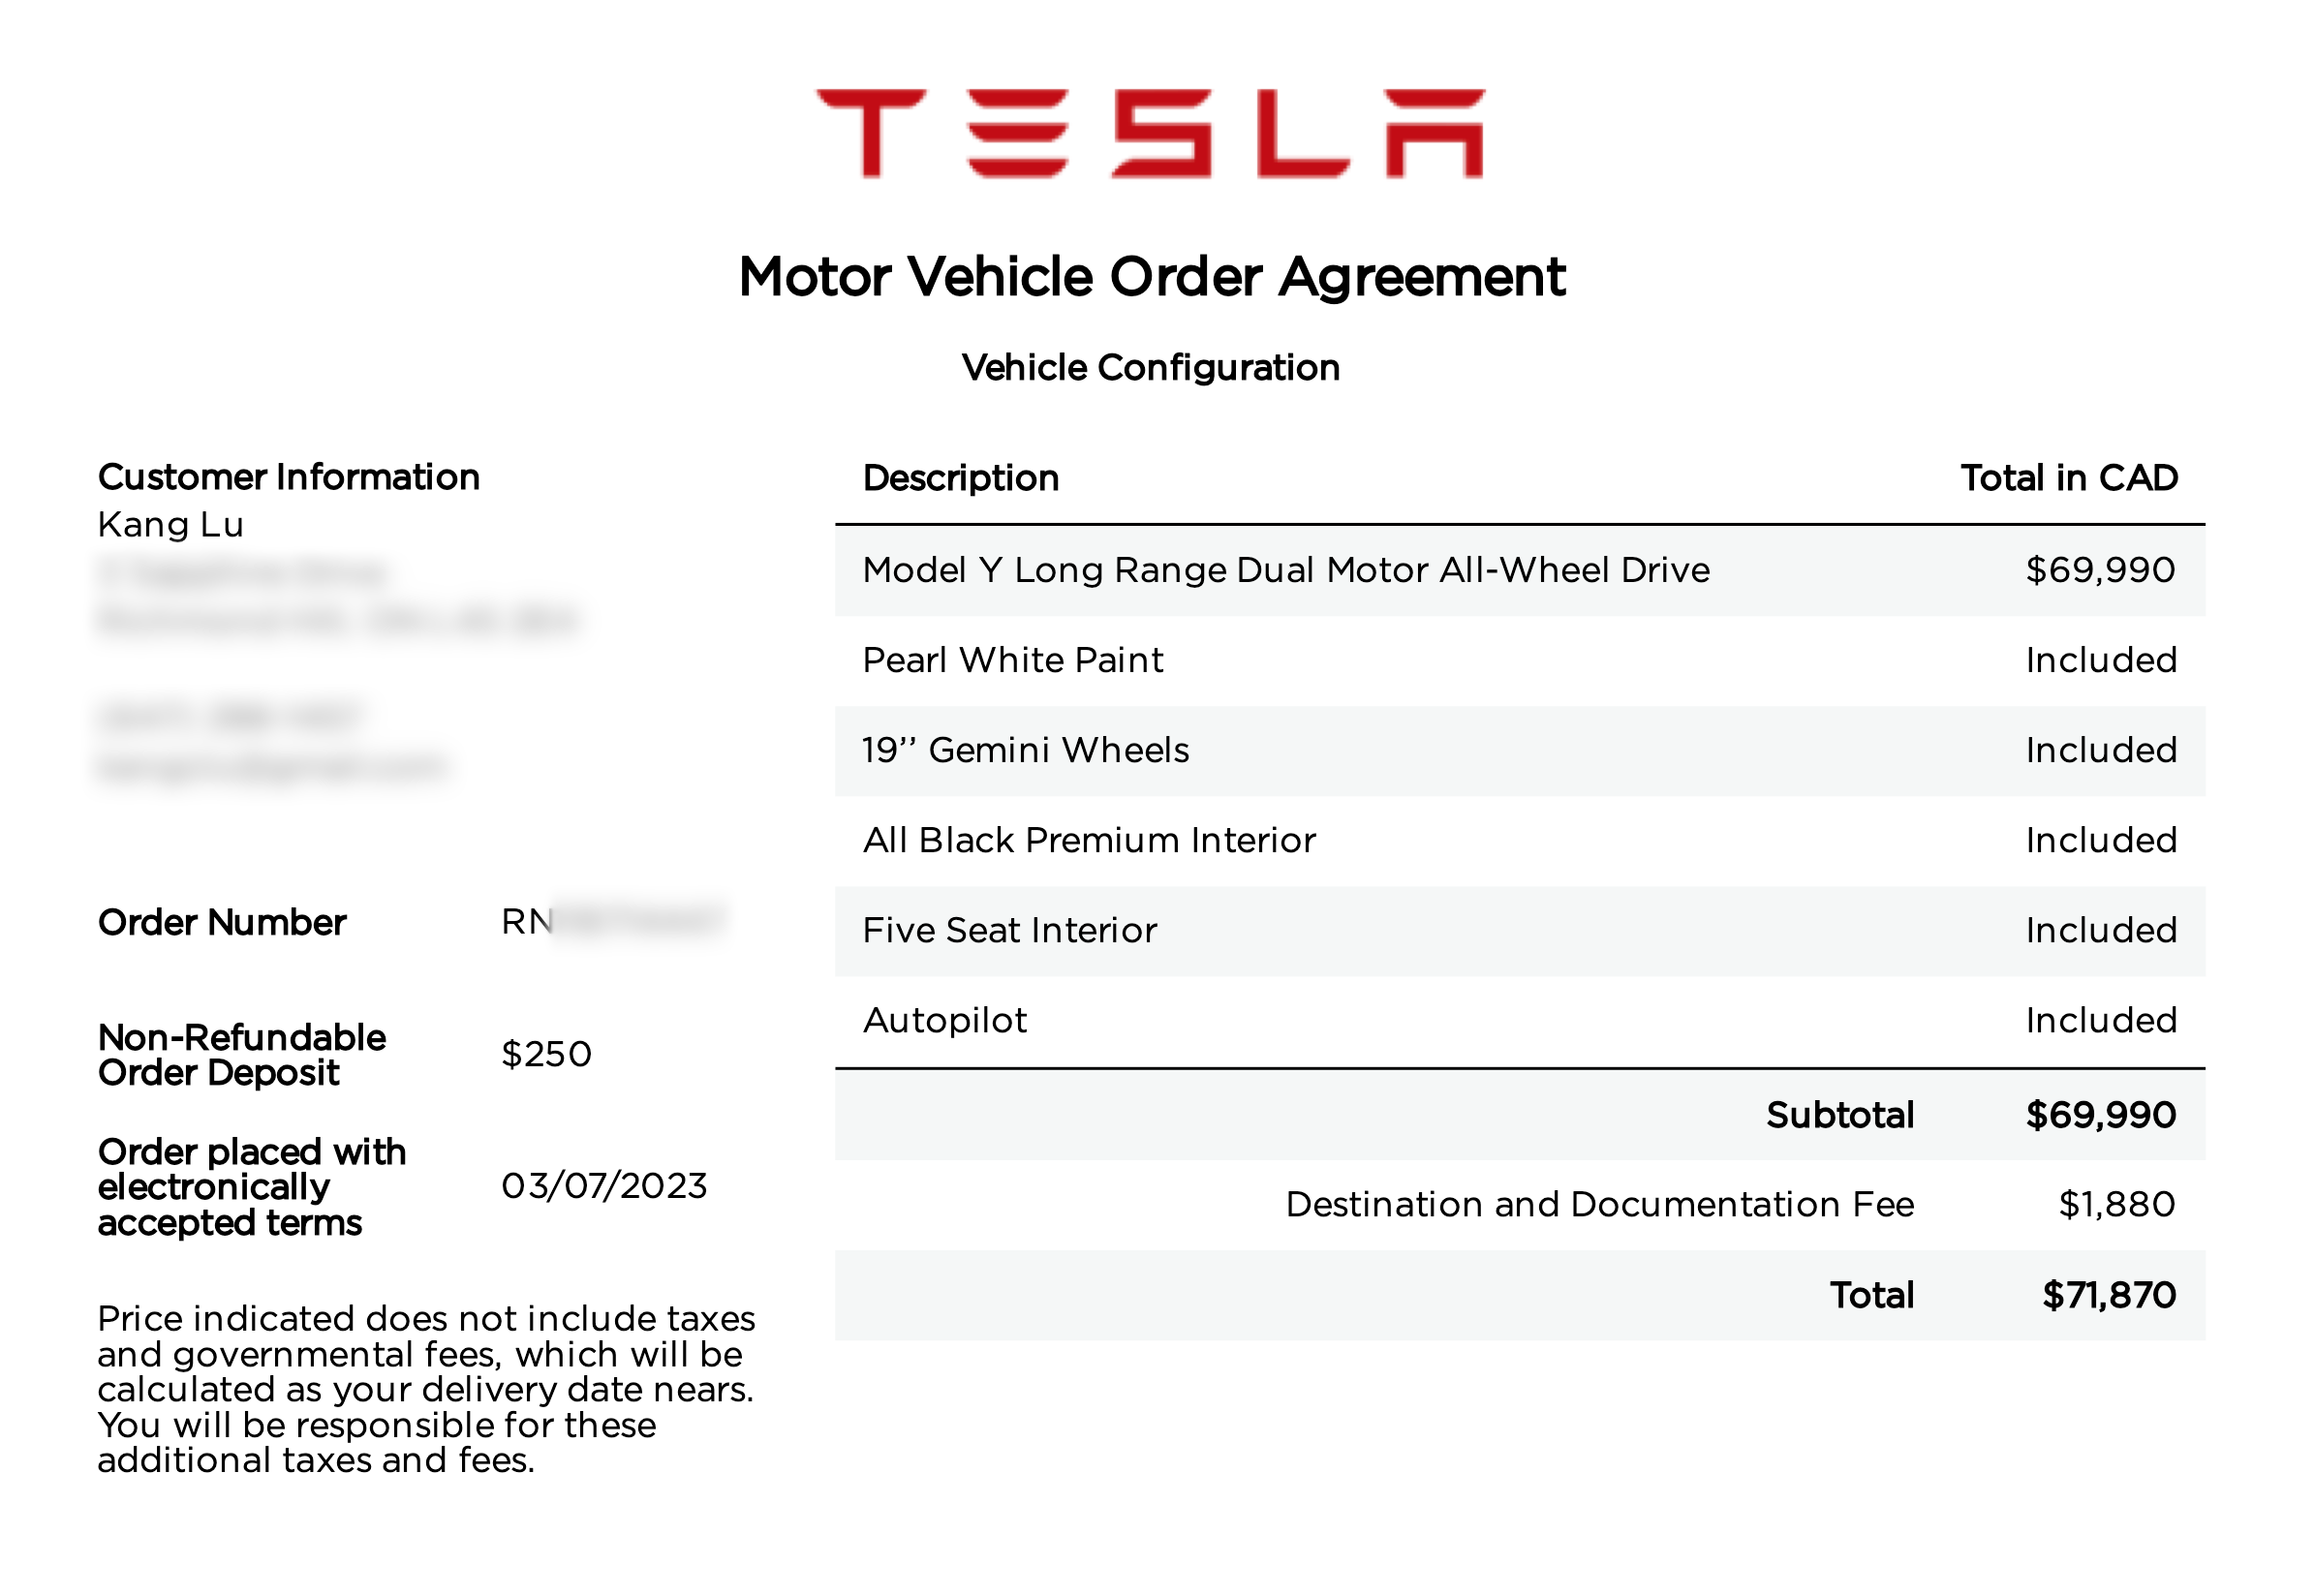
On March 7, 2023, I received a call from my contact at Richmond Hill Toyota and he told me he had a 2023 RAV4 Prime XSE available. The price was $66,073 CAD all in. In January, Tesla dropped their price on the Model Y Long Range AWD to $69,900 CAD (from $85,000). Since we already have a fossil car, a 2013 Subaru Impreza; and a PHEV, the 2020 Toyota Prius Prime, we decided to pull the trigger and reserved the Tesla Model Y on the same day. Below is the configuration and the price breakdown.
Basic configuration (click to enlarge)
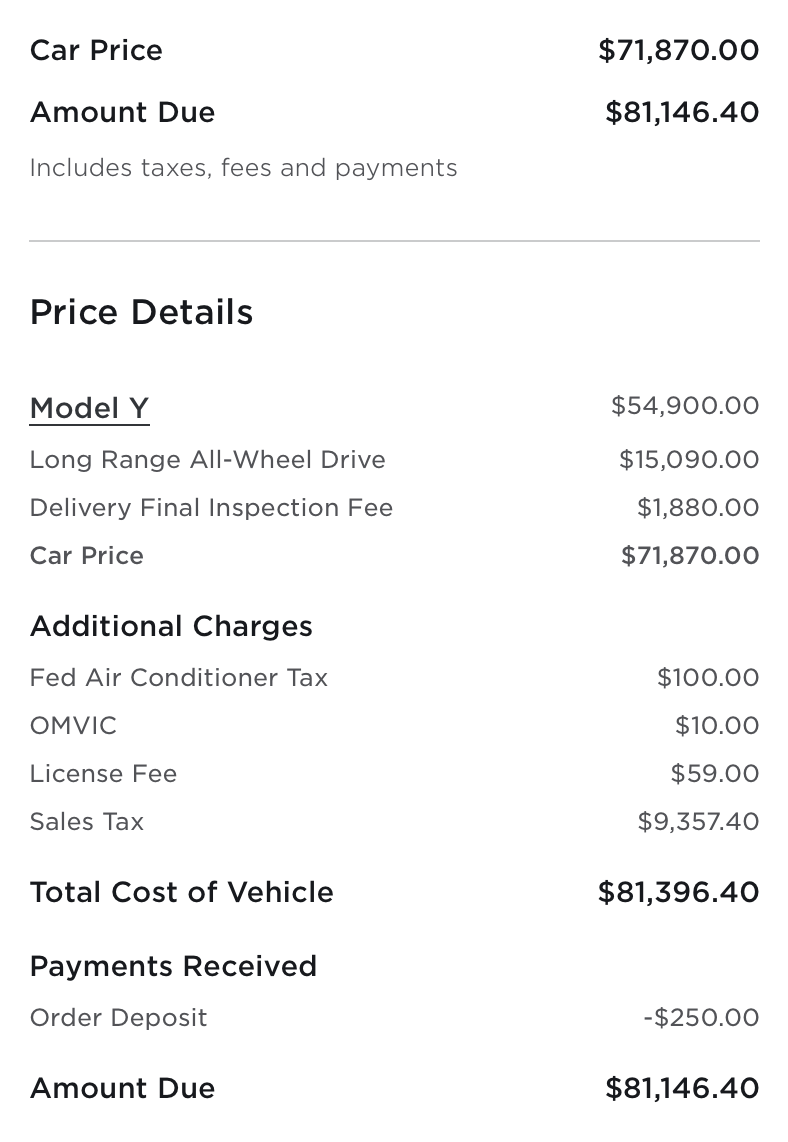
Price Details (click to enlarge)
The $81K price tag is higher than the $66K of the RAV4, but I figured that I will probably not buy another car for a very long time. At my age, I minus will cease the waiting and enjoy what life remains. Assuming Tesla meet its commitment on delivery timeframes, we should be getting the car before July, fingers crossed!
I also pulled the trigger in getting the mobile charger, wall connector, and the All-Weather Interior Liners. As a matter of fact, the interior liners already arrived and the charge accessories have already been shipped. We will hit the ground running (or driving). In the meantime, we are back in the waiting game again. May the EV gods be kind to us.
I am already super addicted to YouTube channels that are sharing other people’s Tesla experiences. My wife and I are already quite excited and may even partake on a few road trips with the new purchase. Perhaps testing out the Supercharging network to Montreal, and then an across Canada trip from Toronto to Calgary and perhaps even to Vancouver. We will see.
I will update with another post when the car arrives!
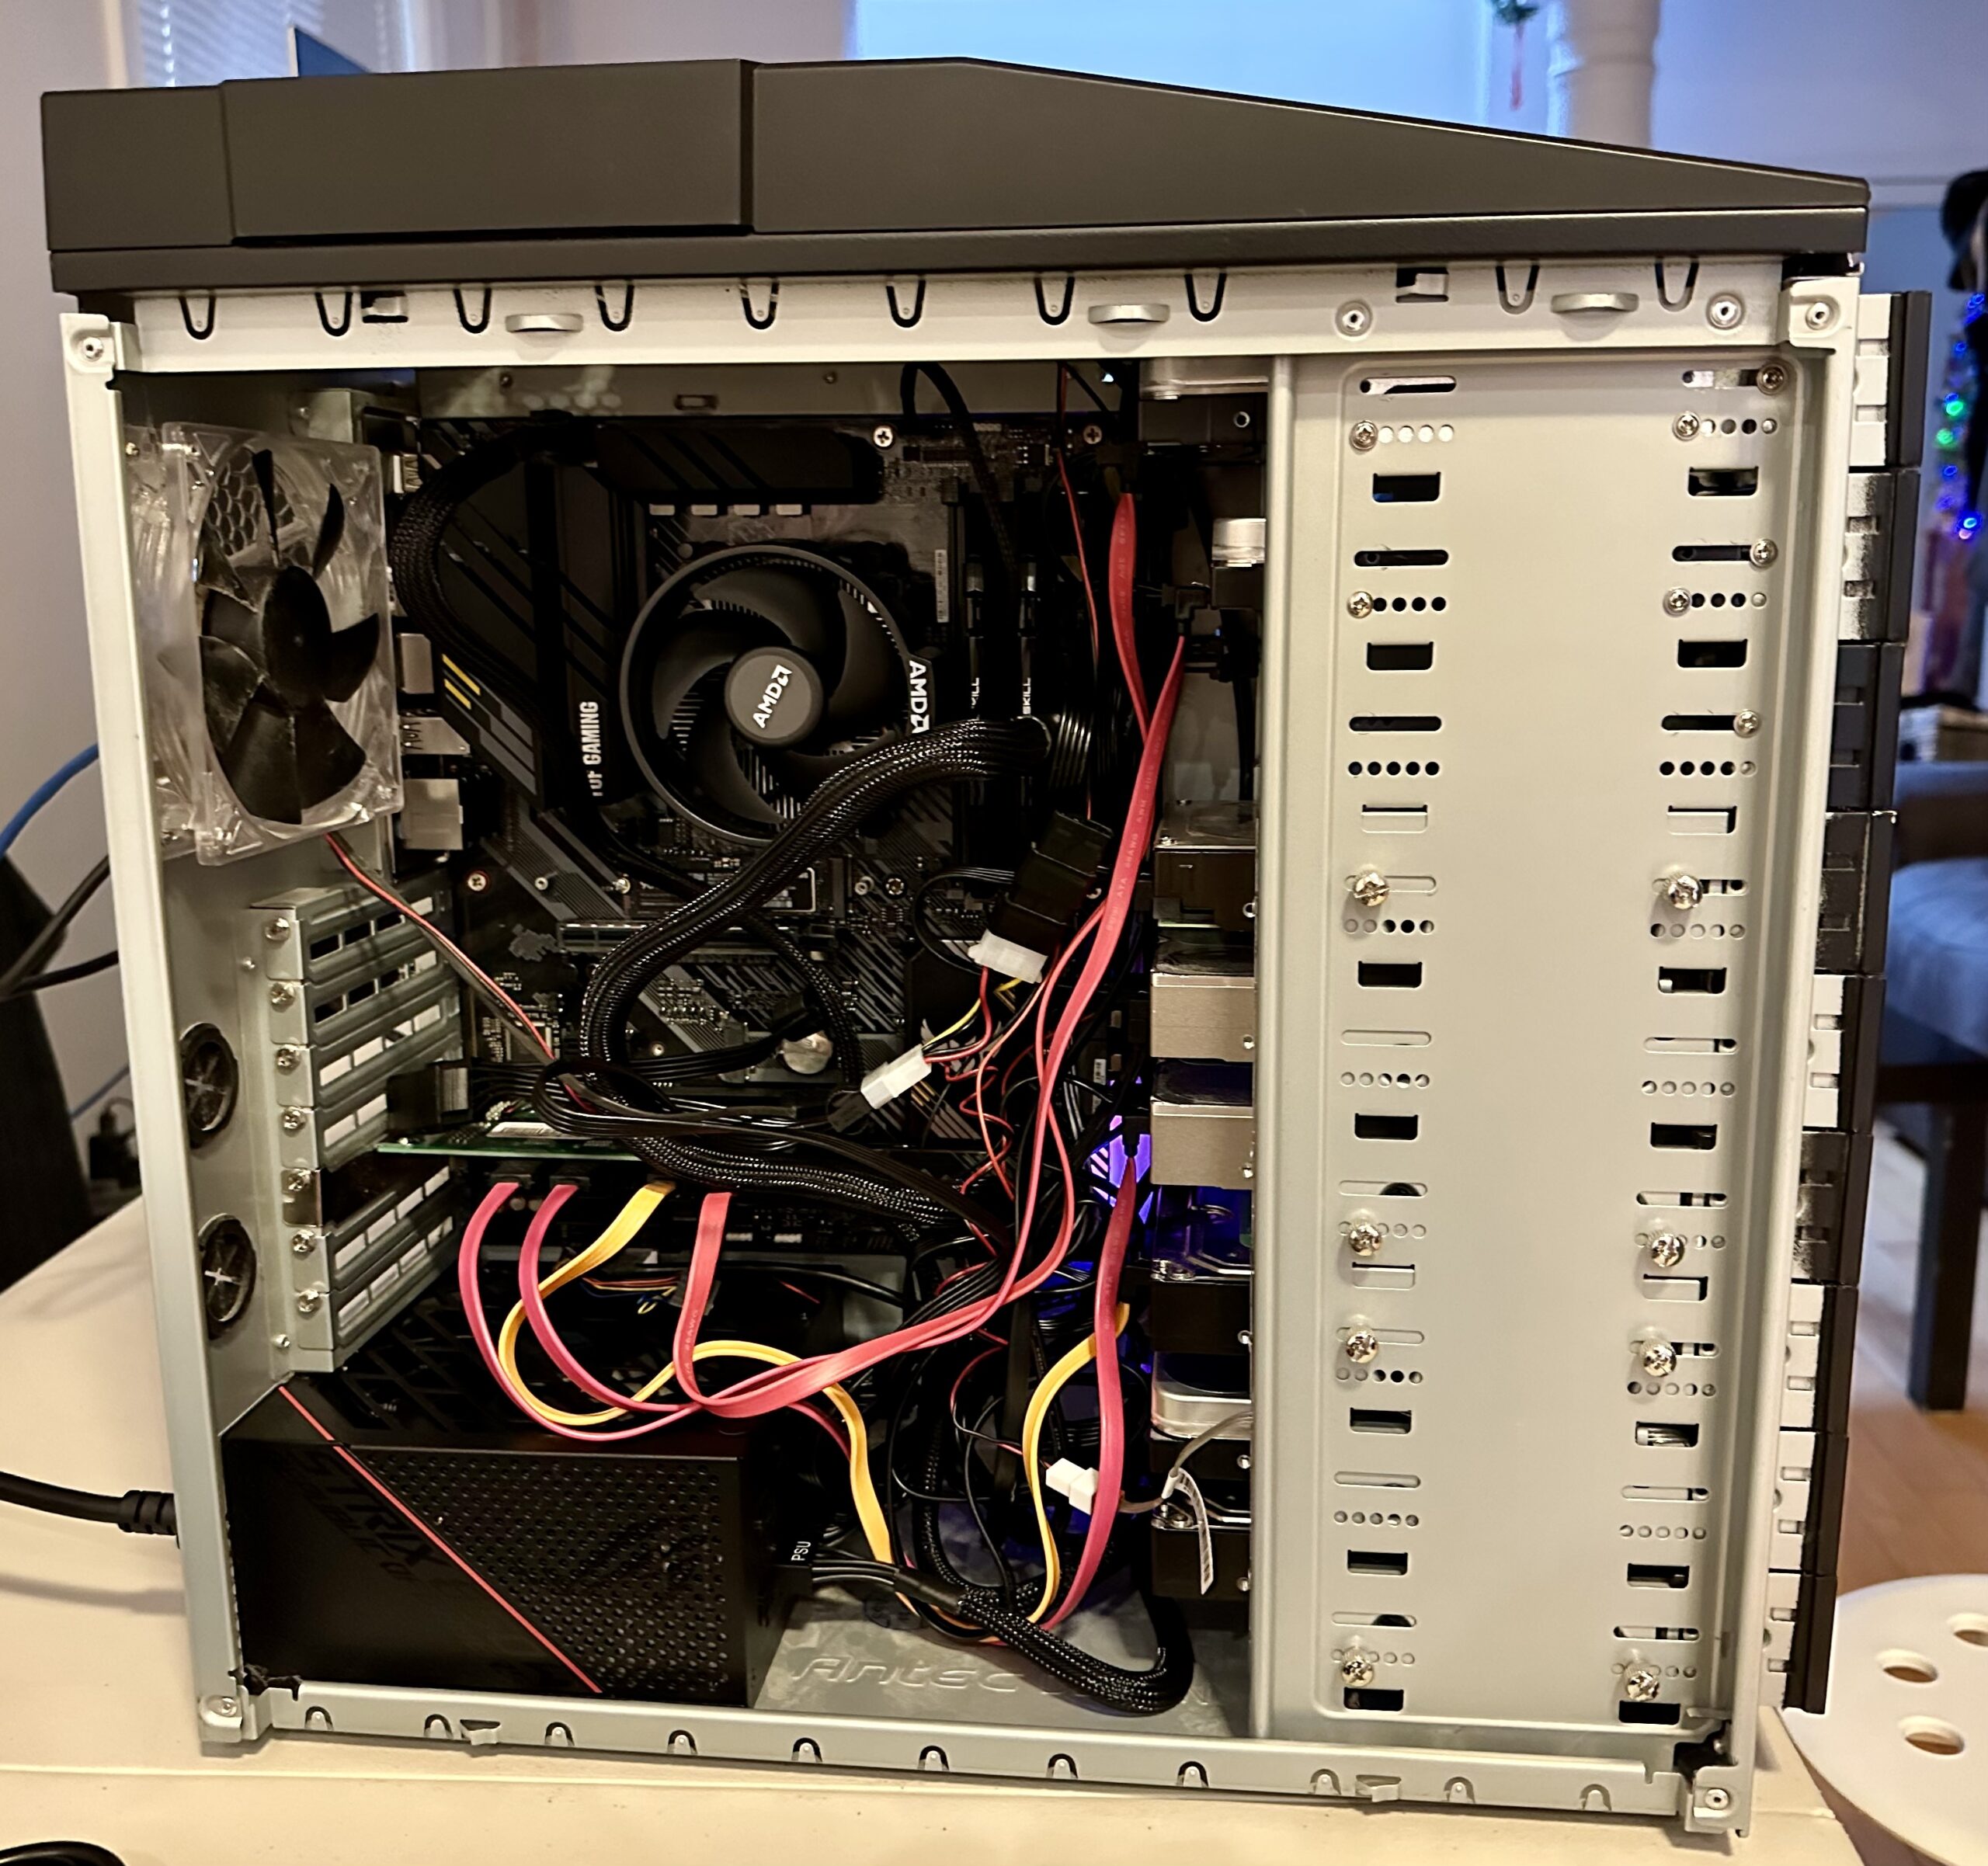
Prior to the holidays in 2022, I upgraded my media NAS server as detailed here. After this upgrade, I repurposed the old server’s components and built another PC.
Originally I was going to use this extra PC as a simple online media encoder, since encoding videos in the HEVC codec takes a lot of CPU power. I did this for about a month. My son, Kalen had an old GTX1060 6GB graphics card that he was going to place on Kijiji for resale. I offered to purchase this graphics card off of him so that that I can pair it up with this repurposed PC. The new idea was to turn this PC into my gaming PC. I don’t do many 3D intensive gaming, so an older GPU is certainly good enough for me.
Off I went installing Windows 10 Pro on the PC. I also discovered at this time the Windows Subsystem for Linux (WSL). I thought it would be a wonderful idea for me to have the gaming PC and not lose the ability for the PC to double as a media encoder through the use of a Linux distribution using WSL. My hope is that Linux with WSL will yield near metal based performance. Long story short, the performance of ffmpeg, the tool that I use for video encoding, was disappointing. Apparently there is a bug in WSL v2 that forced ffmpeg to only use 50% of its CPU power. There was nothing wrong with the concept of having a dual purpose PC for gaming and a handy Linux distribution for other endeavours.
The problem is with the Windows hosted Hypervisor, a software layer that usually runs between the hardware and the operating. I know of another hypervisor called Proxmox. This is a perfect opportunity for me to try Proxmox out. Before I installed Proxmox, I maxed out the memory of this repurposed PC to 64GB. It only had 16GB before and I thought this would not be enough.
One of the worries I had was how to get the raw GPU performance from Proxmox? Apparently there is a GPU passthrough option. Before installing Proxmox, I had to make some BIOS adjustments on the PC.
Enable IOMMU
Enable SVM Mode (same as Intel VT-x)
Enable AMD ACS
Only the SVM Mode is required for Proxmox, the other two are required for GPU Passthrough. After I installed the Proxmox server, I followed the instructions outlined in the following sites:
The first site was more clear and was the most helpful. I used the second and third sites as an alternate source and backup reference. Thanks to the above sites, I was able to get Proxmox running and created two virtual machines (VM’s). The first is an Ubuntu distribution called workervm and the second is a Windows 10 Pro instance with a GPU passthrough, called win10. Below is a screenshot of the Proxmox control administration site.
Proxmox control panel (click to enlarge)
Below is the workervm (Linux VM) configuration:
workervm configuration for Ubuntu instance
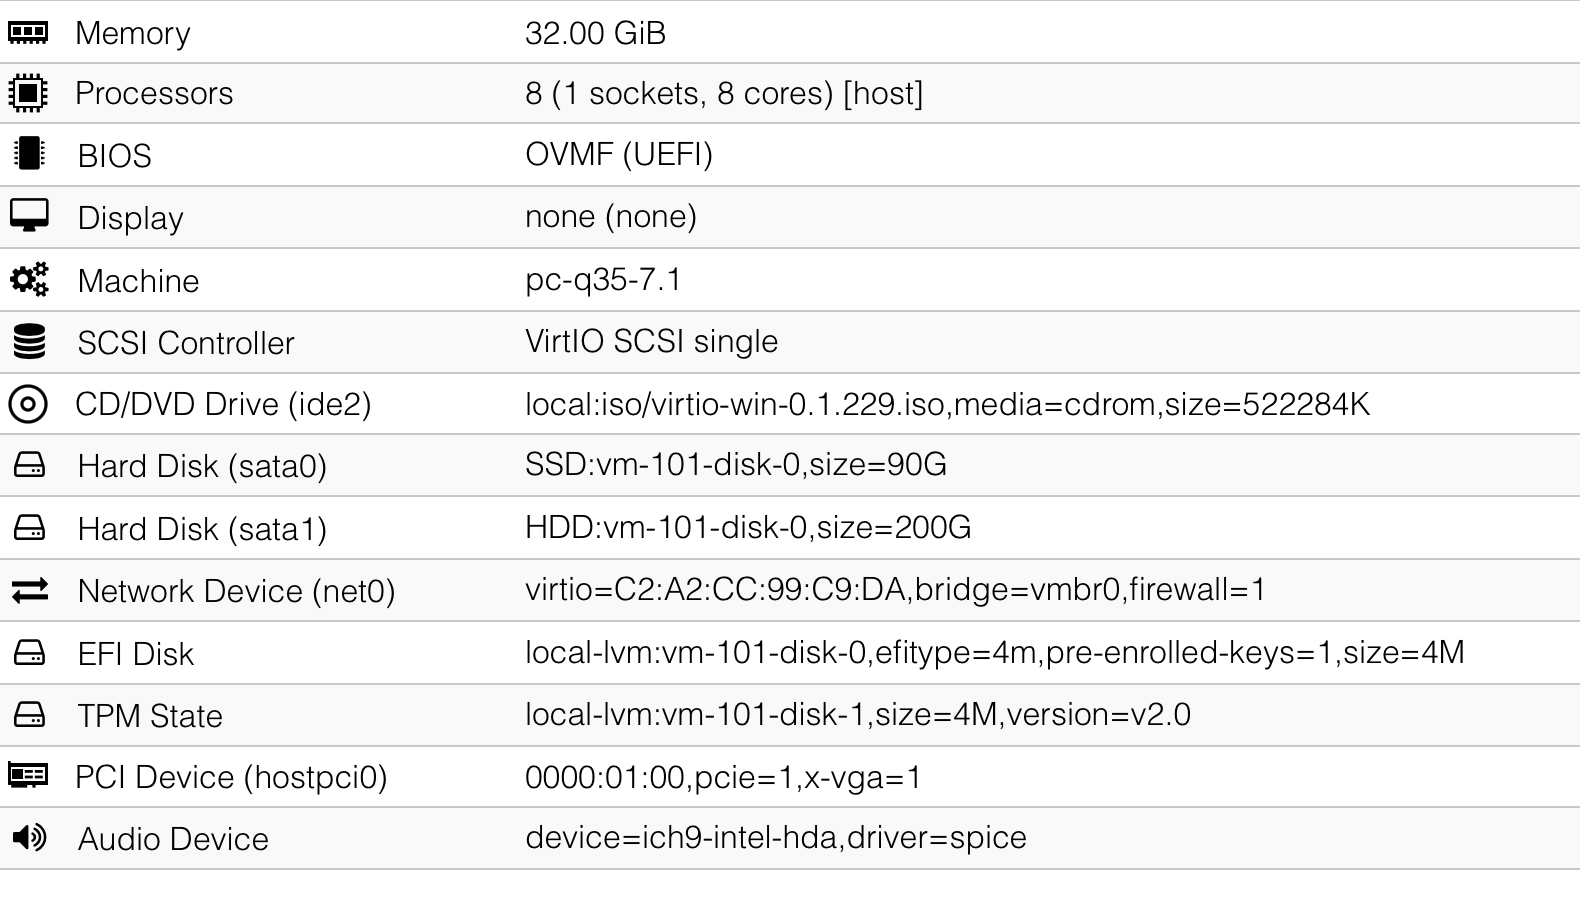
I had to make sure the processor type is set to [host] to get the most performance out of the virtual CPU’s. The Windows VM configuration uses a different BIOS, specifically a UEFI BIOS. We also have to ensure that the Machine type is set to q35. The Windows VM also has the EFI Disk and TPM State configured, and of course the extra PCI Device to represent our GPU passthrough card. Check out the full configuration for the Windows 10 VM below:
win10 configuration for Windows 10 Pro instance
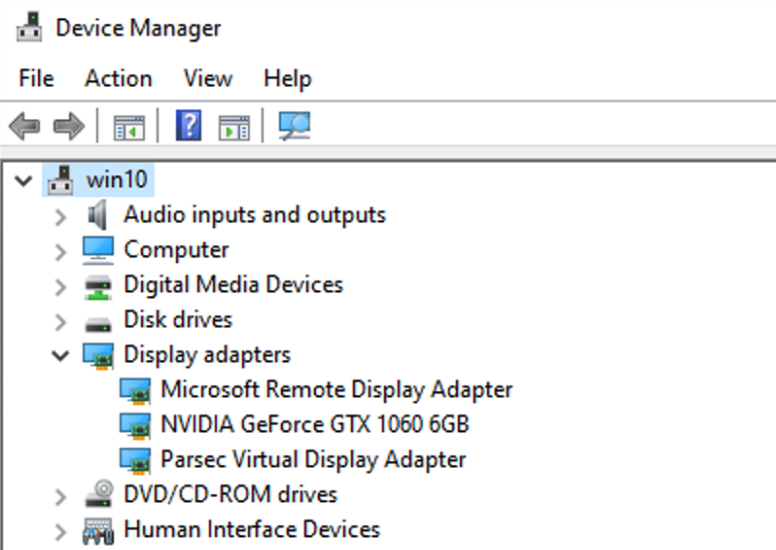
After installing Windows 10 Pro, the network interface is not recognized. To remedy this situation I had to install virtio-win as described by this site here. After the installation of virtio-win, and a reboot. I had networking, connectivity to the Internet, and the Device Manager output from the Windows 10 Pro instance as shown below. Notice that Windows recognized the native NVIDIA GeForce GTX 1060 6GB card.
Windows 10 Pro VM instance Device Manager
I tried to test out the GPU throughput with some 3D rendering demos and tested a couple of games from Steam using Remote Desktop. The performance was okay, but not stellar, and could have been better. I did some more research, and apparently Parsec, a virtual desktop sharing tool, is probably better for remote gaming.
I went ahead and installed Parsec on both the Windows 10 Pro VM, and on my Mac mini, which I used to remotely play games on the previous VM. This worked out to be quite well.
Now the repurpose PC is a Proxmox server hosting as many VM’s that the hardware can bear. The workervm instance can be used for video encoding and other generic Linux oriented work or trials. The win10 instance will be used for gaming and hosting our tax filing software, called TurboTax, which only runs on Windows.
In the near future, I will also be testing out Proxmox with virtual containers instead of machines. The containers are more light weight and less resource intensive. It will be another new adventure here.
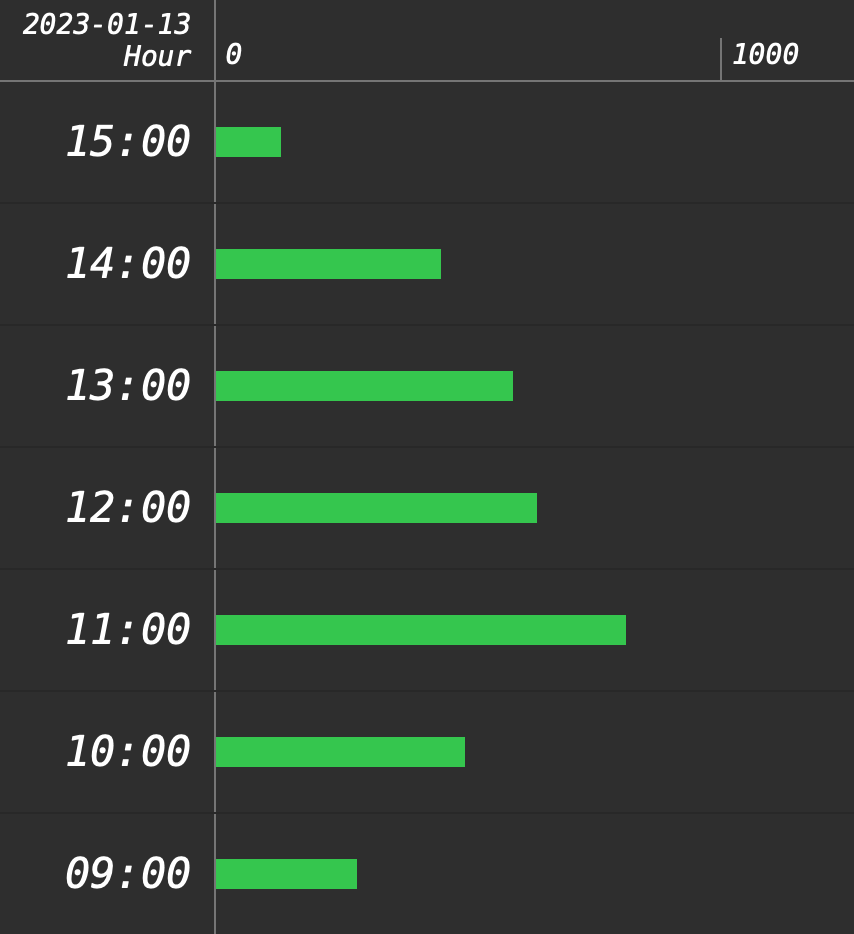
Today is January 13, 2023. We had an icy snow storm last night that lasted until this morning, and I was curious what the roof condition was like. Just how much of the panels were covered in snow?
Solar energy for today
Our peak energy production was at around 11am when we generated a little over 800Wh, which is inlined with what we kind of get on a cloudy, misty, winter day. In contrast, the best we got so far was on January 7th at 1pm. We generated 5,494Wh. That was a sunny day with no snow coverage on the panels.
A quick drone survey of our roof this afternoon at around 3pm.
I was kind of impressed that we got that much with so much of the panels covered. Watch the above video to see just how much of the panels are covered today. Our total production for today is only about 3,400Wh.
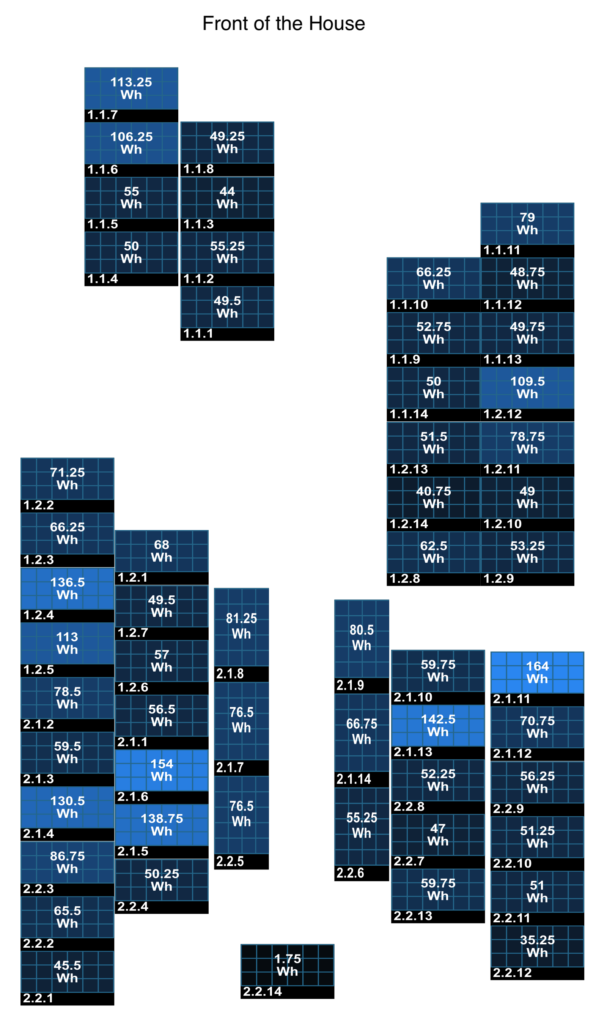
Below are the stats per panel.
Per panel generation statistics for today.
As you can see above, every panel contributed even the covered ones! There will be two sunny days over the weekend, so we will see!
Update: 2023-01-14
I did another roof survey with my drone, seeing that today it was a sunny sky day.
Roof survey on Jan. 14 (day after storm)Solar energy production on Jan. 14
We have generated over 10,000 Wh of energy today about 3 times more than yesterday. The survey was conducted when it was still -6 ºC outside, so way below freezing.
I have a membership with Audible and I sometimes also get other audio book sources. Recently I experimented with combining all of my audio books into a centralized place. Since I already have a Plex server running, I thought it would be a good place to do this.
I did a little research and came across a couple of very helpful articles:
I have a single folder to store all of my audio books. Inside the folder, each audio book is stored as an “m4b” file.
Ensure that audio books have a poster image and that its artist and album_artist tags are set to the author. Where appropriate, the audio book should also contain chapter metadata.
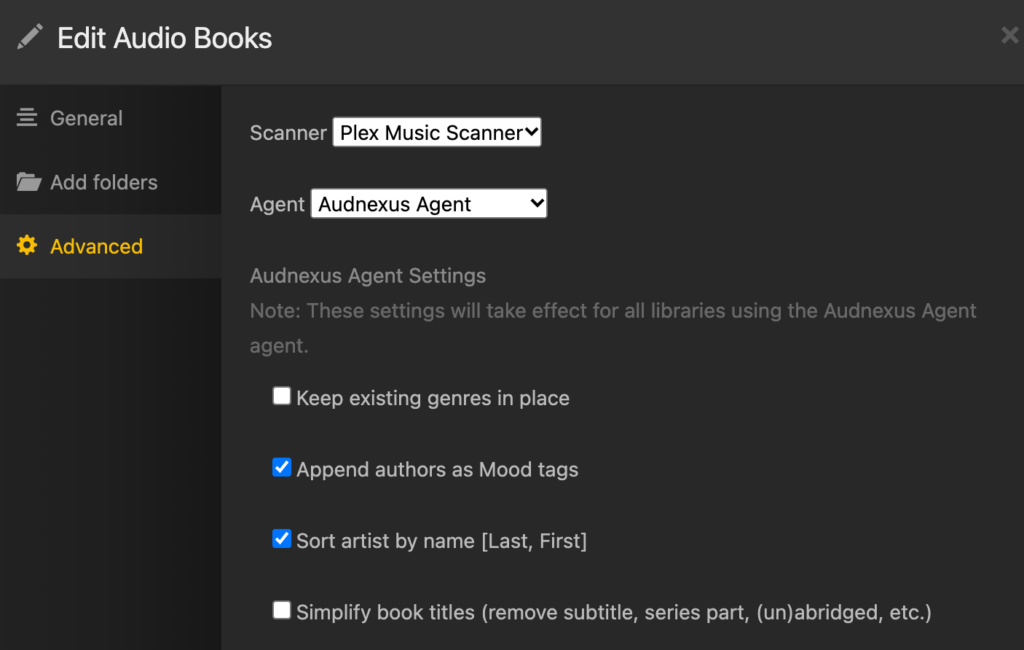
Create a music library on Plex by adding the audio book folder, and set the agent to Audnexus
Note the Agent setting
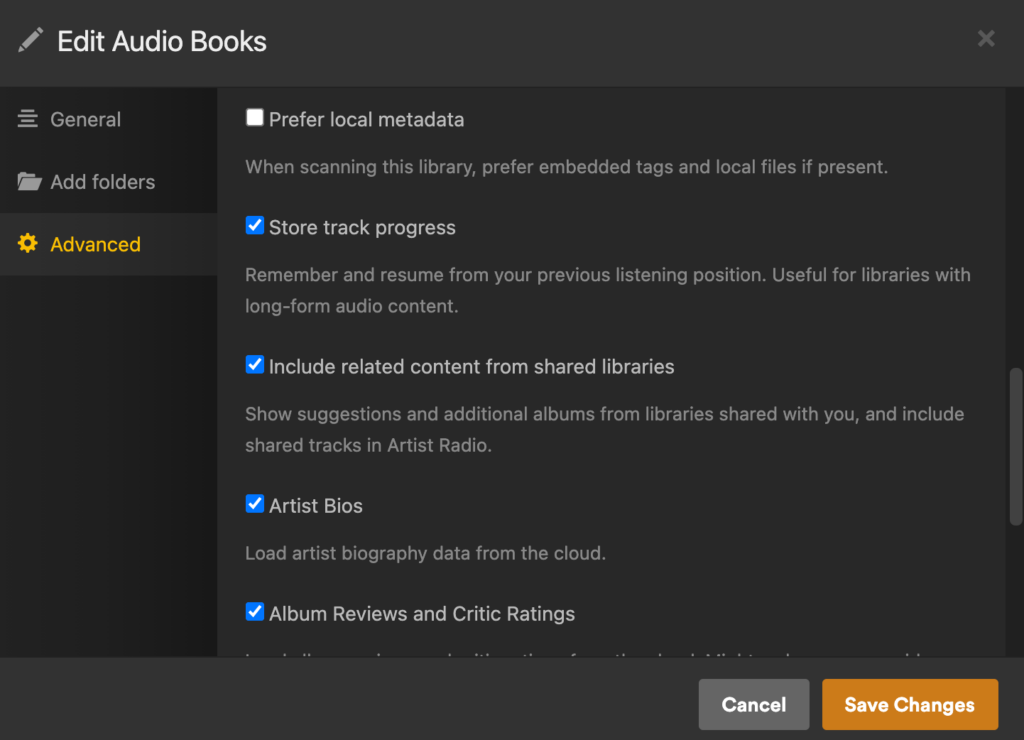
Ensure that the advanced option of “Store track progress” is checked.
Ensure that Store Track Progress is checked!
Each book in the library will be represented as an album, and the author will be mapped to album artist. Once the library is created, you can download and play the audio books from the desktop using the Plex app. However, the more common use case is to listen to the audio books while on the go.
Using Prologue to Play Audio Books
We first have to download the Prologue App. I did not get any of the In-App premium functionality, and just stayed with the free version.
Point the app to my Plex server’s URL, and all the audio books from the library should now be accessible and playable on the iPhone or iPad with chapter, bookmark, and last-left-position support.
This is a really neat solution, and I am impressed how Plex and Prologue together formed a dynamic duo in this manner.
My wife and I were watching Lighter & Princess (点燃我,温暖你). In episode 5, a smart programmer completed a heart animation as part of a programming test in a university course. Everyone of his classmates had a mediocre and simplistic implementation.
My wife challenged me to do the same. I could have done this with SVG and Javascript, but I took the opportunity to learn more Python and Qt. The latter I have not used at all and was always curious how well it worked with Python. I decided to use the PyQt package instead of the PySide package.
I hacked this together today resulting in this rendition:
Click above to see it in action
The PyQt implementation worked really well across Windows, Mac, and Ubuntu Linux. I suppose the Javascript and SVG would have done the same, but I learned something new in this case.
The source code and the installation instructions are at:
In the first part of this post, I talked about making sure all the new hardware that I recently purchased works. Yesterday, upgrading from Ubuntu 20.04 LTS to 22.04 LTS was super simple. Unfortunately, that was the end of the easy part.
I thought I could just image by old boot drive and make a carbon copy of it on my new boot drive. My old boot drive is a simple SATA 512GB SSD, and my new boot drive is an NVMe M.2 1TB SSD plugged directly to the motherboard. The copying was pretty simple, but because the drives differ in size, I had to relayout the partition table with the new drive once the copy is completed. I did this with the parted command.
Unfortunately the new boot drive did not want to boot. At this point I had to do some research. The most helpful articles were:
Both of the above articles were an excellent refresher on how GRUB works. I have used GRUB since the beginning, but one gets super rusty when these types of tasks are only performed once every three or six years!
Instead of detailing what went wrong, I will just explain what I should have done. This way if I need it again in the future, it is here for my reference.
Step 1: Perform a backup of the old boot drive from a Live USB in shell mode. This is done on my server on a nightly basis. This method is clearly described on the Ubuntu Community Help Wiki.
Following this method I will end up with a compressed tar archive for my entire root directory, skipping some runtime and other unwanted directories.
Step 2: After installing a fresh install of the new Ubuntu LTS Server operating system on the new server and boot drive, I proceeded to backup the new boot with the same technique used in Step 1. I stored the backup of the new install on another external SSD drive that I have lying around. Also it is important that new boot drive partition layout of the new install contains a swap partition.
Step 3: I then restore the most recent backup (done in Step 1) of the old boot drive to the new boot drive. I then replaced the /boot/grub directory with the new contents from the new install which was backed up in Step 2. The new GRUB is already installed when we performed a brand new installation on the drive. We just want to make sure the boot partition matches the /boot/grub contents.
Step 4: We also need to fix up the /etc/fstab file because it contains references to drive devices from the old hardware. Paid special attention the main data partition and the swap partition. It should look something like this:
# /etc/fstab: static file system information.
#
# Use 'blkid' to print the universally unique identifier for a
# device; this may be used with UUID= as a more robust way to name devices
# that works even if disks are added and removed. See fstab(5).
#
# <file system> <mount point>   <type>  <options>       <dump>  <pass>
# / was on /dev/nvme1n1p2 during curtin installation
UUID=fc939be4-5292-4252-8120-7ef59b177e5b / ext4 defaults 0 1

# /boot/efi was on /dev/nvme0n1p1 during curtin installation
UUID=5187-A8C6 /boot/efi vfat defaults 0 1

# Swap partition
UUID=512d611e-6944-4a57-9748-ea68e9ec3fad	none	swap	sw	0	0

# /dev/mapper/airvideovg2-airvideo /mnt/airvideo ext4 rw,noatime 0 0
UUID=9e78425c-c1f3-4285-9fa1-96cac9114c55 /mnt/airvideo ext4 rw,noatime 0 0
Noticed that I also added the LVM logical volume for /mnt/airvideo, which is my RAID-1 array. The UUID can be obtained by the blkid command. Below is a sample output:
Step 4B (Potentially): If the system boots in the “grub>” prompt, then we will have persuade grub to manually boot by providing the following at the prompt:
grub> set root=(hd9,gpt2)
grub> linux /boot/vmlinuz root=/dev/nvme1n1p2
grub> initrd /boot/initrd.img
grub> boot
To find the root value on the first line, you have use the ls command which is explained in this article. The root parameter on the linux line references the partition which the root directory is mounted. In my case, it was /dev/nvme1n1p2.
After I rebooted, I reinstalled GRUB with the following as super user:
grub-install /dev/nvme1n1
It may also be required to update our initramfs using:
update-initramfs -c -k all
Step 5: At this point the system should reboot and all of the old server’s content should now be on the old hardware. Unfortunately we will need to fix the network interface.
First obtain the MAC address of the network interface using:
% sudo lshw -C network | grep serial
    serial: 04:42:1a:05:d3:c4
And then we will have to edit the /etc/netplan/00-installer-config.yaml file.
% cat /etc/netplan/00-installer-config.yaml
# This is the network config written by 'subiquity'
network:
  ethernets:
    enp6s0:
      dhcp4: true
      match:
        macaddress: 04:42:1a:05:d3:c4
      set-name: enp6s0
  version: 2
Ensuring the MAC address matches from lshw and that the name is the same as the old system. The name in this example is enp6s0. We then need to execute the following commands to generate the interface.
netplan generate
netplan apply
We need to ensure the name matches because many services on the server have configurations that references the interface name, such as:
Configurations in /var/network/interfaces
Samba (SMB) (/etc/samba/smb.conf)
Pihole (/etc/pihole/setupVars.conf)
Homebridge (/var/lib/homebridge/config.json)
Step 6: Fix the router provisioning DHCP IP addresses so that the new server has the same fixed IP address as the old server. This is important because there may be firewall rules referencing this IP address directly. The hostname should have been automatically restored when we restored the partition in Step 3.
Step 7: Our final step is to test the various services and ensure they are working properly. These include:
On May 15th, 2019 (more than three years ago), I performed a performance boost to my media server by upgrading its CPU, Motherboard, and Memory. You can read that experience in this post.
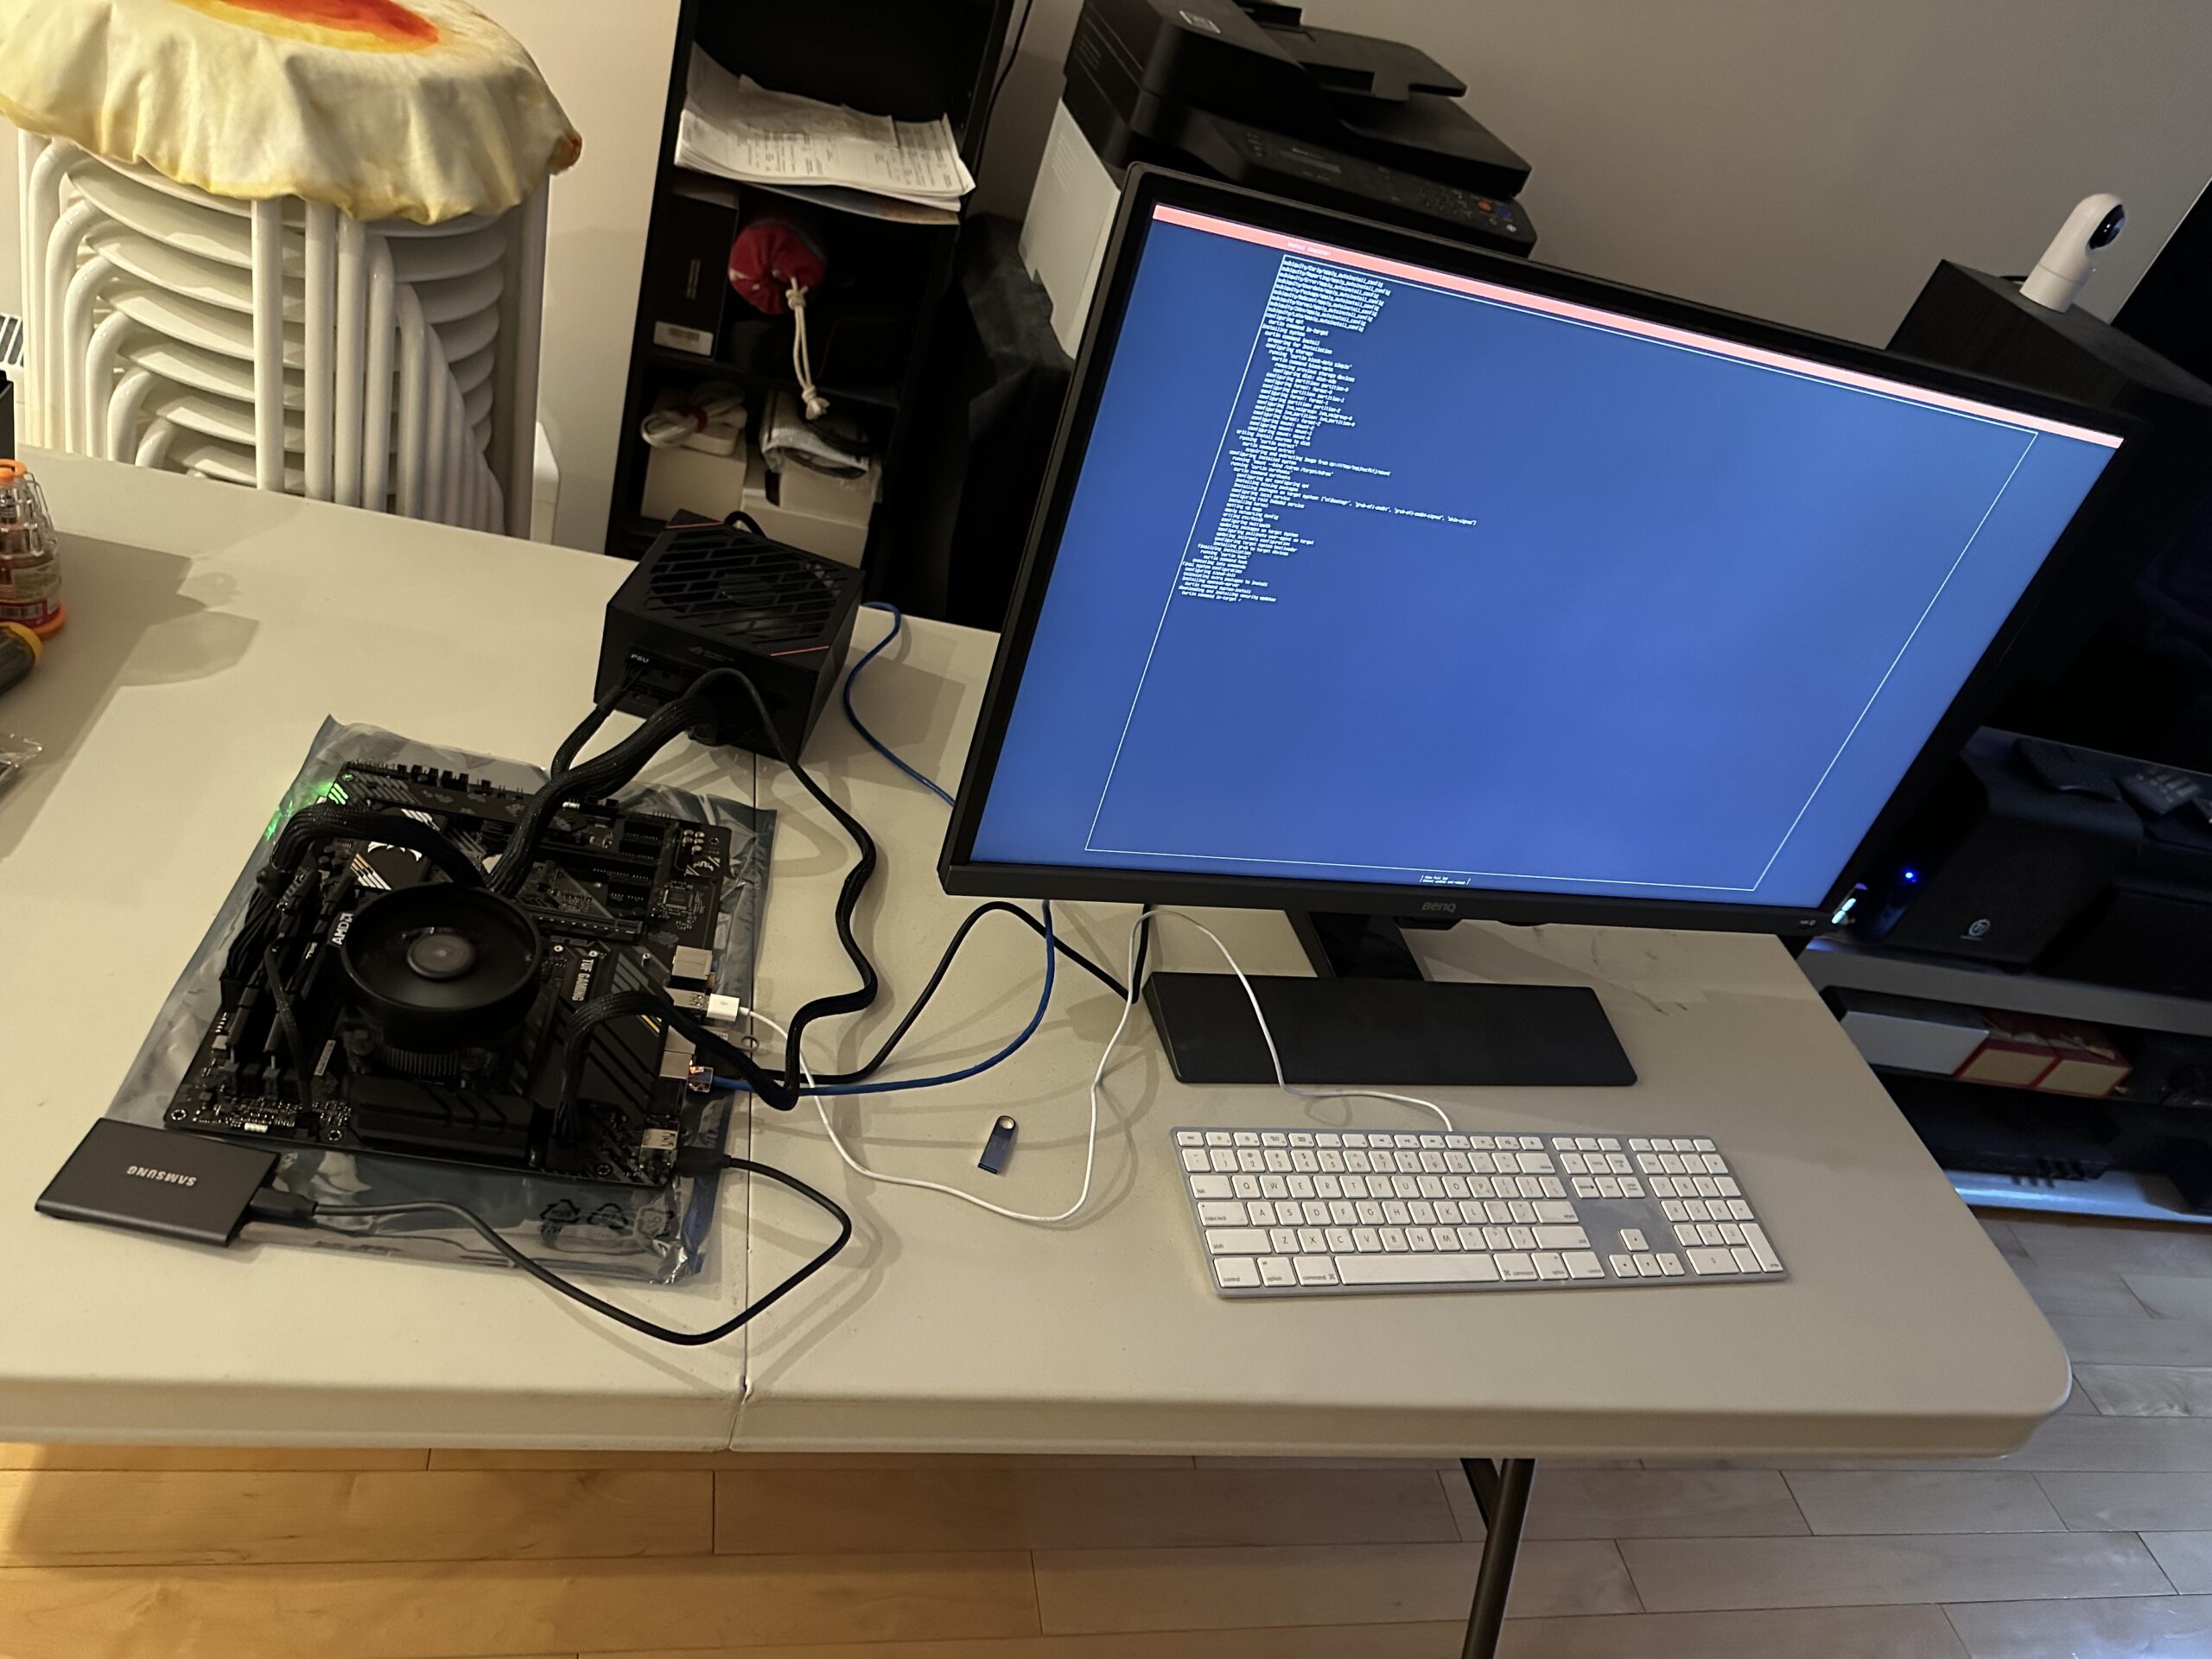
Today, I am going to be doing the same. It looks like we are on a cadence of every 3 years or so to do a spec bump. This time around we are also changing the same items, but will include the power supply as well in the swap. I also decided to swap the boot drive hardware from an old SSD drive to an NVME drive. All of this resulted in the following hardware acquisitions, all from Amazon, which I find them to have lower pricing (when factoring free shipping through Prime), than Newegg even during Black Friday and Cyber Monday offers.
The plan is to spend the time today to roughly test out all the new hardware.
Test Setup
I quickly did a skeleton setup to make sure Ubuntu 22.04.01 Server Edition works with all hardware involved, especially the networking.
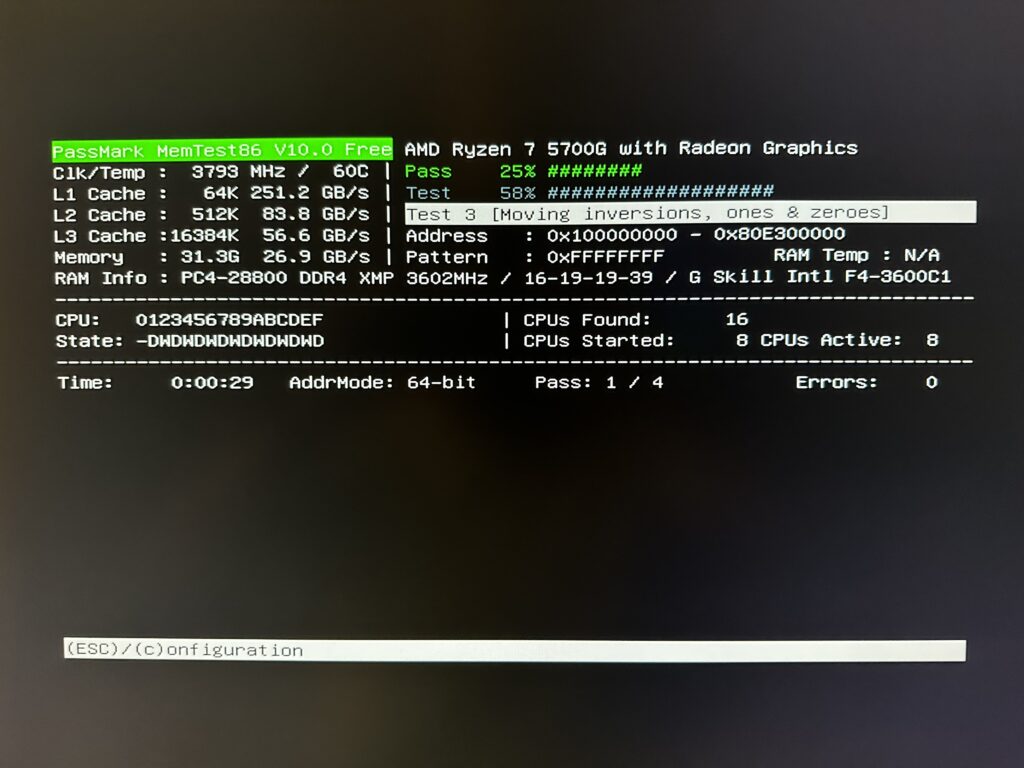
Memory Test
Once I know Ubuntu server is working good, I am now testing the server’s new 32GB DDR4 memory. This is running as I write this post and will let it run overnight.
The plan for tomorrow is to upgrade the current media server from Ubuntu 20.04.5 LTS to Ubuntu 22.04.1 LTS. Once this is done, I can then backup everything, and move the new hardware into the old casing and hope everything works.
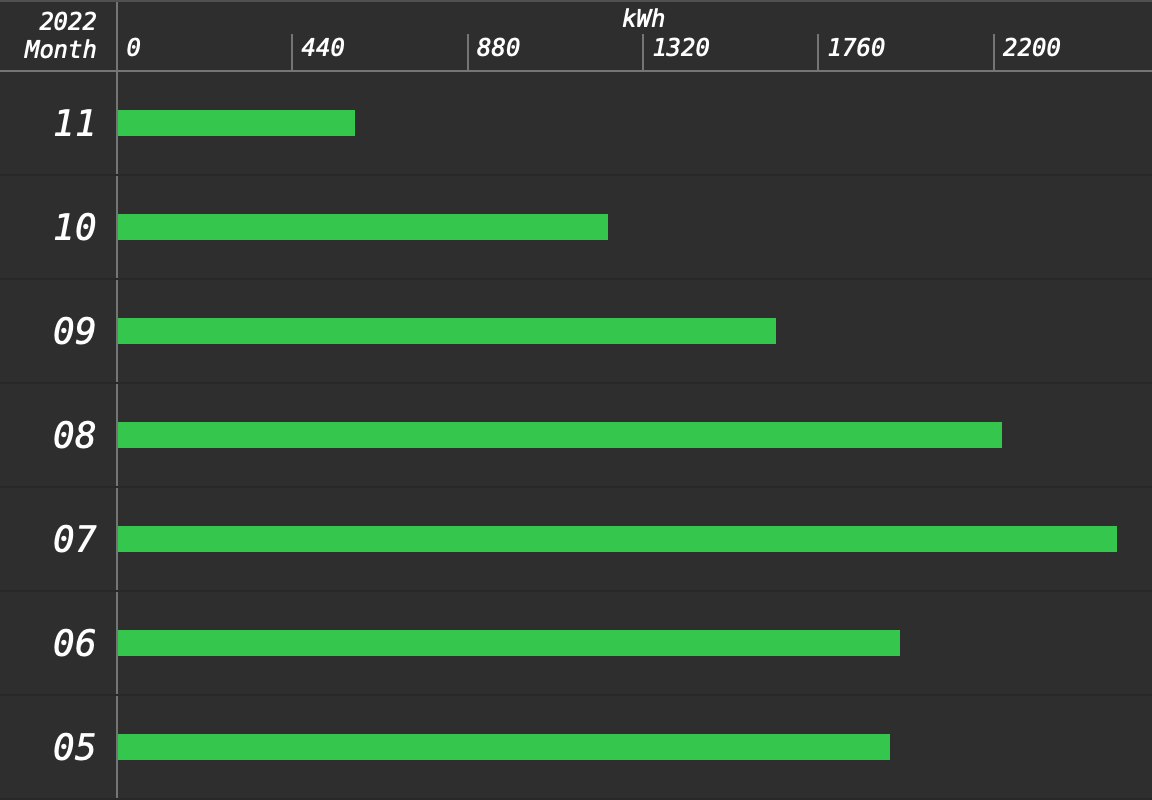
Winter has arrived, and our solar production is seeing a sizeable drop in production. Although the month of November is still incomplete, here is our current solar production history so far:
Historical monthly solar production
We were operating at 50% utilization when on of our SolarEdge inverters went down in June, and as pointed out earlier, November is only about 75% completed as of the time of the writing of this post.
Even with the above discrepancies in mind, we can see a gradual reduction in generation from the summer months. From a peak of over 2500 kWh in July to just around 1230 kWh in the month of October. That is half of our peak from July. Based on the November trend, we will have even less.
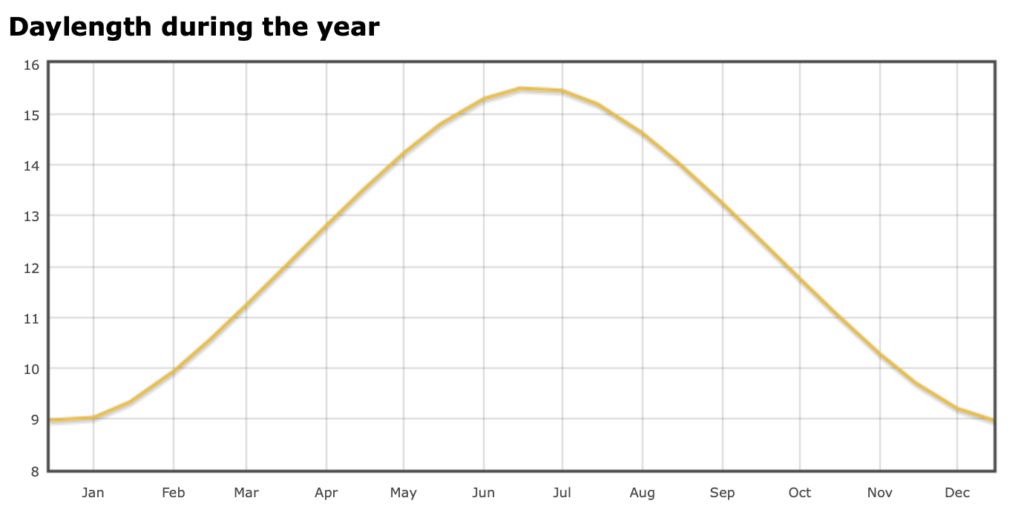
These reductions got me curious to the length of day variation through the year, and I found this handy chart:
Number of hours when the sun is out throughout the year
The above chart is customized by our home location of course. From trough to peak, there is a difference of about a 6.5 hours! I must say, I knew there is a difference between the longest and shortest days, but seeing number was a bit of a shock. These short days are made worst by lowest sun elevation on our Southern horizon during the winter months.
It will be interesting to see how much power we end up generating during December which will be our lowest generating month, per the above chart.
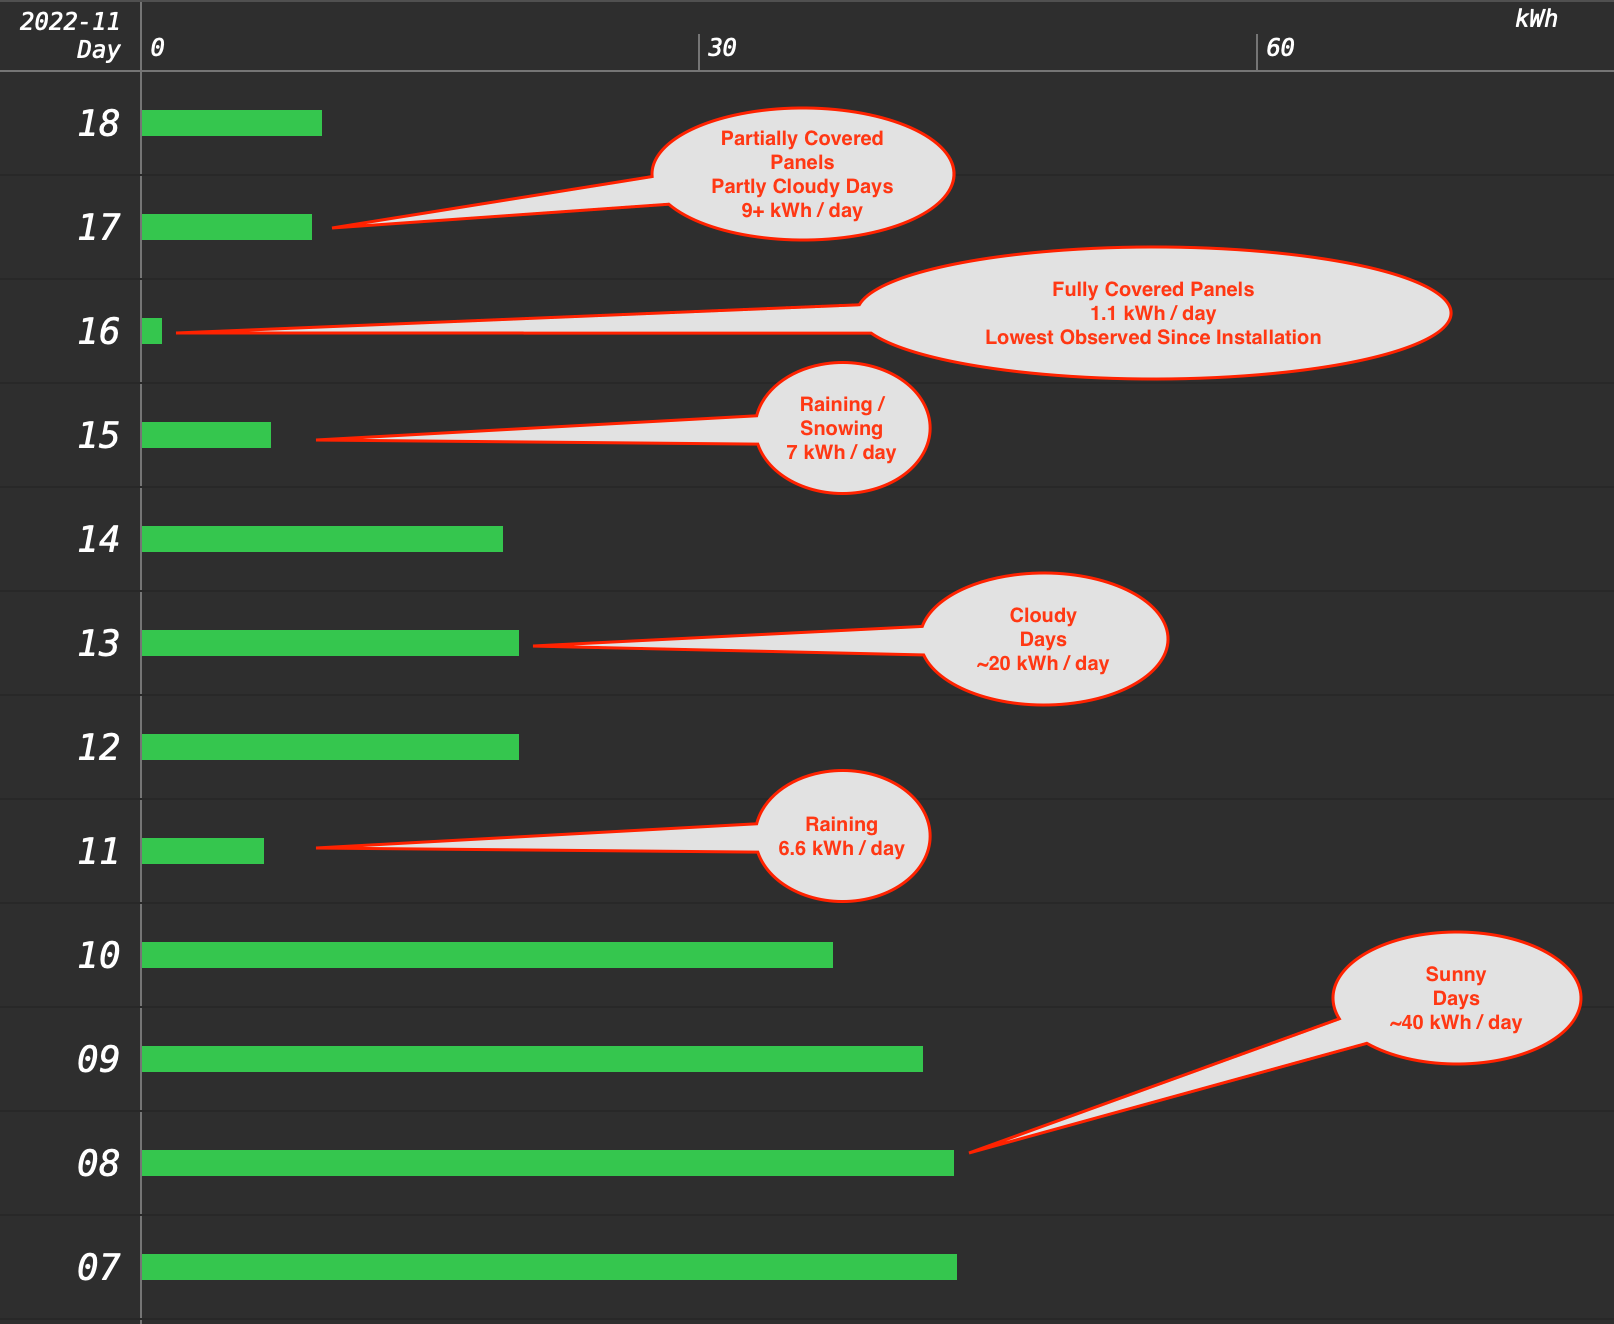
The past few days we have met our first signs of Canadian winter. Although winter has not officially arrived, we have received at least a couple of snow dustings that resulted in enough accumulation on the roof to cover the solar panels.
I wanted to record our observation with this “new” experience in terms of the impact to power generation. Below is a chart on solar power generation in the past few days with different weather conditions during the shorter days of our Canadian autumn.
Solar power generation from Nov. 07 to 18 with different weather
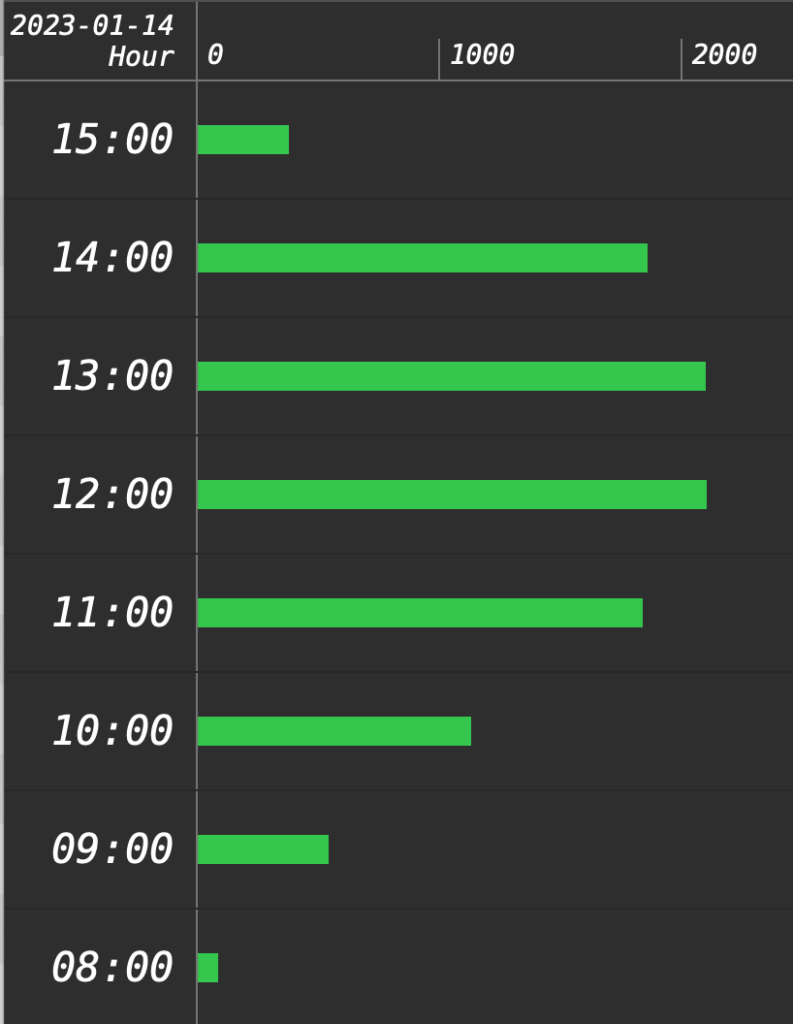
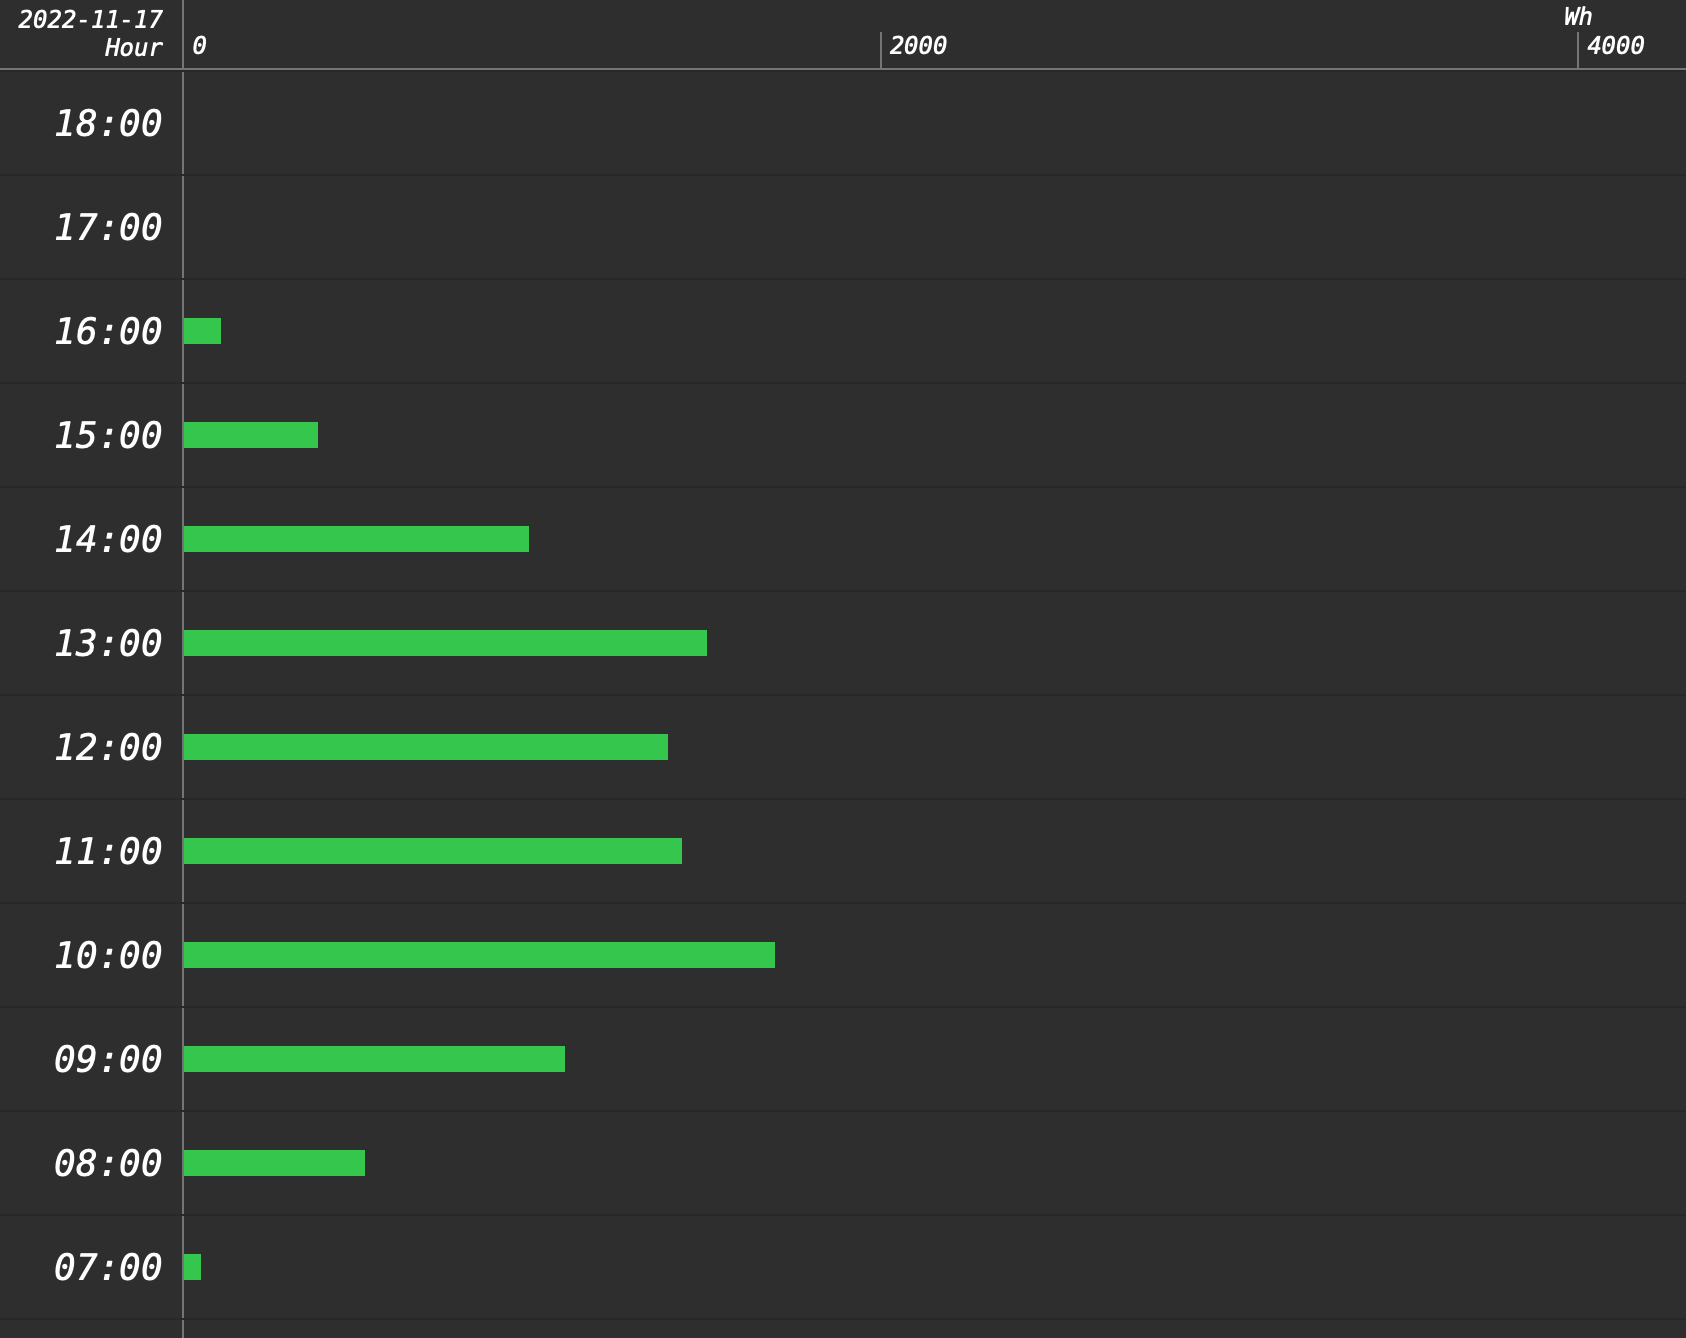
Our highest recorded power per day is around ~110 kWh during a nice sunny, long, summer day in June. We are now facing shorter days with the panels active from around 8am to a little after 3pm, as the chart below shows.
Solar generation through out the day during Nov. 17 (partially cloudy)
Below you will see what my roof looks like today on November the 18th. Click the video below to see the entire roof.
Partially covered roof on a cloudy November 18th (click to play)
You can see that we have some panels that are fully exposed, and some that are partially covered. The solar optimizers are optimizing away during these times, and when the sun comes out, we can still sometimes generate above 3500W of instantaneous solar power.
During these dark and short days, we are now definitely eating into our stored electrical credits from Alectra Utilities.