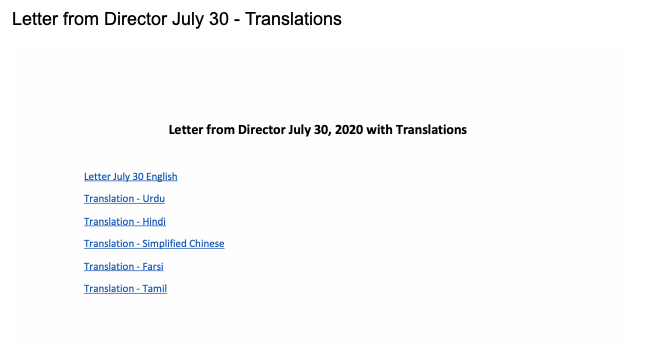
Yesterday I received an email from the Directory of YRDSB (York Region District School Board). It essentially says this:
Click above to see the full size
This is the board that my boys belong to and we now have to decide what we will be doing in September of 2020. The above slide does not represent all of the info from the letter, but certainly all of the gist that a parent like me would be interested in.
The original letter is two and half page, to which you can only access, after opening a PDF document containing links of your preferred language. I almost deleted this email, because the perceptive content looks blank, see below.
This is what I see in my email.
You figure that of all people, those who are in the business of teaching communication would do a better job in these times of crisis. It would have been nice if the slide that I provided above was the first thing that I saw.
Sorry about my rant, but it is now over and I feel better.
As of today, in Ontario, Canada, we are in the midst of reopening from a tight lockdown started in mid-March. The current rules are best explained in this article. While I love staying indoors enjoying my music, videos, and learning new stuff from watching tutorials on YouTube, to reading articles and books, I am certain others are feeling restless and having an innate urge to go out and enjoy the beautiful weather that is bestowed upon us in the middle of June. Part of this enjoyment, is to gather around with friends and family who we have not seen for so many weeks.
I too have been enjoying the blue skies and sunshine by riding my road bike. However, I have seen many people gathering around without practicing social distancing. Of course I am not here to tell people what to do, but I do want to take this opportunity to present my own risk assessment of the current situation. If anything else, many months or years from now I can look back to this post and re-read this assessment, hopefully in a lighter mood.
Currently Ontario is limiting to group gathering of sizes of up to 10 people, while practicing social distancing. The government also allowed the expansion of your household to connect to another household, so called double bubbling, as referred by the previously linked article. On the surface, these new rules seem to relax the isolation policies. However, my interpretation of these rules is that it will provide little opportunity for me to change my current behaviour. Personally, the double bubbling of your household is limited to one additional household, and this assumes the other household is only connected to yours, so the limitation is reciprocal. For us, this is still currently impractical. If you just include our parents (my wife and I), we have already exceeded the limit. As for the group gatherings of 10 people while practicing social distancing, this really means that the other 9 can be potentially asymptomatic carriers of the virus, and we should be wise to treat them as such. The personal risk of contraction really has not been reduced. The group size limitation is probably more for ease of enforcement than a reflection that you are now more safe.
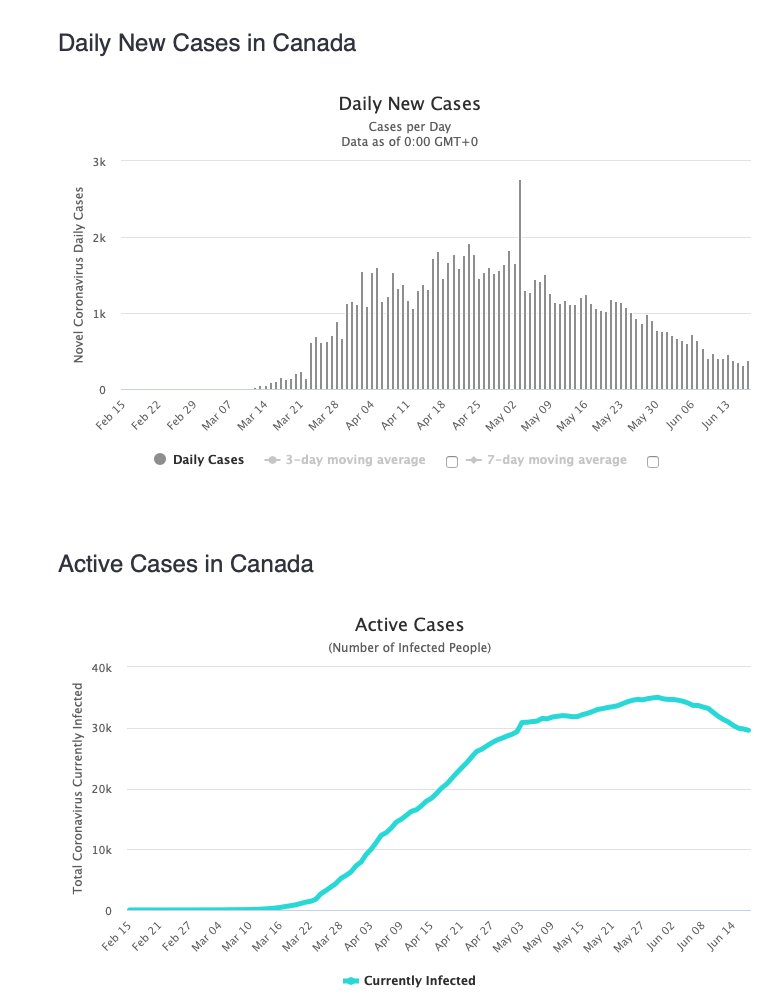
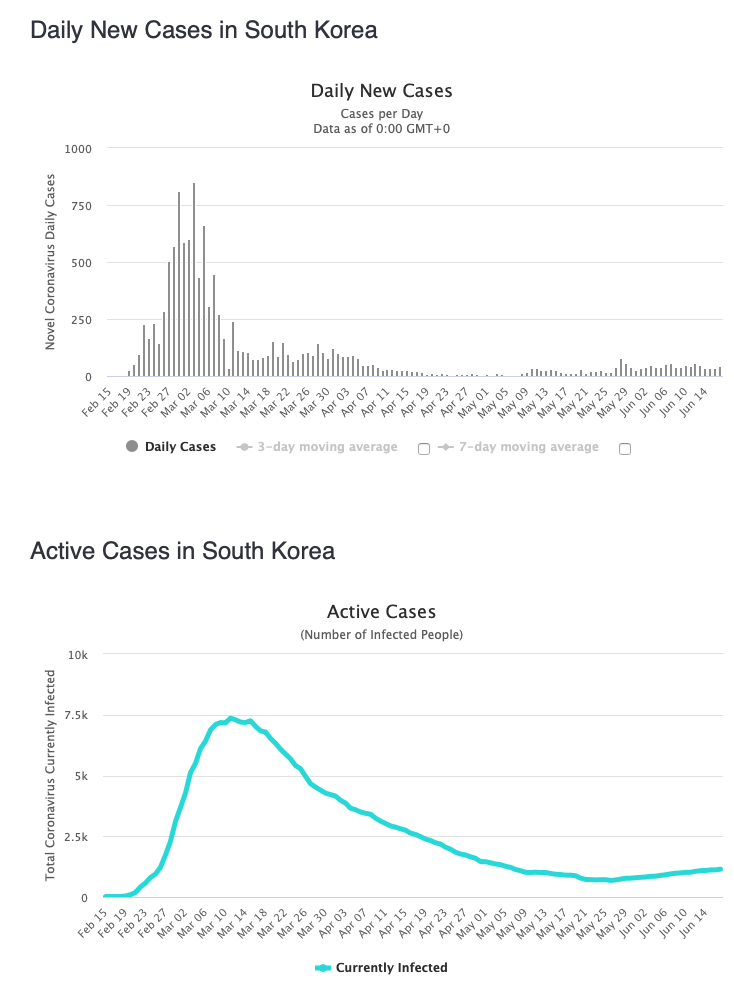
So what is our risk of contraction versus when the lockdown began? I am not a doctor, but I can collect some data from the worldometer web site, and perform some amateur analysis. Here is what I found.
The above clearly shows that daily new cases within Canada is still much higher than before the lockdown (started in mid March). The current active cases are equally alarming. Although the trend is heading in the right direction, it does not appear to reach a state where we can say we are better off today. Granted that these are national numbers, but then I come across articles like this, where the CBC reported less than a day ago that a local Home Depot store (less than 10 km away from our house) has 14 of its employees tested positive for Covid-19.
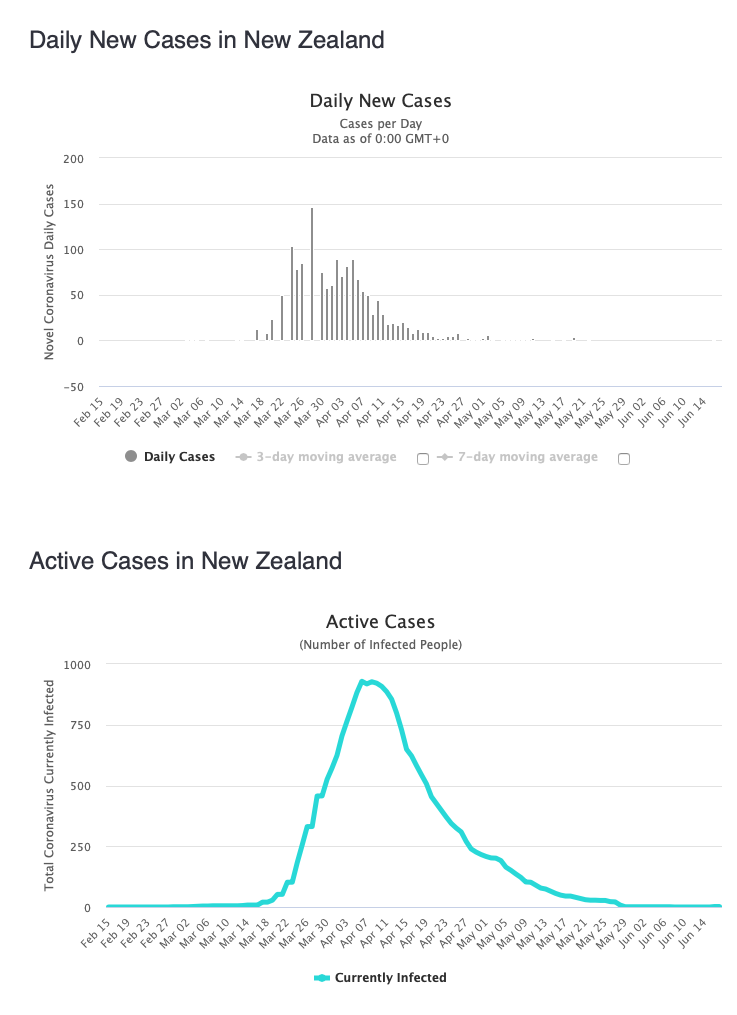
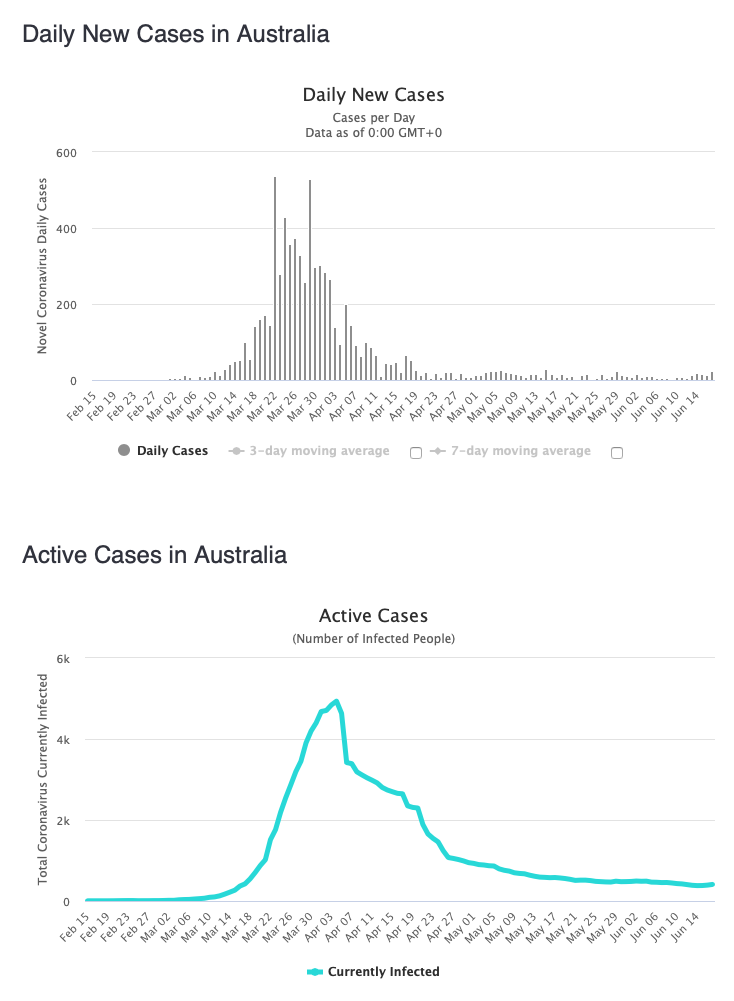
For contrast, I compare our Canadian numbers with two other countries. The first is New Zealand, who victoriously eradicated the virus, and the other is Australia, a country comparable to Canada in terms of population distribution and size.
As you can see that both countries are in much better shape than we are. My point is that Canada should at least be looking like Australia before we even think about re-opening, because our numbers are still 1 to 2 orders of magnitude away from Australia, where they are experiencing a tolerable flatten daily infection rate.
A couple of weeks ago I heard a horrible story. Someone contracted the virus and was asymptomatic and unbeknownst to them, gave it to their parents. The father passed away because of it, and the mother was hospitalized. Although this was second hand information, it was direct enough for me to treat this information to be real. The first thing that came to mind was that to be responsible for your own parent’s death is a burden and a regret that no one should bear. I for one certainly do not want to be in that position, when I can currently control my own behaviour in this current environment.
So in summary, I personally feel that Covid-19 in Ontario, Canada is still a clear and present danger. Any reopening policy should be taken into context and I will personally continue to behave as if everyone who I encounter is a possible carrier of the virus.
So am I paranoid, or do you feel the same after you process the data from above?
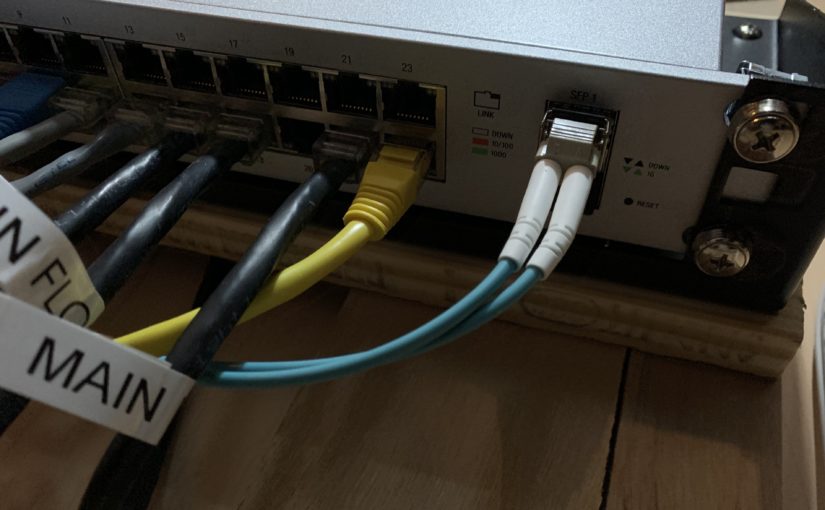
We have a need to expand our home network and to place another switch in the house. Normally I would run a CAT-6 cable and call it job done, but I thought I try something different and run a fibre optic cable.
My existing UniFi Switch 24 POE-250W already has 2 SFP ports, which supports fibre if I purchase the appropriate transceivers. I decided to buy the Unifi 1 Gbps multimode SFP modules (Ubiquiti U Fiber Multi-Mode SFP 1G – UF-MM-1G) just to make sure there are no compatibility issues. There was no point in getting a pair of 10Gbps transceivers because the Unifi Switch can only handle 1 Gbps any ways.
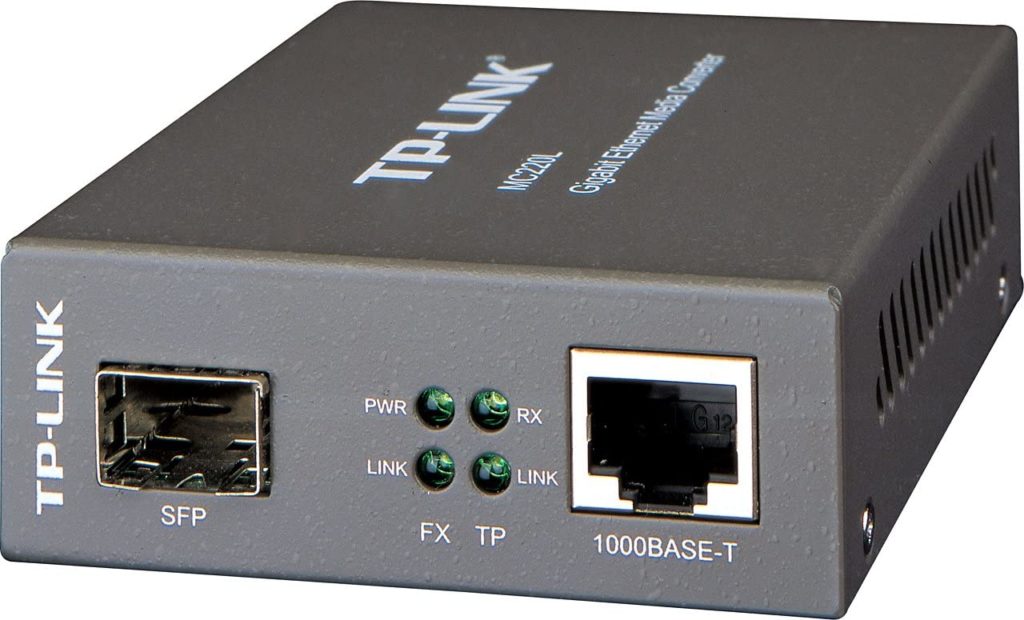
Since I only have one switch that has SFP ports, I needed to buy another device that will receive SFP port and bridge it to a standard RJ45 connection. I found a nice little converter called the TP-Link MC220L Gigabit Media Converter. This worked perfectly.
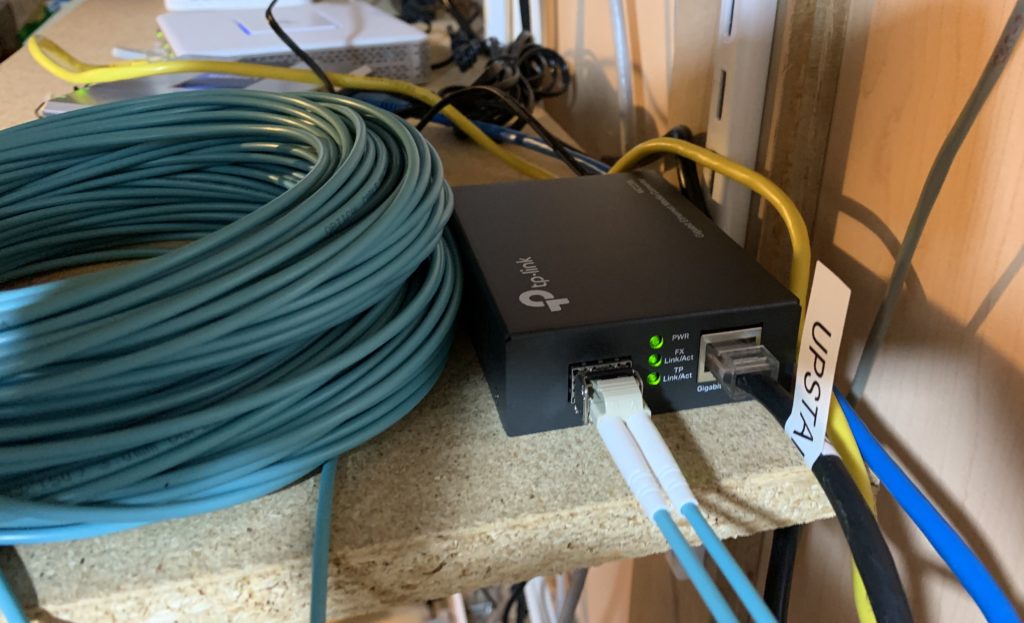
Fibre from UniFi Switch going into the TP-Link Converter and then out to another normal NetGear Gigabit Switch
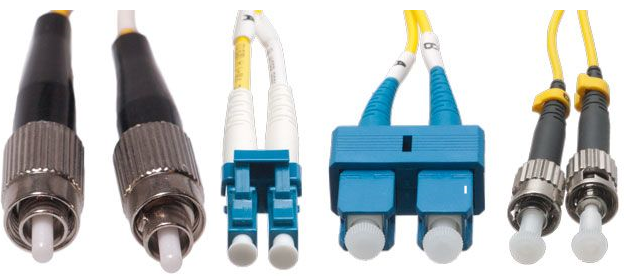
The only confusing part was the different types of fibre connectors that are out there, and whether to go with single vs multi-mode. Apparently most installations are using LC (Lucent Connector), which is the type that I went with. There was no need for me to go with single mode because I don’t need kilometres of cables.
Fibre connectors galore!
Everything worked like a charm. It was much easier than I thought. So step into the light and give fibre a try!
I have two boys enrolled in York Regional District School Board (YRDSB). Both are in high school, Kalen is in grade 9 and Jason is in grade 11. As with their peers both had to accommodate their learning habits in the new age of the Covid-19 pandemic. Both have recorded their experience during this crisis, and you can read their perspectives:
As an observer of their new habits during the pandemic I noticed the following things:
We have to impose a strict schedule that mirrors a regular school day. For example, they have to wake up no later than 9am, and must conduct their studies from 9am to 3pm. They have a lunch break which last between 30 minutes to an hour, and they can use their own discretion to take 15 minute breaks throughout this period. However, if we notice the breaks are being abused, then they are persuaded to continue with their assigned curriculum. This was followed for about 6 weeks, but since Ontario has decided to cancel the remaining school year, the start time of this schedule is slowly creeping to 10am instead of 9am. Without this imposed schedule discipline, they will continue to sleep in until the afternoon.
In subject areas where they are challenged and find the online learning medium to be insufficient of their needs, we hired tutors from Superprof.ca. Even though the tutoring sessions are still remote, the technology employed by the tutors offer a more one on one and real-time access to the material and help. In contrast, all most all the remote learning from YRDSB is based on material delegation. Students are expected to check for online updates and materials, and follow reference links to other self-learning materials, such as power points and PDF documents. Assistance can be obtained through commenting systems or online forums. Although both of my sons are dealing with the situation I think for most students, this is simply woefully inadequate. A live video conferencing medium I think will go a long way here.
The technology employed is under-utilized or insufficient and on the whole subpar to the contemporary online tools that today’s businesses are employing to assist telecommuting. Most teachers are simply inexperienced on how to manage a remote group atmosphere. Students may have the impression that the teachers themselves are being cavalier, so they adopt the attitude of, “Why should I care?”
Group cohesion that is typically experienced within a classroom has disappeared entirely, because no one has access to standardized technology to get together in a live fashion.
The learning motivation has disappeared, since most students feel a lack of recognition for the work that they do put in. Positive enforcements are hard to convey when it is not live.
Like all of us, the Covid-19 situation has caught all of us off guard and many find ourselves unprepared for the crisis. Therefore, it is understandable that our education system falls short in trying to attain the same level of education with the students in a remote setting. In hindsight, it was a good effort, but the goal is simply too ambitious and not enough resources, training, and support to achieve it.
I am not complaining, but simply taking this opportunity to note the observations that were experienced by both Jason and Kalen. I hope by articulating our experiences here, we can help the movers and shakers at YRDSB to formulate an enhanced strategy for the Fall of 2020, as I fear the current situation will continue to persist until a vaccine is widely available.
Over the past few months, I have been peppering the house with the Unifi G3 Flex security camera. They were very easy to install and since they use PoE, they minimize the wiring as well.
To monitor the cameras, I installed the Unifi Video server software on my Ubuntu Server that is up 7 x 24. All of this hardware components are behind my Unifi Security Gateway firewall.
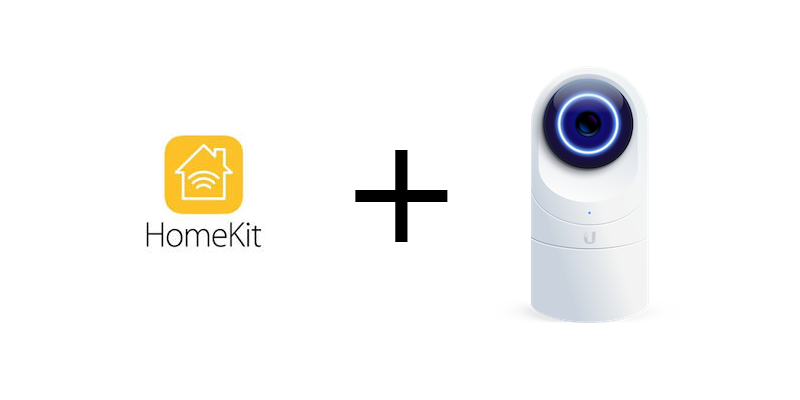
For whatever reason, I had a thought whether Apple HomeKit can talk to these cameras? With a little Google searching, I came across this article. The instructions from the article was a bit outdated, but what peeked my interest was the use of the homebridge server. I already had homebridge service installed on my Ubuntu server because I use the same technique to have HomeKit talked to my home made garage door opener. After looking through the instructions, it looks like all I need to do is:
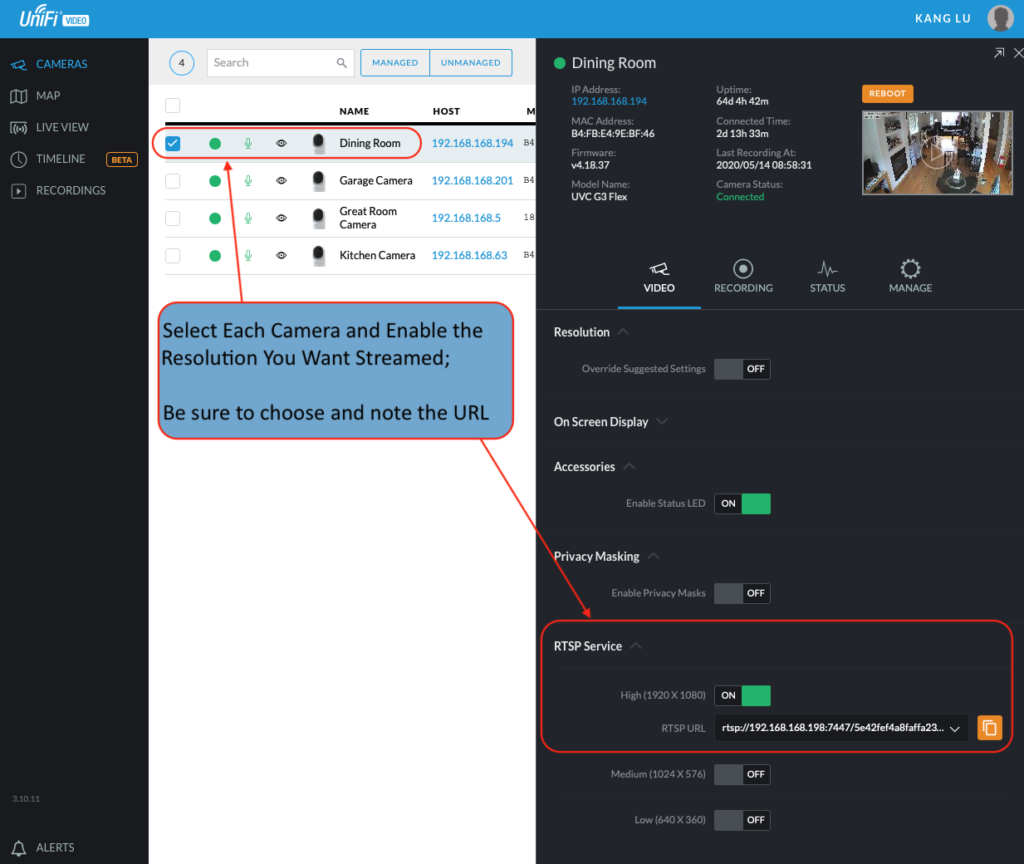
Configure Unifi Video to enable RTSP streaming for each of the camera that it is managing;
I had four cameras installed so you will see four cameras configured within the Camera-ffmpeg platform. Note that the entire platforms section should be sibling to the accessories and bridge sections.
I restarted the homebridge service with systemctl, and you should see messages similar to:
May 14 15:00:05 avs homebridge[2973]: [2020-5-14 15:00:05] Please add [Dining Room] manually in Home app. Setup Code: 031-45-153
May 14 15:00:05 avs homebridge[2973]: [2020-5-14 15:00:05] Please add [Great Room] manually in Home app. Setup Code: 031-45-153
May 14 15:00:05 avs homebridge[2973]: [2020-5-14 15:00:05] Please add [Kitchen] manually in Home app. Setup Code: 031-45-153
May 14 15:00:05 avs homebridge[2973]: [2020-5-14 15:00:05] Please add [Garage] manually in Home app. Setup Code: 031-45-153
You simply open the Home App and add the above camera accessories using the manual process instead of the scan code method.
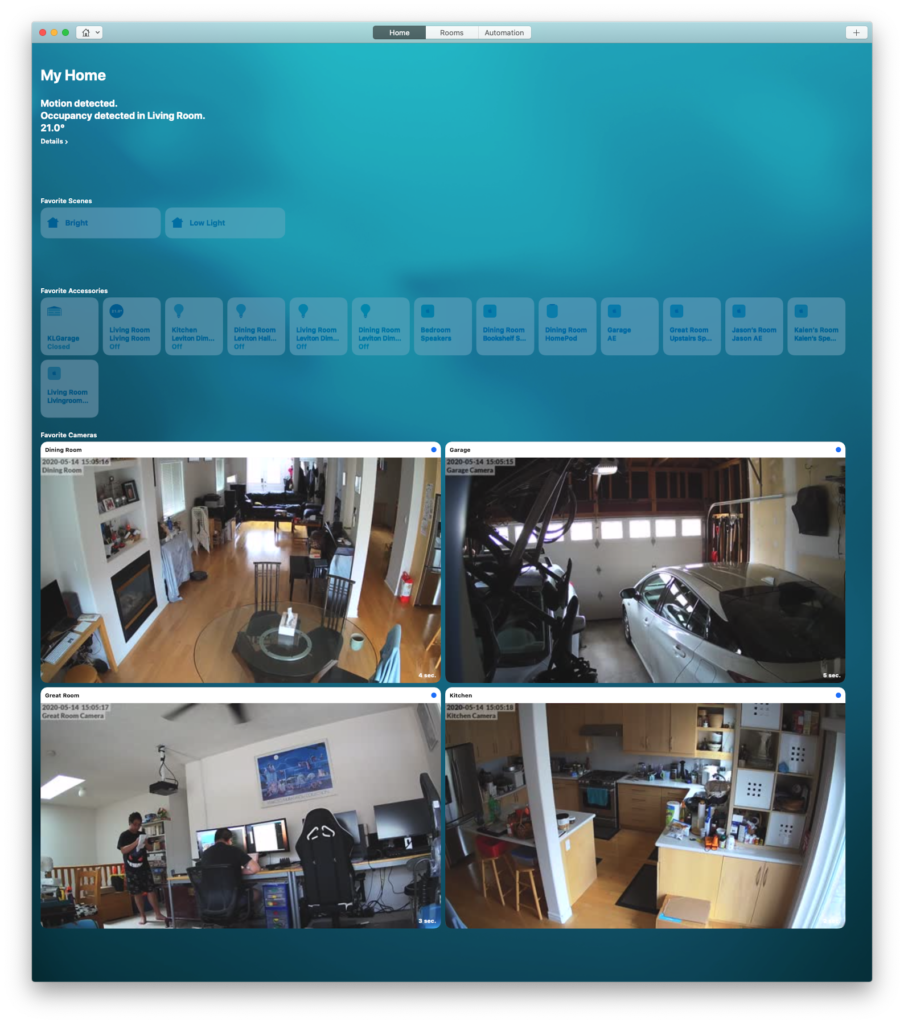
If everything works, you should see something like this on the Home App. Below is a screen shot taken from the macOS version of the Home App.
So it is pretty cool to have something working in your home for several months, and because of a thought, I now have a new capability in the house via Apple’s HomeKit Home App.
Today I went about performing my regular server maintenance update and noticed an IP address 202.107.188.12 hitting my Apache web server. Out of pure curiosity I thought I lookup this IP address. After a quick whois command, I found out it came from Xinjiang Province, China, specifically from the http://www.chinanet-online.com ISP.
After more investigation, I noticed that this particular visitor was attempting a ThinkPHP remote code execution attack. I don’t run the ThinkPHP framework. Below is the log recording its attempt.
I have always wondered how many bad actors are out there and whether these bad people will end up attacking my stuff. Well now I know, experienced first hand.
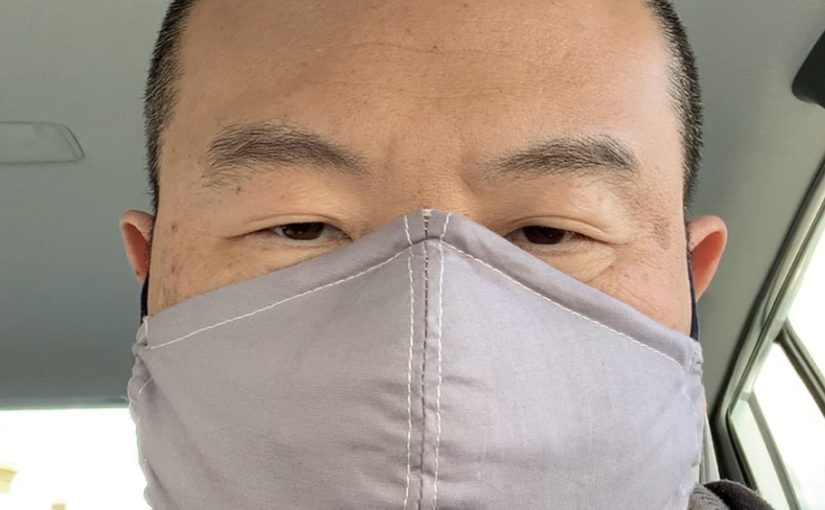
They are now part of our lives. Like shoes, we now have to don one of these before we head out. I don’t disagree with this practice, but it certainly fits the bill of a “new” normal.
We have started to wear a mask when going outside for primarily grocery shopping. My immediate experience with them is the act of putting it on. It immediately felt restrictive. It is not the same as wearing a face covering toque while skiing or going out on a windy, winter day. Those are much more breathable than a mask that is suppose to filter microscopic drops of fluid. Your face immediately gets uncomfortably warm as you recycle more of your own breathes.
If put on loosely, the warm exhalation will escape and causes fogging on your glasses. It took me a couple of days to really experiment and find the best way to wear one so to minimize this effect. I have gotten it to be bearable but still not ideal.
When I check out of the store, simple acts like a smile when saying thank you can no longer be expressed fully. The concealments of such natural expression felt like I was deceiving the person that I’m communicating with. A thank you without a smile seemed incomplete. I wonder how prevalent future misunderstandings this will cause as our face to face interactions become more faceless. Will we be more angrier and less respectful of others like we are when we are in our cars to other drivers? Will this make us a less friendly society with less consideration for others? Will this make us less human to others? I certainly hope not but one has to wonder.
The physical act of checking out made me suddenly discovered that I can no longer use Face ID to authenticate Apple Pay. Luckily I still have my Apple Watch on hand. I know first world problems, but it really makes you realize how often you check your phone, from looking up contact information to monitoring simple notifications.
Aside from my unhelpful whining in regards to sporting one of these and looking like a typical Mortal Kombat character, I do support and believe that wearing one during the Covid-19 pandemic does help to limit the spread of the virus. However, I can’t help but wonder how society will change with this simple facial garment.
Perhaps this is all nothing as we all adjust to this new normal and it is no different than interacting with everyone on a cold blizzard day when everyone’s faces are concealed. However, something tells me that this will be more impactful. How do you feel about wearing a mask?
This past weekend, I was writing a simple HTML5 utility that provides certain videos that I have in my own personal library. The idea is that I can make a limited selection of videos and present it on a web page, so that the user can simply click on the cover art of the video and plays inline on the web page.
I thought it was a pretty simple requirement and I should be able to whip this up in a few minutes. I used the HTML5 <video> tag. Everything worked on my Mac and my iPad. It even worked on my LG OLED TV. However, when it came to the iPhone, mobile Safari would load the movie but it would not play. I was even able to seek through the movie by scrubbing the scroll bar, but when I press the play/pause button, nothing would happen.
After many hours scouring the web, I found out many caveats when serving videos on iOS with the iPhone.
Videos behind an authorized location may not work on an iPhone because when Safari passes this information to the player, the player does not inherit the previously authorized identity. To get around this, I had to create a token based technique, where the main page have to pass this token to a PHP page that checks this token and serves the video contents.
The PHP used to serve the video also need to handle HTTP Range based requests. This wonderful contribution from GitHub really helped me out!
Multichannel audio such as 5.1 audio encoded in AAC will load but not play on my iPhone XS currently running iOS 13. The video will play if I re-encode the audio to either AAC stereo, or 5.1 multichannel in AC3 encoding.
Multiple audio streams also did not work. The iOS player was only happy with a single compatible audio stream.
If you want to make the video autoplay while inlined within the page, it must first be muted.
Lots of things to consider here. I lost about a day and halve researching and experimenting with this, so here it is all recorded just in case I forget in the future. I also hope that this information will help you out as well.
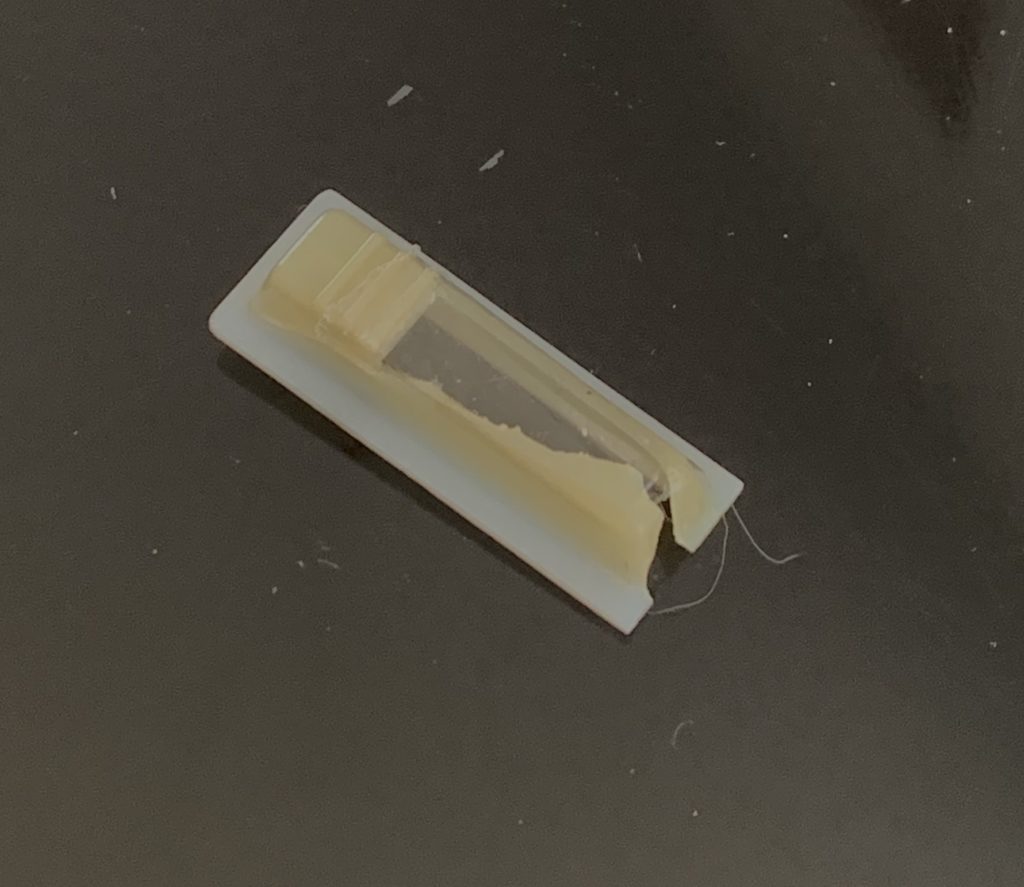
We had a situation. Our original door bell that came with the house from 1999 (more than 20 years old) decided to crack and disintegrate on us last summer.
We used some transparent packaging tape to salvage the button, but last month it too has had enough of the weather.
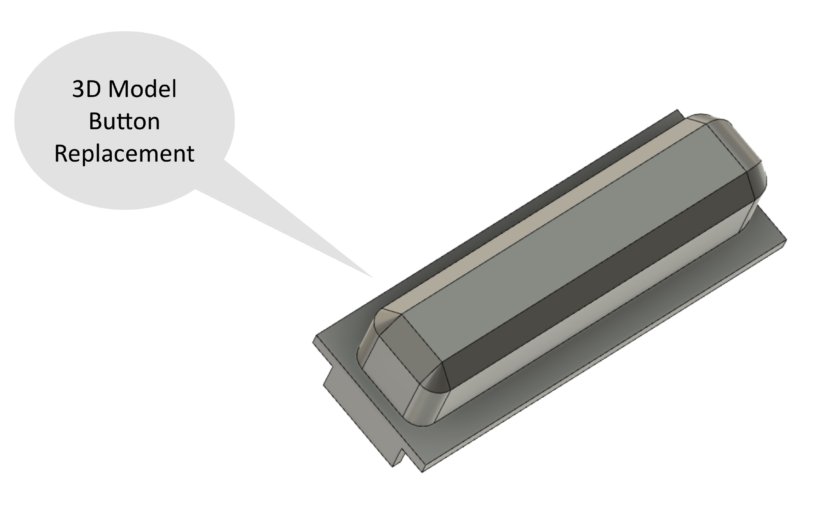
Once again our 3D printer came to the rescue. First I designed a replacement button in Autodesk Fusion 360 after I meticulously did all the measurements at least three times. Since it was a very small part, after around 20 minutes of printing, I had the replacement ready to go. Here is the final part installed:
I was on the receiving end of some ridicule when I first purchased the 3D printer, but it certainly has come in quite handy.
To get Plex working on my old Apple TV 3, I had to setup a PlexConnect server that bridges the Apple TV 3 to the Plex Media Server. Previously I discussed about hosting the PlexConnect server on a virtual machine (VM) because the host that PlexConnect is running on must be listening to port 80 and 443. Having a virtual machine is a big nuisance, because the VM may not be up and running. I even try to host PlexConnect on a dedicate Raspberry Pi so that I can leave it on, but that proved to be too slow.
I do have a Network Attached Storage (NAS) server so it will be ideal to run PlexConnect on that, but the NAS server is running Apache 2 which is already using port 80 and 443. Eureka! How about running a reverse proxy that points to an instance of PlexConnect running on the NAS that is running on a separate port. A quick Google search for the term “PlexConnect and Apache 2” found this page on GitHub. The article turned out to be extremely helpful.
I downloaded PlexConnect as before and created the certificates.
I had to configure my firewall’s local DNS to resolve trailers.apple.com to my NAS server, which is 192.168.168.198. This was pretty simple on my UniFi Universal Secure Gateway (USG).
The Apache 2 configuration files needed to be setup with the reverse proxy for both port 80 and 443. To do this I added the following VirtualHost settings.
<VirtualHost *:443>
        ServerName trailers.apple.com

        SSLEngine on
        SSLProxyEngine on
        SSLCertificateFile "/home/kang/PlexConnect/assets/certificates/trailers.pem"
        SSLCertificateKeyFile "/home/kang/PlexConnect/assets/certificates/trailers.key"

	<Proxy *>
		Require ip 192.168.168.0/255.255.255.0
	</Proxy>

        RequestHeader set User-Agent AppleTV
        ProxyRequests Off
        ProxyPass / http://avs.localdomain:18080/ nocanon
        ProxyPassReverse / http://avs.localdomain:18080/
</VirtualHost>
<VirtualHost *:80>
        ServerName trailers.apple.com
        SSLEngine off

	<Proxy *>
		Require ip 192.168.168.0/255.255.255.0
	</Proxy>

        RequestHeader set User-Agent AppleTV
        ProxyRequests Off
        ProxyPass / http://avs.localdomain:18080/ nocanon
        ProxyPassReverse / http://avs.localdomain:18080/
</VirtualHost>
I also needed to enable the headers module.
sudo a2enmod headers
We then needed to create a new systemctl service for PlexConnect. I had to create a plexconnect.service file in /etc/systemd/system with the following contents.
Went to the Apple TV 3, and reconfigure the DNS to auto, removed the old profile and re-add http://trailers.apple.com/trailers.cer as the new profile. I discussed in my previous blog.
After signing into my Plex account, and testing various Plex media sources with the Trailers app, as well as trying out YouTube and the Prime Video app, everything is good! The VM is no longer required and we declare victory!