We have several UPS (Uninterruptible Power Supply) units around the house. They are there to prevent power interruptions to networking equipment and computer servers. When you are into home automation, keeping these services up and running is almost essential.
Previously this year, I noticed one of the UPS unit keeps on chirping and the body of the UPS unit was warm to the touch. I noticed on the LED display, that its battery is due to be replaced. This was not an issue. However I treated this as a cautionary tale because some of my UPS units were situated within the house that I rarely visit, so I may not hear the beeping alerts and may end up being a potential fire hazard should the battery misbehave. I decided that I needed to monitor my UPS units more frequently.
I started to learn about NUT (Network UPS Tools), and went on a mission to deploy this solution so that I can centrally monitored all of my UPS on a single web site. The first step is to ensure that all of my UPS can physically communicate its status to a computer host. This means they all have to be connected with a USB port.
Once communication is established, I then had to install NUT software on each of the computer hosts. My UPS units were installed on different hosts consisting of Raspberry PI, Ubuntu Linux, and Mac, so I had to configure each properly. Below is a summary of the configuration steps.
Linux & Raspberry Pi configuration:
First install the NUT software
# apt update
# apt install nut nut-server nut-client
# apt install libusb-1.0-0-dev
Ensure the UPS is connected to with USB.
# lsusb
Bus 001 Device 001: ID 1d6b:0002 Linux Foundation 2.0 root hub
Bus 001 Device 002: ID 0764:0601 Cyber Power System, Inc. PR1500LCDRT2U UPS
Bus 002 Device 001: ID 1d6b:0003 Linux Foundation 3.0 root hub
Perform a scan.
# nut-scanner -U
[ups-name]
        driver = "usbhid-ups"
        port = "auto"
        vendorid = "0764"
        productid = "0601"
        product = "CP1500AVRLCD3"
        serial = "BHPPO7007168"
        vendor = "CPS"
        bus = "001"
        device = "002"
        busport = "008"
        ###NOTMATCHED-YET###bcdDevice = "0200"
Modify the following files in /etc/nut:
nut.confups.confupsmon.confupsd.confupsd.users
Inside nut.conf:
MODE=netserverInside ups.conf: Copy the above output from nut-scanner into end of the file and be sure to change the ups-name into something that is unique.
Inside upsmon.conf: Remember to replace ups-name.
MONITOR ups-name 1 upsmon secret primaryInside upsd.conf:
LISTEN 0.0.0.0 3493
LISTEN ::1 3493
Inside upsd.users:
[upsmon]
        password = secret
        actions = SET
        instcmds = ALL
        upsmon primary
Finally we need add a file in /etc/udev/rules.d which governs whether we can send commands to the UPS. We need to create a file called 99-nut-ups.rules and that file should contain the following content:
SUBSYSTEM=="usb", ATTRS{idVendor}=="0764", ATTRS{idProduct}=="0601", MODE="0660", GROUP="nut", OWNER="nut"Note that idVendor and idProduct should be replaced with the appropriate data from the nut-scanner.
Once all of this is completed, we have to restart all the relevant services and driver.
udevadm control --reload-rules
udevadm trigger
systemctl restart nut-server.service
systemctl restart nut-client.service
systemctl restart nut-monitor.service
systemctl restart nut-driver@ups-name.service
upsdrvctl stop
upsdrvctl start
You can test it now by reading the current UPS status information. Below is an example with ups-computer-room.
# upsc ups-computer-room@localhost
Init SSL without certificate database
battery.charge: 100
battery.charge.low: 10
battery.charge.warning: 20
battery.mfr.date: CPS
battery.runtime: 2725
battery.runtime.low: 300
battery.type: PbAcid
battery.voltage: 26.0
battery.voltage.nominal: 24
device.mfr: CPS
device.model: CP1500AVRLCD3
device.serial: BHPPO7007168
device.type: ups
driver.debug: 0
driver.flag.allow_killpower: 0
driver.name: usbhid-ups
driver.parameter.bus: 001
driver.parameter.busport: 008
driver.parameter.device: 002
driver.parameter.pollfreq: 30
driver.parameter.pollinterval: 2
driver.parameter.port: auto
driver.parameter.product: CP1500AVRLCD3
driver.parameter.productid: 0601
driver.parameter.serial: BHPPO7007168
driver.parameter.synchronous: auto
driver.parameter.vendor: CPS
driver.parameter.vendorid: 0764
driver.state: updateinfo
driver.version: 2.8.1
driver.version.data: CyberPower HID 0.8
driver.version.internal: 0.52
driver.version.usb: libusb-1.0.27 (API: 0x100010a)
input.voltage: 122.0
input.voltage.nominal: 120
output.voltage: 122.0
ups.beeper.status: enabled
ups.delay.shutdown: 20
ups.delay.start: 30
ups.load: 21
ups.mfr: CPS
ups.model: CP1500AVRLCD3
ups.productid: 0601
ups.realpower.nominal: 900
ups.serial: BHPPO7007168
ups.status: OL
ups.test.result: Done and passed
ups.timer.shutdown: -60
ups.timer.start: -60
ups.vendorid: 0764
You can also perform actions on the UPS unit. First we can query a list of commands that we can execute on the UPS. Note that with this example the UPS is being queried by a remote host hence the usage of avs.localdomain instead of localhost.
# upscmd -l ups-computer-room@avs.localdomain
Instant commands supported on UPS [ups-computer-room]:

beeper.disable - Disable the UPS beeper
beeper.enable - Enable the UPS beeper
beeper.mute - Temporarily mute the UPS beeper
beeper.off - Obsolete (use beeper.disable or beeper.mute)
beeper.on - Obsolete (use beeper.enable)
load.off - Turn off the load immediately
load.off.delay - Turn off the load with a delay (seconds)
shutdown.reboot - Shut down the load briefly while rebooting the UPS
shutdown.stop - Stop a shutdown in progress
test.battery.start.deep - Start a deep battery test
test.battery.start.quick - Start a quick battery test
test.battery.stop - Stop the battery test
test.panel.start - Start testing the UPS panel
test.panel.stop - Stop a UPS panel test
Reading the above, we see that we can perform a quick battery test by sending the command test.battery.start.quick. We do this with:
upscmd -u upsmon -p secret ups-computer-room@avs.localdomain test.battery.start.quickMaC configuration:
We install NUT with brew:
brew install nutThe configuration files are stored in /usr/local/etc/nut.
Since there is no lsusb or nut-scanner on the Mac, you can use the following command to see if the UPS is connected with USB or not.
system_profiler SPUSBHostDataTypeYou can also use:
pmset -g psThe ups.conf file is more simple, because you don’t need the other details:
[ups-dining-room]
  driver = macosx-ups
  port = auto
  desc = "APC Back-UPS ES 550"
All other configuration files is the same and there is no need to create the /etc/udev/rules.d file.
I need to start nut when the Mac reboots, so I need to configure launchd for this. First I created two scripts, start.sh and stop.sh in the ~/Applications/nut. Below are their respective contents:
❯ cat start.sh
#!/usr/bin/env zsh

/usr/local/sbin/upsdrvctl start
/usr/local/sbin/upsd
/usr/local/sbin/upsmon

❯ cat stop.sh
#!/usr/bin/env zsh

/usr/local/sbin/upsmon -c stop
/usr/local/sbin/upsd -c stop
/usr/local/sbin/upsdrvctl stop
Next, we have to create a home.nut.custom.plist file in /Library/LaunchDaemons. It has the following contents:
<?xml version="1.0" encoding="UTF-8"?>
<!DOCTYPE plist PUBLIC "-//Apple//DTD PLIST 1.0//EN" "http://www.apple.com/DTDs/PropertyList-1.0.dtd">
<plist version="1.0">
  <dict>
    <key>Label</key>
    <string>home.nut.custom</string>
    <!-- Start script -->
    <key>ProgramArguments</key>
    <array>
      <string>/bin/zsh</string>
      <string>/Users/kang/Applications/nut/start.sh</string>
    </array>
    <!-- Stop script -->
    <key>StopProgram</key>
    <array>
      <string>/bin/zsh</string>
      <string>/Users/kang/Applications/nut/stop.sh</string>
    </array>
    <!-- Run at boot -->
    <key>RunAtLoad</key>
    <true/>
    <!-- Logging -->
    <key>StandardOutPath</key>
    <string>/var/log/nut.out.log</string>
    <key>StandardErrorPath</key>
    <string>/var/log/nut.err.log</string>
  </dict>
</plist>
We then have to enable the daemon.
sudo launchctl bootstrap system /Library/LaunchDaemons/home.nut.custom.plistNow the NUT daemon will be running when we reboot the Mac.
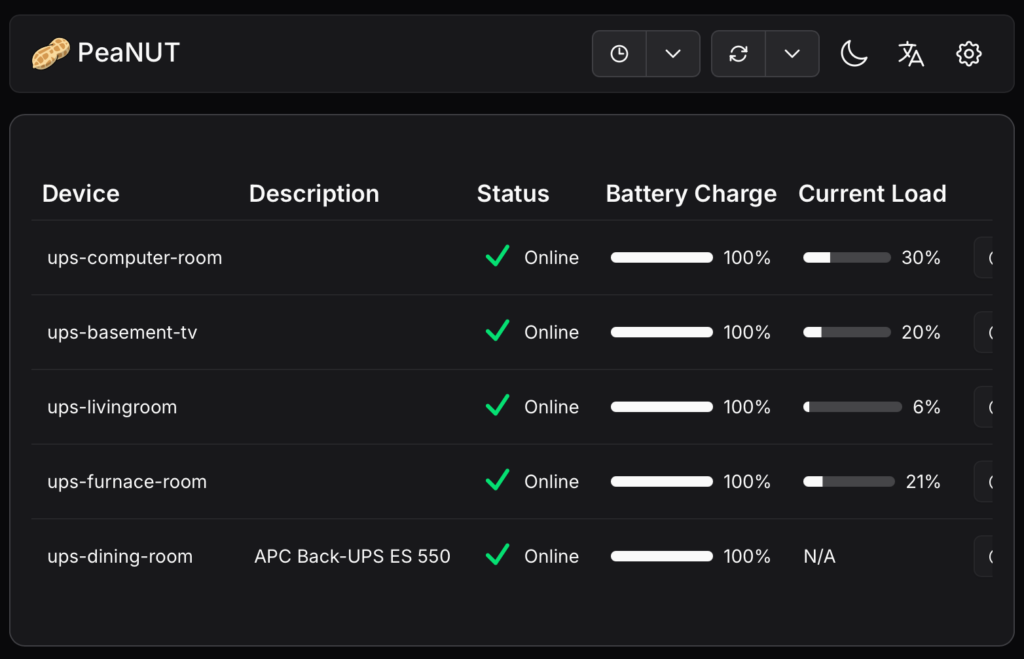
PEANUT Installation
Once this is all done, I am then able to retrieve all of my UPS units’ status from anywhere on my network as long as I have the nut-client package installed and have access to the upsc command. We are now ready to install the PEANUT web interface using podman.
On a computer host that is running other centralized services within my house, We performed the following steps.
We created the following systemd unit file called: /etc/systemd/system/peanut.service, which contains the following:
# container-1518f57b9c9880dc5538fdd8c1a770993ab5a09dda03071b5a603142104831d2.service
# autogenerated by Podman 4.9.3
# Thu Dec 11 17:08:07 EST 2025

[Unit]
Description=Podman Peanut.service
Documentation=man:podman-generate-systemd(1)
Wants=network-online.target
After=network-online.target
RequiresMountsFor=%t/containers

[Service]
Environment=PODMAN_SYSTEMD_UNIT=%n
Restart=always
TimeoutStopSec=70
WorkingDirectory=/home/kang/peanut
ExecStart=/usr/bin/podman run \
        --cidfile=%t/%n.ctr-id \
        --cgroups=no-conmon \
        --rm \
        --sdnotify=conmon \
        -d \
        --replace \
        --name peanut \
        -v ./config:/config \
        -p 58180:8080 \
        --env WEB_PORT=8080 docker.io/brandawg93/peanut
ExecStop=/usr/bin/podman stop \
        --ignore -t 10 \
        --cidfile=%t/%n.ctr-id
ExecStopPost=/usr/bin/podman rm \
        -f \
        --ignore -t 10 \
        --cidfile=%t/%n.ctr-id
Type=notify
NotifyAccess=all

[Install]
WantedBy=default.target
The above file was generated with the podman utility itself using:
podman generate systemd --new --files peanutFor the above to work, there must be a container peanut running first, which we did with the following command just to temporary create the file. This also assumes a local config directory is created for the volume mapping.
podman run --name peanut -v ./config:/config --restart unless-stopped -p 58180:8080 --env WEB_PORT=8080 docker.io/brandawg93/peanutOnce the system file is created, we do the following to enable it.
sudo systemctl daemon-reload
sudo systemctl enable peanut.service
sudo systemctl start peanut
I did some reverse proxy settings on my Apache 2.0 server, and a CNAME record on my local DNS, and then I have my UPS monitoring system.